How to Replace Window Regulator 2002-06 Suzuki XL-7
Created on: 2014-02-25
How to remove and replace a broken or malfunctioning window regulator and motor to the Suzuki XL-7, years 01, 02, 03, 04, 05, and 06.
-
If your window is stuck in the up position, remove the 10mm bolts from the regulator and motor before loosening the screws from the window
step 1 :Removing the Door Panel
- Remove the Phillips head screw inside the door pull
- Remove the Phillips head screw inside the door handle
- Pull the door handle forward
- Pry out the clip on the door handle from the door lock rod
- Pry out the along the door panel
- Lift the door panel up and off
- Disconnect the wiring harness
- Remove the two Phillips screws from the bracket
- Remove the bracket
- Carefully peel off the water shield
-
step 2 :Removing the Window Regulator
- Push on the tabs and remove the window motor lead from the door
- Disconnect the window motor lead
- Loosen the two Phillips screws that hold the window to the regulator
- Raise the window by hand
- Hold the window in place with painter's tape
- Remove the six 10mm bolts from the regulator
- Pull the window regulator out through the door
-
step 3 :Installing the New Window Regulator
- Push the regulator into the door
- Hand the regulator by its studs
- Insert the six 10mm bolts into the regulator
- Connect the window motor lead
- Remove the painter's tape from the window
- Lower the window onto the regulator
- Insert the two Phillips screws that hold the window to the regulator
-
step 4 :Reinstalling the Door Panel
- Put the water shield into place
- Insert the two Phillips screws into the metal bracket
- Connect the wiring harness
- Lift the door panel into place
- Push in the door panel clips
- Push the door handle rod into the door handle and re-clip the door handle
- Insert the Phillips screw into the door handle
- Insert the Phillips screw into the door pull
Tools needed
-
Flat Blade Screwdriver
Phillips Head Screwdriver
Painter's Tape
10mm Socket
Ratchet
Brought to you by 1AAuto.com, your source for quality replacement parts and the best service on the Internet.
Hi, I'm Don from 1A Auto. I hope this how-to video helps you out, and the next time you need a part for your vehicle, think of 1AAuto.com. Thanks.
In this video, we're going to show you how to replace a rear window regulator on this 2002 Suzuki XL7. We show you on the driver side, but the passenger side is a similar procedure. The items you'll need for this is a new rear window regulator from 1AAuto.com, a Phillips screwdriver, a flat blade screwdriver, and a 10mm socket and ratchet.
Start off by removing the Phillips screw in your interior door handle and the one down in the pull cup. Now we'll just fast-forward as Don removes these. Pull the door handle forward and push this clip off the door handle rod. Then pry the door handle rod up and out of the door handle. Pull out along the edges of the door panel. Then lift the door panel up and out of the window seal and over that loft rub. Push the tab on this harness and disconnect it. Remove these two Phillips screws from this bracket and pull it free. Pull back your water shield and you want to do this carefully, you don't want to rip the water shield.
Now, reach in behind this harness, push the tabs together, and pull the harness from the door. You can see the tabs right here. Now push on the tab on the harness and disconnect it. Next, you want to remove these two Phillips screws that hold the window to the regulator. If your window is stuck down, then you want to reach into this side area here. If it's stuck up, you're going to have to remove these two nuts, this 10mm nut, and these three 10mm nuts. Push the studs through and pull the whole assembly down. Then remove those Phillips screws.
We're going to show you with it in the center so we can show you the whole procedure. Once the window is separated, pull the window up into place and tape it. Next, remove these six 10mm nuts. Now, we'll fast-forward as Don does this. Now, push those studs through the door, angle the regulator, and pull it out through here.
On the left is the old window regulator; on the right I the new one from 1A Auto. You can see they're identical, and will mount exactly the same. Feed your new window regulator back into the door. Then wind up those studs with the holes and pull those studs through the door. Do the same thing with the motor. We'll just fast-forward here as Don replaces those six 10mm nuts. Reconnect the harness, remove that tape, and then lower the window down into place. Replace those two Phillips screws. To keep this harness out of the way, if you have a wire tie, we recommend wire tying this into place. It's not necessary, but it will keep the harness out of the way.
Replace the water shield. Make sure that your door handle rod comes through. Now replace this bracket and the two Phillips screws. Replace your door panel and reconnect this harness. Put the window seal up over the walk rod and down into the window seal. Just hit those clips in around the edge of the door panel. Now put the door handle rod into the door handle and re-clip it. Replace those two Phillips screws and you're all set.
We hope this video helps you out. Brought to you by www.1AAuto.com, your source for quality replacement parts and the best service on the Internet. Please feel free to call us toll-free, 888-844-3393. We're the company that's here for you on the Internet and in person.
Shop Products


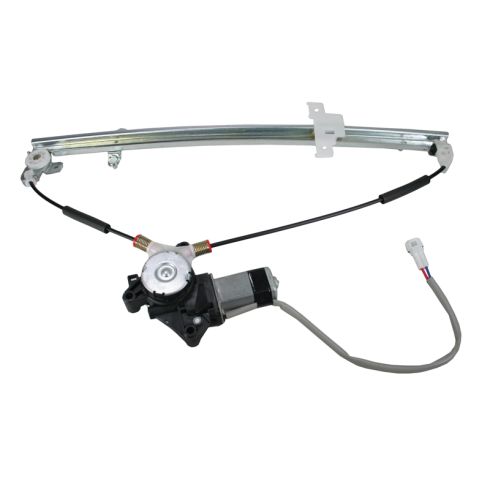
Chevrolet Suzuki Rear Driver Side Power Power Window Motor & Regulator Assembly TRQ WRA51725
Part Details:
- Power
- 2
- No
- No
- Galvanized Steel
- Nylon
- Yes
- 15.75 in
- No
- 8

How to Replace Front Window Regulator 2010-15 Cadillac SRX
How to repair, install, fix, change or replace a slow, stuck, cracked or damaged window regulator on 10, 11, 12, 13, 14, 15 Cadillac SRX
