How to Replace Wheel Bearing Hub Assembly 1998-2004 Chevy S10 Pickup Part 2
Created on: 2010-05-04
Check out part 2 in this video series on how to replace the wheel bearing and hub assembly on your 98-04 Chevy S10 Pickup.
-
step 1 :Install the new hub
- Apply the O ring to the new hub
- Use a grease gun to apply grease to the lower ball joint, upper ball joint and tie rod end.
- Feed the ABS wiring for the hub through the dust guard and mount the hub.
- Thread in the three bolts and tighten them up evenly.
- Torque these bolts to 65 ft lbs.
- Clip the wiring harness up using the 10 and 13 mm bolts to secure the clips.
- Connect the wiring harness.
-
step 2 :Assemble the brakes
- Put the rotor on the hub.
- Mount the caliper bracket, pads and caliper.
- Torque the bolts on the caliper to 50-60 ft lbs.
-
step 3 :Put the wheel back on
- Put the hub nut back on.
- Put the wheel back on and thread the lug nuts.
- Lower the vehicle.
- Torque the hub nut to 90 ft lbs.
- Use a star pattern to torque the lug nuts to 75 ft lbs.
- Put the cap and lug nut covers back on.
Tools needed
-
12mm Socket
13mm Socket
Socket Extensions
Torque Wrench
14mm Socket
15mm Socket
Rust Penetrant
16mm Socket
17mm Socket
Jack Stands
18mm Socket
19mm Socket
Flat Blade Screwdriver
34mm Socket
10mm Socket
Slip-Joint Pliers
Ratchet
Floor Jack
1/2 Inch Breaker Bar
11mm Socket
Brought to you by 1AAuto.com, your source for quality replacement parts and the best service on the Internet. Hi, I'm Mike Green. I'm one of the owners of 1A Auto. I want to help you save time and money repairing and maintaining your vehicle. I'm going to use my 20-plus years experience restoring and repairing cars and trucks like this to show you the correct way to install parts from 1AAuto.com. The right parts, installed correctly--that's going to save you time and money. Thank you and enjoy the video.
This is part two. We're going to install the front hub on this 4-wheel drive S10. Same as Blazer, Jimmy, and Sonoma. Tools you're going to need are metric sockets, 10-19mm, plus some metric wrenches, jack and jack stands, a 35-mm socket for the hub nut, large screwdriver or pry bar, penetrating oil, a torque wrench and you might want to throw in a hammer and a rubber mallet, too. Here's the new 1A Auto hub versus the old one. See, leads all the same, has the same bracket, same end. Now it's going to mount the same. Everything's going to be all the same. Next step, take our old ring and put it onto the new hub. Now is as good a time as any to grease the lower ball joint, the tie rod end, and the upper ball joint. Technically it goes on here like that. Feed the harness through. The connector is going to be where that big gap is. We'll get this up in here, get everything somewhat lined up. Grab one of our bolts, make it one of the easy ones down here, put it through, work it in, get it going a little bit.
Now I'm going to speed it up. Now I'm going to work the other two bolts in. Then I'm going to use a ratchet and socket and tighten them up. Shifting the steering a little bit to get to them. You do want to try to tighten them up evenly. You don't want to just tighten one all the way up because you want to pull the hub into the steering knuckle pretty much evenly. So I'm just rotating around and tightening. After this, I'll set my torque wrench to 65 foot-pounds and torque them up. Now you tighten these up to about 65 foot-pounds. Now we're going to put the harness back in. Remember here, you've got a little 10-mm bolt there on that first clip and you got a 13-mm bolt and nut on that second clip and you have to clip it in together with the brake line. The hub harness goes in behind the brake line, so the bolt goes to the hub harness first then the brake line harness. Then it's opposite on the frame connector. The brake line goes onto the frame and then the hub harness goes on top of it. So tighten up that bolt, tighten up the frame and then... Tighten the frame, and then you can take the clip, put it onto the frame, connect them together. Once they're connected, pull your flap back down and you're all set.
Here I'm putting the rotor back on. I apologize for the poor camera work here, I didn't realize I wasn't shooting it very well. I'm putting the lug nut, just one on. Just to keep the rotor in place. Makes it easier to get the caliper on. I'm grabbing the caliper. I'm also not touching the disk or the brake pad surface. You want to try to keep them clean, keeps your brakes working better. If you do hit them, just use a little linseed oil or brake parts cleaner. Then I use the rubber mallet to persuade the caliper on there. Put the bolts in for the caliper. They should be torqued to 50 to 60 foot-pounds. The top, I didn't get a torque wrench on, so I used my well-calibrated arm and hand, as you'll see. After that, torque up the bottom one correctly. I'm going to tighten the hub nut up with an impact wrench. I'm going to watch in back here, as you can see, there's a little gap right here. This shiny ring. That will close up as I tighten and I'll just stop before that closes all the way because I want to tighten that with a torque wrench when the car is on the ground. I replaced my hub and those three bolts have been torqued. I put my brake back on, those bolts have been torqued. I reinstalled my line here. That's all tight. Now I need to put my wheel back on. I'm going to torque the lug nut to 90 foot-pounds. Now I'm going to torque the wheel lug nuts to 75 foot-pounds. Put my cap back on. Lug nut covers.
We hope this helps you out. Brought to you by www.1AAuto.com, your source for quality replacement parts and the best service on the Internet. Please feel free to call us toll-free, 888-844-3393. We're the company that's here for you on the Internet and in person.
Shop Products


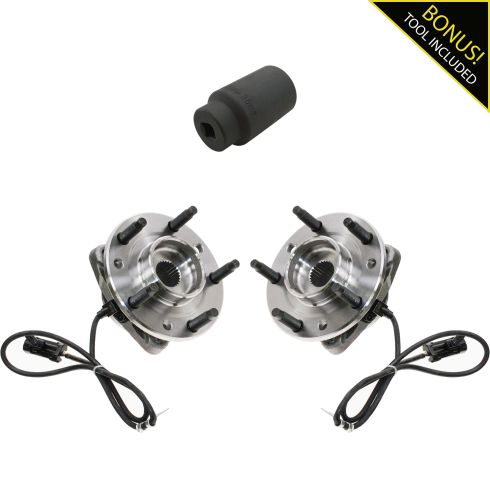
Chevrolet GMC Olds Isuzu Front Driver & Passenger Side 3 Piece Wheel Bearing & Axle Socket Kit TRQ BHA84992
Part Details:
- (2) Front Wheel Bearing & Hub Assemblies
- Ball
- 3 Piece
- (1) Socket
How to Replace Hub Assembly 1997-2008 Pontiac Grand Prix
Learn how to replace your own wheel hubs on your97-05 Chevy Impala, Buick Century, or Pontiac Grand Prix. In this video, the expert mechanics at 1A Auto will show you how to replace a hub that's vibrating, groaning or loose.
