How to Replace Wheel Bearing Hub Assembly 1995-2001 Ford Explorer
Created on: 2010-10-13
Watch this video for step-by-step instructions for replacing the front hub in your 95-01 Ford Explorer.
-
step 1 :Removing the Wheel
- While your car is still on the ground, use your 32mm socket to loosen the center hub nut
- Loosen your lug nuts and jack up the car
- Remove the lug nuts with your 19mm socket and ratchet
- Remove the wheel and set aside
-
step 2 :Removing the Brakes
- Remove the 13 and 15mm bolts holding the calipers and the bracket
- Wire tie the caliper up and out of the way, and set the bracket to the side
- Remove the rotor and set aside
- Remove the dust shield by removing the three 8mm bolts
- Disconnect the ABS wiring harness using a 5mm allen wrench
-
step 3 :Removing the Hub
- Use an axle puller or a light but firm tap with a small hammer on the axle to remove the hub
- Remove the three 15mm bolts, using penetrating oil to help
- A breaker bar or piece of pipe on the end of your ratchet may be needed
- Remove the hub and clean the area with a wire brush
-
step 4 :Replacing the Hub
- Put position your new 1A Auto hub on the axle
- Put the three 15mm bolts in place and tighten the nuts to 70 ft lbs
- Reinstall the wiring harness, clip everything to the frame
- Reinstall the dust shield, tightening the three 8mm bolts up
-
step 5 :Reinstalling the Brakes and Wheel
- Refer to our other videos for more detailed instructions
- Remember to replace the lug nuts on in a star pattern
- Lug nuts tighten to 90-100 ft lbs
- Hub nut is 157-213 ft lbs
- Make sure to check your brakes and steering before driving again
- Make sure to have the vehicle aligned
Tools needed
-
32mm Socket
13mm Socket
Flat Blade Screwdriver
15mm Socket
Jack Stands
8mm Socket
19mm Socket
Ratchet
Floor Jack
Needle nose pliers
Brought to you by 1AAuto.com. Your source for quality replacement parts and the best service on the internet.
Hi. I'm Mike Green. I'm one of the owners of 1AAuto. I want to help you save time and money for repairing and maintaining your vehicle. I'm going to use my 20 plus years of experience, restoring and repairing cars and trucks like this, to show you the correct way to install parts from 1aauto.com. The right parts installed correctly. That's going to save you time and money. Thank you and enjoy the video.
In this video, we'll be replacing the front hub on this `98 Explorer with four-wheel drive, the same as a `95 to `01 Explorer Mountaineer and Sport Track. The tools you'll need for this are jack and jack stands, various millimeter sockets including a 32mm socket for the center hub nut, a hammer, screwdriver and pliers and you will also need a torque wrench that can go up to 150 foot pounds.
Okay, so obviously you're going to want to jack up and secure your vehicle. You just work a screwdriver in there and pry off your cap. Okay, if you don't have an impact wrench, you want to remove the center hub nut when your car is still on the ground. You'll need a 32mm socket, and probably a big breaker bar; I have the luxury of an impact wrench so I'm going to use it. Okay, we will leave the hub nut on there for now. So now, I'm taking the wheel off and take the brakes apart and these are 19mm. If you don't have impact tools, loosen your lug nuts on the ground, then raise your vehicle and secure it with a jack stand and then remove the lug nuts. Once the lug nuts are off, the tire right off. There's four bolts, okay, that basically hold the brakes on. There's one here, 13mm and one up here. Okay and those just hold the calipers to this big bracket. There's also a 15mm bolt here and a 15mm bolt right up here.
Okay, so we're just going to speed through removing those four bolts. You pull the caliper up and off and you can wire tie it up top and then that bracket comes off with the 15mm bolts and we'll pick it up from there. Okay, this bracket, that comes right off and your rotor comes right off. Okay, you are going to want to take off this dust shield and its 8mm bolts. When I filmed this, I did it out of order. You want to take off the backing plate, unbolt the hub, and then remove the hub, and disconnect the wire harness and I did it, like I said, out of order. You're going to see some things appearing and not appearing at different times there during the video
So remove the three 8mm bolts that hold the backing plate on. Okay and here, I used a 5mm Allen wrench to undo this bolt which then you can unplug your ABS harness. You could do it that way or you can pull the harness off with the hub. The correct tool to use, which I'll show you is an axle puller. What I like to do is sometimes they're easy, so smaller hammer, not a huge hammer. Okay and I still have the bolt on here. I'm just going to watch the bolt. I'm going to give it one good whack. You don't want to pound on this. You don't want to beat it with a big sledgehammer because you could ruin your CV joints but giving it one good tap with a good hammer won't hurt the CV joints and if it breaks away it makes your life a whole lot easier, and it did it. It actually broke right away which is good, most of them do.
Okay, to quickly re-summarize what I did there. I just used the hammer. I watched the axle closely, gave it a good whack and if you can see, the axle removed in relation to the hub then you know it's broken loose. Okay now if it hadn't broken away. I would have used this two-jaw puller, go over like that. Okay and I'll just push it right through. You'll see it's pushing the axle right through. Once you know you have the axle broken loose then there's three bolts right back here, one, two and then if you pull, you're steering around, the third bold is right in there. You can see the other right here. It's probably a good idea to spray a whole bunch of penetrating oil on them and let that sit for a little bit.
These are 15mm bolts. Make sure you get your wrench on that good and tight. Actually, it usually come without too much problem. I'm not even using that big of a bar. Yeah, but you may notice here that I do trade in my smaller bar for a larger breaker bar to get the other two bolts out. I could also hook a piece of pipe or just take a piece of pipe and put it around the end of your ratchet and that gives you more leverage as well.
Okay, what you can do is before you get the bolts all the way out, you can give the bolts themselves a whack. It usually sometimes tends to break the other way but if you have to, you can just resort to, and then from right here and that breaks the hub away from the steering axle.
Okay, get the bolts all the way out. Then there's my hub off the truck. Okay, so now in preparation to put the new hub on. I do want to remove this harness because the new hub comes with one. There's an 8mm bolt here and then you just need to pull up a couple of pins out of the frame there and then it unplugs right here. Then the other thing is I'm going to just take a screwdriver and a wire brush and just kind of clean that out a little bit. We're just going to fast forward here as I pull out that 8mm bolt and then I use pliers and screwdrivers and whatever to get the clips out of the frame for the ABS harness. Basically, I break some of the clips and then just pry them out.
Okay, when you that pull off, you just ... you feel for this little tab right here, press, and fold it. Okay, so you have the worn out on the old hub. Everything's all the same. It's got the harness on it, which I did disconnect from the original, got a bolt all in there. The harness does point towards the front then you're going to have to put it on, get it into the axle, push it right on there and force the bolts through the start, got that one started. Got that one started.
Okay, we'll speed things up here as I just take those three 15mm bolts, and work them into the back of the hub and snug them up. I got my torque wrench set to 70-foot pounds and then make sure it's on that bolt fairly well. Okay, I torque all three of them up to 70-foot pounds. Okay, so fast forward, torquing those other two bolts and then re-install your wiring harness. Clip everything to the frame and make sure you hook it back up.
Okay and we're fast forward, putting that brake shield back up and tightening up those three 8mm bolts. Okay and we'll also fly through putting the brakes back together and your wheel back on. Just the first time you drive your car, just be very careful. You've worked on the brakes. You've worked on the steering. So make sure your car is stopping before you go fast and make sure that there's no looseness or anything in the steering before you road test it.
If you do want to see putting your brakes back together in regular motion, just check out our front brake video.
Put the wheel back on. Put your lug nuts on, get them snug, then lower the car to the ground. Torque them up to 90, to 100-foot pounds. Torque up this hub nut and it calls for a 157 to 213 foot pounds of torque. My trusty torque wrench here will set to 150 pounds. I'm going to torque it to 150 and then just pull it another couple of inches or so. Okay, now I can put the cap back on. I need to put the single thing right up here, where this leak is.
We hope this helps you out, brought to you by www.1AAuto.com, your source for quality replacement parts and the best service on the internet. Please, feel free to call us toll free, 888-844-3393. We're the company that serve you on the internet and in person.
Shop Products


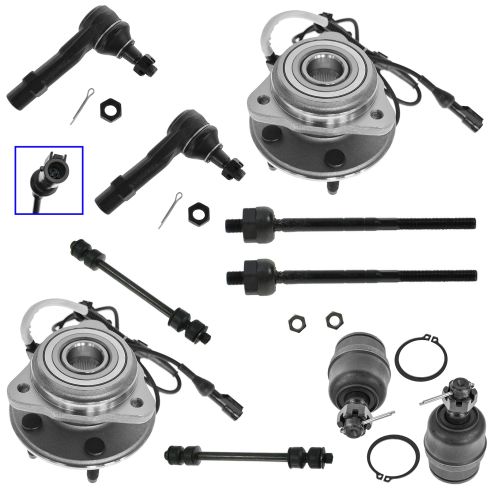
Ford Explorer Mercury Mountaineer Front 10 Piece Steering, Suspension, & Drivetrain Kit TRQ PSA59839
Part Details:
- (2) Front Lower Ball Joints
- (2) Front Sway Bar Links
- Ball Bearing
- 10 Piece
- (2) Front Wheel Bearing & Hub Assemblies
- (2) Front Outer Tie Rods
- (2) Front Inner Tie Rods
How to Replace Wheel Bearing Hub Assembly 1999-2005 Pontiac Grand Am
Watch this video to learn how to replace the wheel bearing & hub assembly in this 99-05 Pontiac Grand Am.
