How To Replace Water Pump 2007-16 GMC Acadia
Created on: 2020-07-31
This video shows you how to install a new water pump on your 2007-16 GMC Acadia.
Tools needed
-
Razor Blade / Gasket Scraper
Torque Wrench
15mm Socket
Pry Bar
18mm Socket
Trim Tool Set
Safety Glasses
Gloves
Flat Blade Screwdriver
Serpentine Belt Tensioner Tool
Hose Clamp Pliers
10mm Socket
Drain Pan
Ratchet
T20 Socket
In the passenger side under the backseat, you're gonna remove this carpet right here, slide this over. You wanna access the battery right here. Scrub this panel and then slide it up. This seat has to be further back. Just take that off, there's some trim clips. To take this cover off, you need a T20. And just slide it back and then slide...it slides this way. There's some feet right there. Then there's the battery. And you can disconnect the negative cable, just use a 10-millimeter socket. And take off the connector and just slide it so it doesn't hit by accident, out of the way. Now, there's no drain on the radiator, so what we're gonna have to do is take the lower radiator hose off. And there's a hose clamp right there, I'm just gonna use a hose clamp remover tool. All right. And grab the lower radiator hose and just slide it back. You might have to twist it back and forth a little bit. And there's no coolant in this system right now but normally you'd have a lot of coolant draining down. Take my hose clamp pliers off. Now, you can drain the coolant out this way if you want to. If you didn't wanna do that, you could just take the water pump off, just you're gonna have a lot of coolant spill at the front of the engine.
I'm gonna take this engine cover off, take the oil cap off, just twist it and grab the cover, slide up, and then slide up in the back. A couple of retainers there. Take the oil cap, put it back on, just so nothing falls down there. Now we'll take this cover off. Just use a straight blade screwdriver. There's a little walk pin there, one right here, lock tab, and back here. And slide that off. And open this cover up, just slide it over, and use a 13-millimeter socket, make sure you have the battery disconnected or you're gonna arc stuff out. Take this nut off. Take this cable, slide it to the side, and same with this cable. And then take a 10-millimeter socket or a Phillips head screwdriver and loosen this bolt and this bolt. And it's not gonna come out. There's a little indicator right here, that little orange tab, and right there. And sometimes they get stuck but you should see it go down. Now, if you loosen this, and then you'll feel it clicking. I'm gonna do the same on this side. And then it's good. That's disconnecting the wires from the box.
Then you can grab the fuse box and use either a trim tool or a screwdriver. And there's some locks, just release the lock right there and right there. And there's some over here. It kinda helps to have the curve of the trim tool. There's two right there. There's another one right here. All right. Slides up. Those are all those locks. Just like that. Right. Now, we can take these connectors out of here, slide this up. Now, this connector is tied together, take a small straight blade screwdriver and slide in between here. There's a little lever. And just push it to one side. And then you can separate that. That's the little thing. And then disconnect the connector here, push down on the tab. You can slide these wires out of the way. And then take this bracket up, this plastic bracket. Use a straight blade screwdriver. These little clips right here, just pry up on those clips. This one right there, it slides out. And this wiring harness, take this off, just use a trim tool and pry it up. Just right here, pry up on the retainer. Also right here under this connector, just pry up on the retainer. And then take these two nuts and that bolt out. Use a 10-millimeter socket. And slide this bracket out of the way.
I'm gonna remove this reservoir just to get more access. Use a 10-millimeter socket, take these 2 bolts out, and we'll take this A/C bracket bolt out as well. We can slide this up and then take a trim tool and just pry this off. And slide this out of the way. When you remove this upper radiator hose, just use a hose clamp tool, or you can use some pliers to loosen up the hose clamps. Squeeze it, slide it down. And just grab the hose. You can twist it a little bit or you might need to use a 90-degree pick and just loosen it up first. Slide that off. There might be some coolant that comes out when you're doing that. And take these 2 bolts out, use a 15-millimeter socket. Take those out. Take this mount out of the way. Kind of get it twisted a little bit and just slide it up. There's an opening right there. Now, I'm gonna take this bracket off. There's two bolts. Use a 15-millimeter socket to get those out. Slide that out. Now, I'm gonna take this bracket off, take an 18-millimeter socket, take these 2 bolts out. There and right here.
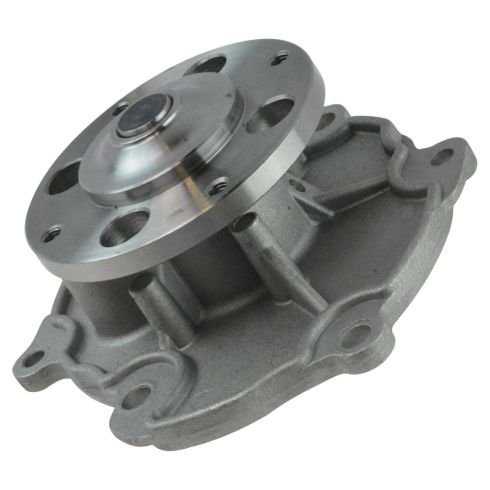
All right. Slide that off. This is the water pump pulley, right here. Before we take the serpentine belt off, we wanna loosen up these bolts a little bit. You don't have to take them off, just loosen them. Just take a 10-millimeter socket or wrench and just loosen it. Now, we're gonna loosen up the belt, take a belt tensioner tool with a half-inch drive on the end. We can use a breaker bar and take the belt off. Just slide it out of the way. Take it off the power steering pump with the alternator. There we go. Take that out of the way. Now we're gonna take these bolts out of the pulley, and then grab the pulley, and slide it off. Remove the 10-millimeter bolts that are holding the water pump on.
And then you're gonna take a pry bar. Whoops. Sorry. And just pry this out. All right, pull that out. And then there's a gasket on here, just grab that. Be careful, this is really sharp. It's a metal gasket.
Now, I wanna clean up this gasket area. You can take a razor blade, just be careful, or a scraper, and just try to scrape off some of the old gasket material. We're gonna make it nice and clean. All right, that's all cleaned up. You can just wipe it down with a rag. You could use a little brake parts cleaner if you want. Just get it nice and clean. Looks good. Now, take the water pump and the new gasket and just kind of put it together like that. And the water pump is gonna go in like this. There's this little area where there's, like, a freeze plug, that's gonna go towards the bottom. You line it up. Okay. And then take the bolts. You should replace these bolts. The water pump comes with these bolts, so you should be good. So it's gonna be kind of hard to torque these, but you wanna torque these bolts to 8 foot-pounds on the first pass. And you wanna alternate. So you start with this one and then go to the opposite side and back over to this side. And just go around that, the pump, that whole way. Just like that. And, once you do that, then go around again one more time, 8 foot-pounds. Now take the pulley and line it up. There's a couple alignment pins and just line it up with the water pump. And take the bolts and get those started. Then we'll take these up. You're gonna hold the pulley the best you can. Just try to snug these up. And then once you get the belt on, you can just double-check, just to make sure they're snug. And just make sure you get the serpentine belt lined back up. Put the tensioner tool on first. Get this line back up on the power steering pump and with the water pump. And then just check the other pulleys, make sure everything is lined up. Looks good. Take the tool off. I'm gonna just double-check these bolts, just make sure they're tight.
I'm gonna take this bracket with the bolts and I'm gonna separate here. Get the bolts started. And then tighten these bolts down. And take this bracket with the bolts. Get those started. And tighten those bolts down. And take this mount and just slide it in position. There we go. And then take the bolts, put the bolts back in. And tighten down the bolts. Now, we can take this hose, upper radiator hose, and line it back up. And get the clamp lined up. And there's a lock on the clamp, so I'm gonna have to unlock that. You normally just use a screwdriver or a different type of pry tool. Just pry in one side and just push down the down latches. Just make sure it's lined up. If not, you can adjust it with some pliers or some hose clamp pliers.
Now take the reservoir, and you're gonna line the reservoir up. Take this wire retainer and just push that back through right there. Make sure the hose isn't twisted, of the reservoir. And line that up in that bracket, put those bolts back in. And tighten them down. And just move the wires out of the way. Take this bracket. Just go underneath some of those wires. And line it up in the studs. On top just like that. Install the nuts. And tighten these down. Oops. And this bolt as well. YOu're gonna line this bracket up and lock it into place. That's good. Slide that connector there. And then this one is gonna slide into it. Just like that. Line that up. And connect this connector here. Lock it in place. I'm gonna take the fuse box, line this up, push it down. Now take a Phillips head screwdriver. And there's a hole right there, you're gonna wanna pay attention to that hole as I tighten it. You're gonna see a little orange tab come up. Just like that. That's tight enough. And do the same on this one. That's good enough. And then take these wires, and this one is gonna go first, the smaller one. Then the larger bracket goes next, then the nut. And tighten that down, snug. Just give it a wiggle test to make sure it's tight. Put the cover back on. Now you can put this cover back on, lock it down. Take the engine cover, pull the oil fill cap off again. Line the engine cover up, and then put the cap back on. Now, from underneath the vehicle, you can put this little radiator hose back on. And once it's in position, you can unlock the hose clamp. It's in position right there. And lock it there. Looks like it's good.
To fill the coolant, we actually have to remove this cover. The radiator cap is underneath here. Just take a pick tool, take some push pins out right there. The two in the corner you need the pick tool for. The other ones you can just use a regular trim tool. Let me get that one. And take this cover off. Now, to fill it with coolant, you're gonna take this cap off. And then you can use a funnel or you can just pour the coolant right in there. You're gonna wanna do a 50/50 mix. Check your owner's manual for the appropriate coolant. You wanna fill it up and then you wanna start the engine and just monitor the level. After about 10 minutes, the engine should be warmed up. You're gonna put the cap back on. Just be careful, you don't wanna burn yourself. And then, when the engine cools back down, readjust the level, check the level in the reservoir, top that off. And after you go for a road test, adjust accordingly.
Shop Products

ACDelco Professional Engine Water Pump General Motors OEM 19325605
Part Details:
- ACDelco Professional
- Gasket
- Pulley Studs
- Yes
How to Replace Water Pump 2007-09 Toyota FJ
Check out this video to learn how to replace the water pump in your 07-09 Toyota FJ Cruiser. 1A Auto shows you how to do it yourself and save money!
