How to Replace Washer Level Sensor 2014-19 Toyota Tundra
Created on: 2018-03-27
How to replace a broken or failed washer level sensor on 14 Toyota Tundra.
-
step 1 :Removing the Windshield Washer Bottle
- Disconnect the level sensor connector
- Disconnect the pump connector
- Remove the 10mm bolt from the top of the bottle
- Remove the two 10mm bolts from the bottle
- Lift the bottle up
- Pour out any fluid into a container
- Remove the hose
-
step 2 :Removing the Washer Level Sensor
- Pry the sensor out of the bottle with a prying tool
- Remove the grommet from the sensor
-
step 3 :Installing the Washer Level Sensor
- Insert the grommet to the bottle
- Press the sensor into the bottle
-
step 4 :Installing the Windshield Washer Bottle
- Connect the washer hose
- Clip the hose to the bottle
- Lower the washer bottle into place
- Connect the level sensor
- Connect the pump
- Tighten the 10mm bolts to the bottle
- Refill the bottle with the appropriate fluid
Tools needed
-
Funnel
Socket Extensions
Flat Blade Screwdriver
10mm Socket
Ratchet
Trim Tool Set
Hi, I’m Mike from 1A Auto. We’ve been selling auto parts for over 30 years!
Remove the windshield washer fluid container and reach down. This is the level sensor. Lock is on the bottom side of the connector. Push it in. Pull the connector off. I want to pull this out of the bottle, so we'll drain all the fluid out.
Pump is plugged in on this side. Lock is under the bottom of it. If you can't push it in with your finger tip, use a small five by eight screwdriver and just carefully push the lock in. It will pop it off. There's a ten millimeter bolt on the top here, and then two down in the engine compartment. I'm going to start with the one up top here. Need a 10 millimeter socket and a short extension and a ratchet. Loosen this up. You can use the short extension to get down in here if you've got access to it. You can use a much longer extension. It will just make it slightly easier, because now I can turn the ratchet up here instead of down here in the engine compartment.
Lift the bottle up. It is full of fluid. Do my best to not spill it. Pull the hose off. It is clipped in down here. As soon as you pull this off, it's going to want to leak out. What I'm trying to do is lift up and get it on the side here. So we need to drain this if it has fluid in it. I'm going to take the gallon container, and I'm going to put it right where the originally one was and get a funnel in there. And let's see if I can pour it in without spilling it everywhere. If you do spill some, it's just windshield washer fluid. Really, it's not a big deal.
You can rinse it out with water, or it will just dry out. This holds about a gallon. Put this cap back on, and hold it this way. So there is still some fluid in here, but I can pull the washer hose off, just come right off the nipple here. And tip this over so we can get the rest out. Change the level sensor. Grab onto it. Work it out of the bottle. Use a plastic prying tool. You can get these from 1A Auto.
Just get under here and start to pry it up. Carefully pull it out. See there's a little float in there. If it's not floating, the low fluid light will come on. So pop the grommet off. Push it in place, and then reinstall it. This went towards the bottom. And it will seal up. The bottle can go back in the vehicle.
Reinstall the washer bottle. Make sure you plug the washer hose back in, or else it's just going to spray washer fluid all over the inside of your engine compartment. It'll just push over, and then it was clipped up into here. And as we lower it down into place, I'll plug in the level sensor. It'll click when it locks into place. I can reach down and plug in the washer pump. Clicks when it locks into place.
Line up the spots where it was sitting. Get this top one caught here. And reach down and get the other two caught. Tighten these up. You don't need to kill these. If you fell them get tight, just stop. And the same for this one here. Fill up our washer fluid bottle. Pretty big opening. You don't need a funnel. And just fill it up to the top. Probably takes about a gallon, maybe a little more. Once you're done, put the cap back on.
Thanks for watching. Visit us at 1AAuto.com for quality auto parts, fast and free shipping, and the best customer service in the industry.
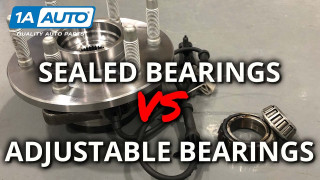
Wheel Bearings on Cars and Trucks Sealed Bearing vs Adjustable Bearing
Do you know the difference between sealed wheel bearings, and adjustable wheel bearings on cars and trucks?
