How to Replace Vapor Canister Purge Solenoid Valve V6 3-6L 2010-11 Chevy Camaro
Created on: 2017-03-30
If the evap canister purge solenoid needs to be replaced on the 10-11 Chevy Camaro, this video has the steps needed to do the job yourself
-
step 1 :Removing the Evap Canister Purge Solenoid
- Twist off the oil cap
- Lift off the engine cover
- Pry the two plastic tabs out of the noise insulation with a trim tool
- Lift the insulation up and out
- Disconnect the electrical connectors from the evap canister purge solenoid
- Disconnect the hoses from the solenoid
- Remove the 10mm bolt from the solenoid bracket
- Pull the bracket up and out
-
step 2 :Installing the Solenoid
- Connect the hoses to the solenoid
- Put the solenoid bracket into place
- Fasten the 10mm bolt into the bracket
- Connect the solenoid electrical connector
- Line up the noise insulation
- Pop the two plastic tabs into the insulation
- Line up the engine cover
- Twist on the oil cap
Tools needed
-
Flat Blade Screwdriver
10mm Socket
Ratchet
Trim Tool Set
Hi, I'm Mike from 1A Auto. We've been selling auto parts for over 30 years. We're dedicated to delivering quality auto parts, expert customer service, fast and free shipping, all backed by our 100% satisfaction guarantee. Visit us at 1AAuto.com, your trusted source for quality auto parts.
In this video we're going to be working with our 2011 Chevy Camaro 3.6 liter V6. We're going to show you how to remove and replace your vehicle's evap canister purge solenoid. If you like this video please click subscribe we have a ton more information on this and many other vehicles, but if you need this part for your car you can follow the link down in the description over to 1AAuto.com. Here are the items you'll need for this repair.
Remove your oil cap, lift up and pull forward to remove your engine cover. You'll also need to use either one of these trim tools or a flat blade screwdriver to lift up on the two plastic tabs securing this engine noise insulator here. You can then move the insulator over to the driver side before lifting it out.
Your evap canister purge solenoid is located here on the rear passenger side of the intake manifold. We'll start by disconnecting the electrical connector, grab the hose and push in, and move the thumb latch over, and pop that fitting off. You can then slide this back off of its bracket. There is one more quick connect style fitting here you'll want to rotate this, push in, and remove the solenoid from the hose. Now you could change just the solenoid on the bracket right there but ours comes with a new bracket so we're going to remove this 10mm bolt.
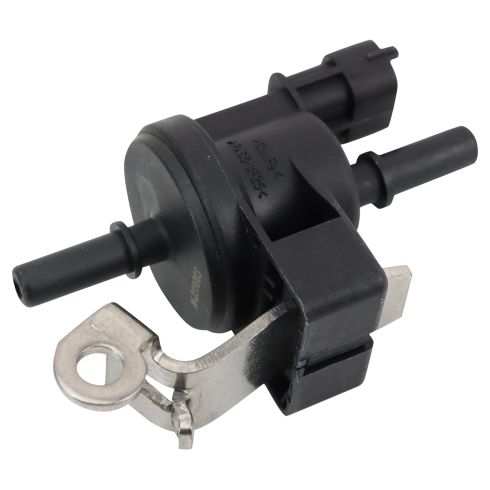
Here we have our old canister purge solenoid that we removed from our vehicle and our new part from one 1AAuto.com. As you can see these parts are exactly the same with the same inlets and outlets and the same two tab electrical connector, as well as a nice smooth bracket and rubber bushing on both. What your canister vent purge solenoid does is it allows the flow of gases from your evaporative emissions canister into the intake manifold to make sure that the evaporative emissions from putting fuel into your vehicle, go through the engine and get used and burned rather than venting to atmosphere like much older vehicles did. If one of these jams it's going to cause a check engine light you probably won't notice an issue with running although if it does stick open you may notice a stronger fuel smell from the vehicle running a little too rich but most of the time it's just going to be a check engine light for one of these that lets you know that something's wrong with it. It's still an important part of your emission set up and you are going to want to make sure it's in good condition. If yours has gone bad this new part from 1A Auto is going to go in direct fit just like your original equipment, and fix you up right.
Install your new purge solenoid. Install the 10 mm bolt back through the bracket and into the intake manifold. Should be able to get that just about tight by hand and then we'll just snug it up with our socket ratchet. You can simply snap all of your quick connect fittings back on. Make sure you hear them lock-in and just give them a little wiggle to make sure they're on there tight. Reconnect your electrical connector.
Reinstall the insulator, as well as the two pop clips. That's how you want to set them up. Just get them into the top of the bottom piece there and then it will go through both holes and just push the top down to lock them into place. Reinstall the cover and your oil cap and you're good to go.
Thanks for watching. Visit us at 1AAuto.com for quality auto parts, fast and free shipping, and the best customer service in the industry.
Shop Products

Top 5 Problems Chevy Avalanche Truck 1st Generation 2002-06
This video discusses the top problems with the 1st generation Chevy Avalanche, which includes model years 2002 to 2006.
