How to Replace Vapor Canister Purge Solenoid Valve 2007-14 Chevy Suburban 1500
Created on: 2018-05-17
Check out this video to learn how to replace the vapor canister vent valve on your 07-14 Chevy Suburban.
-
step 1 :Lowering the Spare Tire
- Pry the cover off the rear bumper
- Insert a key into the key lock
- Turn the key to the right
- Remove the slot
- Open the hatch
- Remove the tray
- Turn the retaining screw counterclockwise
- Remove the spare tire tool kit
- Connect the two stems
- Insert the square end into the slot
- Turn the stem with the tire iron counterclockwise
- Lower the tire
- Fish the hook through the tire
-
step 2 :Removing the Vapor Canister Purge Solenoid Valve
- Spray the 13mm bolt with rust penetrant if needed
- Remove the 13mm bolt from the top
- Disconnect the electrical connector
- Press the lock and disconnect the hose from the solenoid valve
- Cut the cable ties with a side cutters
- Lower the purge solenoid valve and wire
-
step 3 :Installing the Vapor Canister Purge Solenoid Valve
- Insert the solenoid valve into place
- Tighten the 13mm bolt to the solenoid valve
- Connect the electrical connector
- Connect the hose to the solenoid valve
- Tie the wires with wire tie
-
step 4 :Raising the Spare Tire
- Insert the hook through the tire
- Raise the tire by turning the stem and tire iron clockwise
- Remove the stem from the slot
- Insert the stem and tire iron into place
- Replace the tray
- Close the hatch
- Insert the key lock into place
- Press the cover on to the bumper
Hi, I’m Mike from 1A Auto. We’ve been selling auto parts for over 30 years!
In this video, we are removing and replacing a vapor canister purge solenoid valve in a 2009 Chevy Suburban. If you need this part or any other parts for your car, click the link in the description and head over to 1AAuto.com. Our vehicle has a P0455, which is an emissions EVAP leak, which is a large leak. One of the things that this could be is the EVAP vent valve, so we're going to change it out. This could be the problem. It could be something else, but we're going to start there and see if it fixes our problem.
We're going to take the spare tire down. We're going to have to gain access right here. You're going to take your key. There may be another cover that goes over here on your vehicle. There will be two twists that you will untwist underneath there, and then this will pop down. To get this cover off, you're going to take your key. Pop that off. Sometimes there's a connecting tab right here, so this will just hang. Then you're going to take your key. It should just - there we go. The key twists, and it pulls out. Open the lift gate.
We want to get the tools to access the spare tire, so we're going to have to pull this panel up to get the tool kit out. We're going to unscrew this retainer. It's loose. Slide that off. Then we can pull the tool kit out. All right, we're going to open the tool kit up. For this video, this piece is not required. Slide this up.
Next, we're going to put these two pieces together. Slide it in. Push down on this little tab. Make sure they're good and tight. Next, we're going to slide this bigger open square end into the hole. Then you're going to feel some tension. Wiggle it a little bit so you're able to put this on the other end. We can lower the tire. All right, then pull this up. Loosen this a little more as I'm pulling it. Now, to get this off, we're going to have to lift up the tire. Then you're going to move this. You're going to fish it the center of the tire. That's how you get it off. With the spare tire down, you can see different parts of the vent valve system.
This is the actual valve solenoid right here, but there's a tube. It goes over here and goes to the EVAP canister. Also, the exhaust hose goes over here and goes up next to the filler neck right there. The bolt for it is right up here, so we're going to have to get it from the top side. Our bolt's really rusty, so we're going to spray it with some penetrant. We're going to use a 13 millimeter ratchet wrench from the top. If you don't have a ratchet wrench, you can use a ratchet and a socket, or just a regular wrench will work. Both out. Before we pull this down, we're going to disconnect the electrical connector. Just pull up on the tab. Pull out. Some of these may look different. This is an updated harness that I'll show you in a little bit, but the older one has this electrical connector connected right to the vent valve.
On our EVAP canister, we're going to disconnect this hose. There's a lock on the bottom side, on the almost bottom side, like the back side, more towards the front of the vehicle. We're going to use a flat-blade screwdriver to push in on the lock and then slide out the pipe. Here's the lock right here. You just push in on that, and it pushes out on the fingers. Then you slide right out. We're going to use these side cutters to cut these cable ties. You want to take this down. Be careful. Make sure you wear safety glasses so you don't get sand in your eyes. Feed it through here. Now we're going to pull this bracket out. You're going to have to push it up and slide it out that way. Then we will fish this back this way, and it's out.
Here's our old EVAP vent valve. Here's our new EVAP vent valve from 1AAuto.com. As you can see, the parts are almost identical. The exhaust hose is the same. The intake hose has the same bends in it. This is the updated harness that you're going to need if you have the old style vent valve. The harness from the vehicle would plug into a connector looking like that. Then you would plug this into the new vent valve like that and lock it in. Get your part at 1AAuto.com, and you'll be ready to rock and roll. Okay, so first thing we're going to do, we're going to slip this intake hose. It's going to go over here, over near the EVAP canister. Slide the valve up. On the bracket, we're going to push that little ear in. Tip it up. Then it's in place. Next, we're going to connect this hose to the canister. Going to push it on till it clicks. All right, next we're going to run our exhaust hose and go over the fuel filler neck over there. We're going to run it up here. It comes with a couple ties. You're going to go around the filler neck. Okay, with this piece, we want this facing down, because we don't want water to go up and come back down the tube. We are going to cable tie this up here to get it out of the way. That should keep it out of the way of water. We're going to insert the electrical connector. Then there's a clip. Slide the clip on the frame. Then last, we're going to install the bolt. [inaudible 00:10:09] tighten it down with our 13 millimeter ratchet wrench.
To reinstall your spare tire, you're going to put this bracket through while you lift up on the tire. Get that lined up. Now we're going to start cranking over here. As the tire goes up, we may have to stabilize it a little bit. Make sure it's good and tight. We can pull our tools out. We're going to take this retainer. Put that on first, and slide this into place. I'm going to tighten it down. It's snug. I'm going to pop this cover on. It goes this way.
I'm going to reinstall the lock. There's a guide right here. You're going to want to line that up with the slot and the hole. I'm going to push that in. Then turn to the left, and pull the key out. We're going to insert the cover. Sometimes the covers have a tie right here, so this one's broken. The long part goes on the bottom. The shorter part goes on top. You put the top in first, and then lock it in. Our check engine light is right there. After replacing the vent valve and driving this vehicle for a week, we have confirmed that that was the problem with the vehicle. We fixed it, and it's all set.
Thanks for watching. Visit us at 1AAuto.com for quality auto parts, fast and free shipping, and the best customer service in the industry.
Shop Products
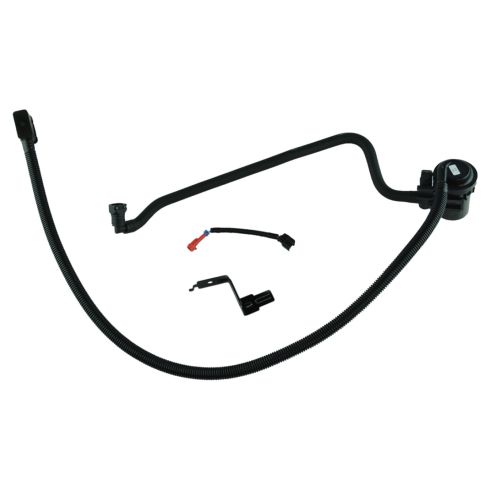
Chevrolet GMC Cadillac Vapor Canister Vent Valve Standard Motor Products CP516
Part Details:
- Hoses
- Bracket
- Harness
How to Replace Leak Detection Pump 2004-06 Jeep Liberty
Follow along with this video to learn how to replace the leak detection pump on your 04-06 Jeep Liberty.
