How to Replace Upper Motor Mount 2003-12 Volvo XC90
Created on: 2019-09-10
Watch this video to learn how to replace the upper motor mount on your 03-12 Volvo XC90. 1A Auto shows you how to do it yourself and save some cash!
-
step 1 :Removing the Upper Motor Mount
- Remove the T25 bolts to remove the inner timing cover and the ignition coil cover
- Support the engine on an edge of the oil pan with a floor jack
- Remove the 18 mm nut from the 15 mm upper through bolt and remove the bolt
- Remove the two front 14 mm bolts
- Remove the two rear 14 mm bolts
- Remove the upper motor mount
-
step 2 :Installing the Upper Motor Mount
- Align the motor mount in position
- Install the two rear 14 mm bolts. The longer bolt is on the passenger side
- Install the two front 14 mm bolts. The longer bolt is on the passenger side
- Install the upper through bolt
- Torque the front and rear bolts to 50 Nm
- Torque the through bolt to 80 Nm
- Lower and remove the jack supporting the engine
- Install the timing and ignition coil covers
- Install the T25 bolts
Tools needed
-
Socket Extensions
Torque Wrench
14mm Socket
15mm Socket
18mm Wrench
Ratchet
Floor Jack
Block of Wood
T25 Torx Socket
Hey friends, it's Len here at 1A Auto. Today we're working on our 2004 Volvo XC90. This is the all-wheel drive version, and I'm going to show you how to do an up-top or upper motor mount. Going to be super easy, I can do it. You can do it too.
If you need this or any other part, you can always check us out 1aauto.com. Thanks.
Okay, so one of the first things we have to do after we pop the hood is just take off the cover right here. It comes across the whole valve cover, and then there's another one that comes up along the top right there. Both those need to come out. You're going to use a T25 bit. It looks like a star. That just goes right in here.
You can use a ratchet if you want to. Just show you what the bolt looks like. That's not really the best, not the cleanest, but it's not my fault. That's what it looks like. We'll set this aside, and we're going to remove all the rest of the bolts.
All right, so we'll just get this stuff up and out of here. Just a little cover. There's your timing belt, not that that matters for this job, but ... The ignition coil's under here, there's going to be spark plugs and everything under there.
Here's our mount. Should be fairly easy to do. We've got a bolt that comes through here. We've got two bolts here, and then two bolts on the rearward side. All of it looks fairly easy. What I'm going to do first though is I'm going to get a floor jack and a piece of wood, and I'm going to raise the, or support the engine a little bit, just in case this is holding it up at all.
There's going to be a couple of other motor mounts under here that I'm sure are doing their job well, but just to help them along and just in case, we'll say, we need to be able to move this up or down, to be able to line up the bolt at the end.
I'll grab a floor jack now and we'll move along. Okay, so we've got our jack with our rubber pad. We're going to bring it right in and go right underneath the oil pan there, along an edge. I'm going to go along this edge, because this is the side that I'm going to be working on.
I never like to jack in the center of an oil pan. There we are. I'm just applying very light pressure. I'm not trying to lift the vehicle up off the ground here. Just put that like that. Now we can get started under the hood.
We're just going to take off this rubber boot right here. Pretty simple, slides right off. We'll set that aside. Next, we're going to take out this bolt. There's a nut on the other side. We'll grab our wrench and a ratchet for this side, and we'll remove this bolt.
We're going to use our 18 millimeter on this side, and a 15 millimeter on this side. There's our nut and bolt. This can move around now. The only thing holding in this mount is the four bolts. Let's get those out of there.
We're going to take out these bolts right here. 14 millimeter. If you have access to an air gun, it'll be much quicker than this. For the purpose of this video, I'm just going to do it like this. You can get that one that's hiding all the way in the back there. That one's probably going to be easier with something different. Just because there's something in the way there. There's those. The last one we have is all the way back in this corner right here. This is in the way. I'm going to try and get something a little different. I'll probably just go with a shallow socket and still use my ratchet and see what we can do.
Okay. You have minimal room for this one, but once you get it broken free, should come out fairly easily. There we are. This is the rear left, or driver's side. As you can tell, these are different. It's important to make sure you remember where everything goes. If you're worried about forgetting, you can either draw something or you can just go like this with your new one. Set that aside. I'm going to take out the other two here.
There we are. There we are. We got two more different bolts. Grab our upper mount out of there.
Here we are friends, a quick product comparison for you over here. Right here, we have our original upper mount for our 2004 Volvo XC90 all-wheel drive version, and over here we have our brand new quality 1A Auto part. Both these parts are created equal. You've got your four mounting holes, super important. You got the side over here, brand new rubber bushing. You don't have to worry about it. Even comes with a little extra plate on there for added support.
This is a quality piece. As you could tell, it's the same exact shape. With all that said, I don't see any reason why this wouldn't be a great piece to install onto the vehicle, so I'm going to go ahead and do it. If you need this or any other part, you can always check us out 1aauto.com. Thanks
Okay. It's time to get our brand new quality 1A Auto mount into the vehicle. It's going to be very easy. We're just going to go like this, slide it right along here. It should just want to slide right in there. There it is. Cool. We've got our bolts. I just put mine up, so I'd remember where everything is. Got this one all the way over here. This one went on the passenger side rear, driver's side rear.
I'm not going to tighten any of these down or even bottom them out until all of them are started. The longer of the two for the front goes on the left, or passenger side, I should say. Smaller one. I'll grab this one. That through right there. Okay, everything's started. Let's go ahead and tighten it down.
All right. Now we're going to bottom out these bolts here, the ones that hold the mount to the engine first. I'm going to continue with my 14 millimeter, get that on there. I'm just going to snug this up now.
There we are. All right. Okay. Now, we're going to continue with our torque wrench. We're going to go with 50 Newton meters with our 14 millimeter socket.
Okay. Now, we're going to switch over to our 15 millimeter socket. We're going to tighten up this bolt right here. I'm going to hold the backside of the nut with an 18, and we're going to torque this down to 80 Newton meters. There we are, just check it one more time real quick. Tight. All four of those bolts are tight. We can move ahead to the next step.
We're just going to get our jack out of the way. Okay, let's get some covers back on this. I'm just going to come through like this, right underneath here. Just bring it over. There we are. We've got our other cover. This has little pitons that are going to go into there. Just like that. Bonk bonk.
Cool. I'm just going to grab a few of our bolts up here. We're going to go back to our T25. We're going to get these bolts in here. All right. Down to the nitty gritty here. Get this last one. There we are, tight.
Thanks for watching. Visit 1aauto.com for quality auto parts shipped to your door. The place for DIY auto repair. If you enjoyed this video, please click the subscribe button.
Shop Products

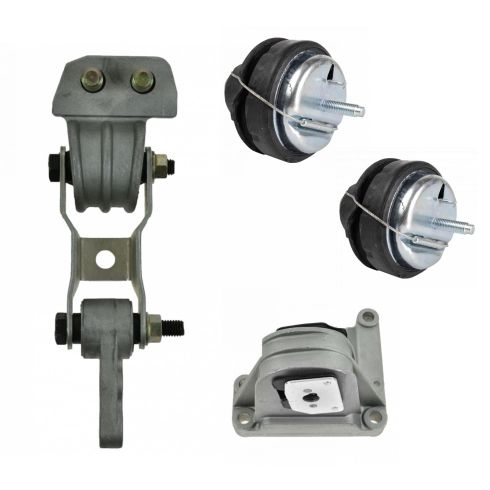
Volvo S60 V70 XC70 XC90 4 Piece Engine Mount Set TRQ MTA34693
Part Details:
- (1) Torque Strut Engine Mount
- 4 Piece
- (3) Engine Mounts
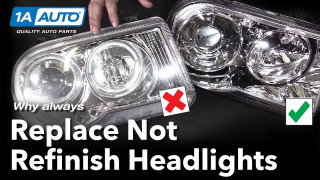
Why you Should Replace Not Restore Headlights
See why replacing your cloudy headlights with new ones is always better than refinishing them Why should you replace your headlights and not clean or refinish them? Three reasons: It's a simple fix, it increases visibility, and it enhances the overall look of your vehicle. Headlights are made from a polycarbonate plastic that can be damaged by UV rays from the sun or suffer pitting caused by road debris light salt and rocks. If you look closely at an old set of headlights, you'll see that the lens is full of micro-cracks. This is called crazing. This crazing, along with pinning, will turn your headlights from crystal clear to hazy yellow and it cuts the output in half, making it very difficult to see at night. It also makes your car look old and dated. With parts from 1AAuto.com and our how-to videos, you can make your vehicle look new and stay safe on the road. To get new headlights for your vehicle, visit 1AAuto.com and visit our YouTube page for do-it-yourself and how-to videos.
