How to Replace Upper Intake Manifold 1997-2006 V8 4-6L Ford F-150
Created on: 2017-07-12
Check out this video on how to replace the upper intake manifold on your 97-06 V8 4.6L Ford F-150 with expert instructions from the mechanics at 1A Auto.
-
step 1 :Disconnecting the Battery
- Disconnect the negative terminal with a ratchet
- Disconnect the positive terminal with a ratchet
-
step 2 :Removing the Air Intake Assembly
- Remove the three 10mm bolts from the engine cover
- Remove the engine cover
- Loosen the hose clamp on the intake tube
- Remove the intake from the throttle body
- Disconnect the air intake sensor
- Pull the air intake assembly off
- Remove the air intake assembly
-
step 3 :Disconnecting the Throttle Body Cable and Vacuum Lines
- Remove the throttle and cruise control cable from the throttle body
- Remove the spring from the throttle
- Remove the 10mm bolts from the cable bracket
- Follow the cables and release the cables from the connections
- Disconnect the five vacuum lines
- Disconnect the vacuum line connect on the end of the intake
- Slide the vacuum cables out of the way
- Disconnect the two sensor connectors from the throttle body
- Remove the two 10mm bolts from the other cable bracket
-
step 4 :Disconnecting the EGR Valve Crossover Pipe
- Remove the 10mm nut from the vacuum tube bracket
- Remove the rubber hose from the intake
- Move the tube out of the way
- Loosen the nut on the EGR tube with an adjustable wrench
-
step 5 :Removing the Throttle Body
- Remove the rubber hose from behind the throttle body
- Remove the four 8mm bolts from the throttle body
- Lift the throttle body forward
- Disconnect the hose on the backside
- Remove the throttle body
-
step 6 :Draining the Coolant
- Open the coolant overflow bottle cap
- Have a drain pan ready
- Open the radiator drain counterclockwise
- Drain the antifreeze
- Turn the drain clockwise to lock it
- Loosen the radiator hose clamp from the intake manifold
- Remove the radiator hose
-
step 7 :Removing the Alternator
- Remove the 10mm bolts from the bracket atop the thermostat housing
- Remove the three 10mm bolts from the spark plug wire bracket
- Insert a 1/4" ratchet into the tensioner
- Turn the tensioner clockwise
- Remove the belt from the alternator
- Remove the two 10mm bolts on the bottom of the alternator
- Lift the alternator forward and off of the intake manifold
-
step 8 :Disconnecting the Fuel Lines and Fuel Injectors
- Disconnect the fuel injector wiring harnesses on the intake manifold
- Disconnect the two temperature sensors
- Open the Schrader valve on the fuel rail
- Surround the valve with a rag
- Press the valve stem down to release the fuel pressure
- Replace the cap on the valve
- Remove the 8mm bolts from the fuel rail
- Pry the fuel injectors out of the intake manifold with a prybar
- Disconnect the heater hose with a flat tip screwdriver
- Remove the 10mm bolt from the ground strap
-
step 9 :Removing the Upper Intake Manifold
- Remove the four bolts on the passenger side from the intake manifold
- Remove the five bolts on the driver side from the intake manifold
- Remove the two bolts on the thermostat housing side from the intake manifold
- Remove the 8mm bolts down the center of the manifold
- Lift the intake manifold up and out
-
step 10 :Preparing the Cylinder Head
- Inspect the intake gaskets
- Gently pull the intake gaskets out, without dropping dirt into the runner holes
- Stuff the runner holes with paper towels
- Vacuum dirt and debris from the surface
- Scrape corrosion from the cylinder heads with a razor
- Rub an abrasive pad against the cylinder head
- Spray a rag with brake parts cleaner and clean the cylinder head
- Remove any seals from the injector rail
- Press the seals onto the fuel injectors
- Remove the thermostat housing from the intake manifold
- Remove the temperature sensors with a 19mm wrench
-
step 11 :Preparing the New Upper Intake Manifold
- Apply thread sealant to the sensors
- Screw the sensors in to the crossover pipe
- Apply the cab to the heater hose slot if needed
- Flip the intake manifold over
- Insert the dowel pins into the manifold that match the part number on the lower intake manifold
- Apply oil to the end of the fuel injectors
- Push the old injectors into the new upper intake manifold
- Apply o-rings to the top of the injectors
-
step 12 :Installing the Upper Intake Manifold
- Remove the paper towels from the runner holes
- Vacuum out the runner holes
- Lower the upper intake manifold into place
- Insert the center bolts into the socket with a piece of tape to secure it
- Tighten the eight center lower intake manifold bolts
- Torque the center bolts following the torque sequence to 18 inch-pounds
- Torque the center bolts following the torque sequence to 106 inch-pounds
- Insert the thermostat into the thermostat housing
- Place the thermostat housing cover on
- Tighten the 10mm bolts to the housing
- Tighten the four bolts on the passenger side from the intake manifold
- Tighten the five bolts on the driver side from the intake manifold
- Torque the exterior manifold bolts to the torque sequence to 18 inch-pounds
- Torque the exterior manifold bolts to the torque sequence to 18 foot-pounds
-
step 13 :Reinstalling the Fuel Injectors and Fuel Rail
- Place oil on the injector seals
- Press the fuel rail onto the fuel injectors
- Tighten the 10mm bolts to the fuel rail while pushing down on the fuel rail
- Install the fuel injector connectors
- Connect the heater hose to the rear of the intake manifold
- Tighten the hose clamp
-
step 14 :Reinstalling the Throttle Body
- Scrape off any old gasket adhesive from the throttle body
- Clean off the mating surface with an abrasive pad
- Clean out any debris from the elbow without getting cleaner in the throttle body
- Connect the EGR tube
- Place the throttle body on the intake
- Tighten the 10mm bolt to the ground strap
- Tighten the 10mm bolts to the throttle body
-
step 15 :Reinstalling the Alternator
- Lift the alternator into place
- Tighten the 10mm bolts to the bottom of the alternator
- Tighten the three 10mm bolts to the bracket behind the alternator
- Turn the tensioner clockwise with a 1/4" drive ratchet
- Lift the belt onto the alternator
-
step 16 :Connecting the Throttle Body Cable and Vacuum Lines
- Plug in the two temperature sensors
- Tighten the 10mm bolts to the power steering bracket
- Connect the hoses to the throttle body
- Tighten the crossover pipe with an adjustable wrench
- Reinstall the bracket with sensors and tighten the 10mm bolts
- Connect the two hoses and bracket to the throttle body
- Connect the vacuum hoses and sensors to the throttle body
- Set the bracket with the throttle and cruise control cables into place
- Tighten the 10mm bolt to the bracket
- Hook in the cables to the throttle body
- Hook in the spring
- Hook the cables into the clips
- Reconnect the sensors to the throttle body
-
step 17 :Reconnecting the Radiator Hose
- Insert the radiator hose into place
- Tighten the hose clamp
- Connect the green and white vacuum connection
-
step 18 :Reconnecting the Air Intake
- Insert the air intake hose to the throttle body
- Connect the two hoses to the air intake
- Tighten the hose clamp with a flat blade screwdriver
- Connect the intake air sensor
- Press the air filter housing in
- Attach the engine cover
- Tighten the 10mm bolts to the engine cover
-
step 19 :Reconnecting the Battery
- Connect the positive cable
- Connect the negative cable and tighten the bolt
- Tighten the positive cable bolt
-
step 20 :Refilling the Coolant
- Insert antifreeze into the coolant bottle
- Run the vehicle with the cap off to bleed the system
- Cap the coolant off
- Shut the vehicle off
- Let the vehicle cool down
- Add anti-freeze as needed
Tools needed
-
Razor Blade / Gasket Scraper
Adjustable Wrench
Socket Extensions
Torque Wrench
Pry Bar
19mm Wrench
Anti-Freeze
Safety Glasses
Engine Oil
Pick
Gloves
Rubber Mallet
Flat Blade Screwdriver
Paper Towels
1/2 Inch Ratchet
8mm Socket
Anti-Seize Grease
Rubber Vacuum Hose
Painter's Tape
10mm Socket
Drain Pan
Ratchet
Needle nose pliers
11mm Socket
Hi, I’m Mike from 1A Auto. We’ve been selling auto parts for over 30 years!
We're going to start by disconnecting the battery. I like to do the negative side first. In our case, it's an 11 millimeter socket, which I'll use with a ratchet. These are some aftermarket terminals that have been put on this battery at some point in time, so yours are probably going to be a different size, but nevertheless, you just loosen up these bolts. I've already actually loosened mine a bit. Then, you can just pop the terminal right off. Might want to do the same with the positive as well. Just be extra safe.
On the top of the engine is a cover that we'll want to remove. There’s this 10 millimeter on the passenger side, then there's two 10 millimeters on the driver side. I'll use a ratchet with an extension to crack all these loose. Once they're loose, you can usually just twist them off by hand. You can take your flat tip screwdriver and put it right on this hose clamp to unscrew it. Once it's loose, you should be able to pop it right off of the throttle body and then you can pull this whole assembly right off. It just pops right off just with some pulling force.
Right here you have your intake air temperature sensor that you'll have to disconnect. Then, you should be able to just lift this up and move it out of the way. Something like that. Right here we have your throttle cable and cruise control cable. We want to remove those. Do that by rolling the throttle back and pulling the cable out like so. Then this one just lifts straight up. You can see how that side comes off. On the bottom you have your spring that you'll want to take out of the throttle. That way the cables are disconnected from the throttle body itself.
Next, you have a 10 millimeter right here and a 10 millimeter right here that you can remove with a ratchet, an extension, and a 10 millimeter socket. If you follow the throttle and cruise control cables back down to the driver side of the engine, you can take your flat tip screwdriver and release them from these connections as well. Same thing with this side. Just pop it out if its holder. Then, you can rest both of these out of the way over by your intake. Coming from the passenger side of the engine is a bunch of vacuum lines and they go to a variety of things on the engine. We're going to start disconnecting those. Here's the first one. Your second one down below. On the fuel pressure regulator is your third one.
Let's see right here. It's the red one. Then, right here you got the green on the top and the white on the bottom. We'll pop those loose. Pull them out. Then, on the back of the intake right over here, you have a slightly larger one that we will also remove like so. Then you should be able to kind of feed them through and push them out of the way so that they're not in the area of the intake manifold anymore.
On the throttle body, there's two connectors that you need to remove. Right here you got the bottom one. You just push the tab down and pull. Same with the top one. Push the tab. Pull it out. Then, once again, you can kind of pull them out of the way and get them away from the intake manifold.
Right here there's a couple of connectors that are plugged into this bracket. We're just going to remove the whole bracket since it needs to come off the intake anyways. We'll start by pulling these two 10 millimeters out. Again, I'm going to use my 10 millimeter socket with an extension and a ratchet. Like most of these bolts, as soon as you crack them loose, you can just pull them out by hand. Just be careful not to drop them down into the intake area, because then you have to fish them out with a magnet. I like to put them back in place so I know where they go. I'll just gently thread them back in. Then you can move this whole thing right out of the way. Set that aside.
We want to take the EGR crossover tube off, but to get at it, we're going to need to remove this other hose that goes over the brake booster. We're going to pull this 10 millimeter nut right off of the EGR valve. 10 millimeter socket and ratchet is what I'll be using. Once you have the nut off, you should be able to slide the bracket off. Pull the rubber hose off of the intake, and like everything else, just tuck it out of the way for right now. Right on the backside of the EGR valve is a large nut. It's a round an inch and a 16th, but in our case, we're just going to use an adjustable wrench, because I'm not sure of the exact size. This should work just fine. I'll get the adjustable on there and just start twisting. Obviously make sure you're twisting it in the correct direction, downward in this case. Now, it's out of the way.
We're going to take the throttle body and the elbow off next. I'm going to remove this rubber hose, and spin it up here out of the way. Then, there's four eight millimeter bolts that are holding the throttle body elbow to the intake manifold. I'll use an extension, an eight millimeter socket, and a ratchet to get at them. Our truck has a body lift, so there's actually a lot of space between here and there. You may have to use some different tools, different length in extensions, or maybe even a swivel socket to access these bolts if you don't have a body lift on your truck.We'll start right here. There we go.
Here's the first one. All right. Now I have all three of the other bolts out, and with the bolts out you can kind of pull it forward. Then, you should be able to disconnect this hose, which you can use a flat tip screwdriver to get. Looks like the rubber is getting to be a little corroded, or a little cracked. Make sure you don't drop any of this dirt down in your intake. You can just set this aside on the back of the engine. Then you should be able to lift your throttle body and elbow right off the truck.
This intake manifold has antifreeze going through it, so we're going to have to disconnect this upper radiator hose to get the manifold off. That means that we have to drain the antifreeze out of the engine and the radiator. Right here on the driver side front of the truck is your radiator overflow bottle. You'll want to open this up and that will allow the antifreeze to come out of the radiator in a much quicker fashion so it won't take so long to drain the whole system out. This is also where you'll be filling it up a little later on.
Right here on the passenger side bottom of the radiator you'll find the valve that opens the radiator up so you can drain all the fluid out. A lot of times you can put a hose on it and you can kind of drain it right into a bucket. If you don't have a hose, it's a little bit messier, but you can usually just put a large bucket underneath it and drain it. This turns counterclockwise, which is the normal direction of a bolt to open it up. Then, as soon as it's done draining, you can tighten it back up again and continue with the job. With the system drain of antifreeze, you should be able to get some pliers on this clamp. Pull the clamp loose. Then, turn the upper radiator hose, and pull it off.
You're probably going to lose a little bit of antifreeze right here, but it won't be too bad as long as you've drained the radiator. On the top of the thermostat housing is this bold and bracket. We're going to have to get this out of the way. Looks like somebody has been here before, because this bolt is in about halfway. I'm guessing it's probably cross-threaded into the hole as well, so we'll start with that one. Oh wow. It's actually quite loose. That's nice.
This is an eight millimeter socket by the way. I am using an extension just because I like extensions. We'll remove these. Then, the third one. With those three bolts out, you should be able to move this bracket and set it aside. I like to keep these bolts in their original holes. That way you don't have to try and guess where all the bolts go when you're done. Right behind the alternator there's a bracket that holds all the spark plug wires in place. These are all rooted kind of all over the place anyways. We're going to remove these three 10 millimeter bolts, take them out of the intake manifold, and we'll get this bracket out of the way at the same time.
You should be able to lift the bracket up out of the way, and we'll move onto the next step. With our body lift, we might actually be able to take this intake manifold out without removing the alternator, but I'm pretty confident that if you don't have a body lift this alternator has to come out, so we're going to go ahead and take the alternator out just to be safe.
Start off with a half inch ratchet on the tensioner of the drive belt. That will allow you to take the tension off of the belt and then remove the belt from the alternator. Just like that. On the bottom of the alternator is a 10 millimeter bolt on each side. There's two of them. Again, I'm going to use a 10 millimeter socket ratchet and a little tiny extension. There you go. Two bolts removed from the alternator. At that point, you should be able to just pull the alternator forward to get it out of the way of the intake manifold.
Now we're going to disconnect the rest of the wiring from the intake manifold starting at the rear passenger side fuel injector. All you have to do is pull up with a little bit of force while you squeeze it. It has a clip on both sides to hold it to the injector. You just grab it with two fingers, squeeze it, and pull out. Same thing every time. On the front, you have these two temperature sensors, and they come out by just squeezing this front tab and lifting up. You can see how the tab works by pushing it down. Same thing on this one. You can just push these out of the way. Then, on this side, it's the same thing. You got the first fuel injector, second, third, and the fourth one is a little tricky. The fourth one. We're going to be disconnecting the fuel lines momentarily, but we want to make sure that there's no fuel pressure in the fuel rail.
Back here on the passenger side, there's a little shrader valve with a cap on it. The first thing you do is pull the cap off. Then, wearing your safety glasses and any sort of protective gloves, what we need to do is we need to basically take the pressure out of the fuel system by pushing down the little shrader valve. This is just like a valve stem on a tire, so if you push it down it's going to release whatever's pressurized the other side.
I'll usually cover it up with a rag surrounded in a screwdriver, and I'll just push it down. Looks like there's not much pressure in there, so at this point I know there's no pressure in the system, so when I disconnect the fuel lines, there won't be any surprises. At that point, you can put the cap right back on the shrader valve. Over here on the rear of the intake manifold on the driver side you have your fuel feed and return lines. Ours are quite rusty. Even with a tool to remove them, they're not wanting to release. That's just because this truck has lived in New England its whole life, and the whole thing is very rusty.
We're going to go about this a different way by taking the fuel rail off of the intake manifold with the injectors. The fuel rail has four connectors to the intake manifold. One's here. One's here. Then, one on this side and one on this side. They all have eight millimeter bolts holding them in. We're going to start by removing these four eight millimeter bolts that hold the rail to the intake manifold. We'll be using an eight millimeter socket and a ratchet. Now we're going to use a short pry bar, or even a flat screwdriver, to pop the injectors out of the intake manifold. It's possible that the rail might come off of the injector as well, but just try not to let that happen. If it does, you can just pop it right back in.
Right, each one a little bit at a time. The fuel rail should come loose. Like I had mentioned, it looks like a couple of the injectors came out. Well, one of them came out, and the other three are in there, but that's actually all right. We just got to pull them out individually and put them back in the fuel rail. The back of the intake manifold is a heater hose. You can use a flat tip screwdriver to get at it or usually an eight millimeter socket. With the hose clamp nice and loose you can pull it off. Then I like to use a pair of pliers like this to put on the rubber hose. You can kind of spin the hose to break it free from its grip on the metal pipe. Here we go. Now that it's loose, you should be able to just pull it right off.
Right here we have a 10 millimeter ground strap to the intake manifold. I'll use a 10 millimeter socket and a ratchet to release it. I'll put the bolt right back in so I don't lose where it goes. We're now at a point where we can begin removing the bolts that actually hold the intake manifold onto the engine. There's five bolts down the passenger side. There's four down this side, and there's two in the front through the thermostat housing. I'm going to use a 10 millimeter extension. Notice I've kind of upped my game to three ace drive instead of the quarter drive that I've been using. I've been using quarter drive the whole time so far. These bolts are a little bit tighter, a little bit longer, so we're going to do a three ace drive with an extension and a 10 millimeter six point socket.
We'll start in the front. There's the first one. As always, if you just crack it loose, you should be able to spin the rest out by hand. It gets really easy after that. There's the second bolt. There's the third one. This is where they start getting a little more challenging to find, especially if you don't have the body lift. This is going to be a little bit tighter on your vehicle. You're probably going to need a different size extension. On to the last one. Looks like this extension is not going to work. Since you can't see it, you just kind of have to feel around until you can get your socket on it. Now that it's loose, should be able to go through and pull all five of these bolts out. Down this one, I'll go to the rear most bolt first. I like to do the difficult stuff first because then it seems like the job just keeps getting easier.
First step is finding it. There we go. Then, there's two in the front right in this thermostat housing. With them all cracked loose, we should be able to just spin them all out by hand. Right here you can see there's an eight millimeter bolt. There's actually a bunch of these right down the center of the manifold pretty much right between each slot of the intake runner. You'll find another eight millimeter bolt. We're going to start removing those with my eight millimeter socket, extension, and ratchet.
I'm back to quarter inch drive by the way because these are usually pretty easy to get out. These ones are a little bit tricky to pull out because they're down in the intake manifold. We might have to fish them out from the side like this. Lastly, there's one on the passenger side all the way in the rear. This is probably going to be the least fun one to take out because it's right against the firewall. If you don't have this body lift, it's going to be a real bear to find. With those eight bolts removed, you should be able to lift the intake manifold right out of the truck. I'll obviously have to move some wires and things out of the way. Right here with this bracket out of the way you can maybe see it better. You can see the intake manifold gasket is actually broken. Most likely this is leaking coolant either internally or externally. Most likely externally.
Actually you can see there's a broken one back here as well. You can see my guess is antifreeze was leaking externally from this engine. We haven't actually driven it much since we've gotten it, so we're not really sure of the condition of it, but you can tell by the broken gaskets that this was not super healthy. You definitely want to inspect your gaskets when you take the intake manifold off.
You'll have a better idea of what exactly was going right and wrong with your engine as far as the intake manifold goes. You want to be really gentle when you pull these gaskets off, because you can see all the dirt and debris around these. You don't want to get any of that down into these intake runner holes in the head, because that will eventually get into your combustion chamber and it'll wear out parts really quickly. You'll want to be very, very gentle pulling these gaskets up. Then, once you do get them out, you're going to want to vacuum these areas out so that none of the dirt goes into the intake of the engine just like that.
Before we vacuum this, we're going to stuff some rags in these holes so that we can make sure that we don't drop anything bad in them. Again, be really careful that you don't get any dirt down in the intake holes, because you don't want the dirt in there. That's the whole point of putting the rag in. Now, we're going to take the vacuum and a flat tip screwdriver. I'm just going to scrape away some of the dirt and debris here and suck it up with the vacuum at the same time. Again, making sure that none of the debris goes down into the holes. You can also use a razor blade to scrape away the corrosion and debris that's on the cylinder heads. After that, I usually go with an abrasive pad to rub against the cylinder head and make sure it's absolutely spotless before we put the intake manifold back on.
Now we're going to spray it off with some brake clean or carb clean just to make sure it's nice and dry and free of debris. I'm going to spray it on the rag first and then wipe the cylinder head. You can see there's still quite a bit of dirt on there. We want to make sure it's as clean as we can have it. In some of the injectors that popped out of the rail, they left their seals inside, so you want to get a hook or a pick and pop these seals out so you can reinstall them on the injectors. It didn't happen to all of them, but just a few of them. I think on the driver side especially.
The injector seal usually just slips right on top of this like that. It pushed right up into the injector rail. As you can see there's still some injectors stuck in this manifold because we popped the fuel rail off and left it in the truck. What we'll do is we'll just wiggle these until they pop out. They are held in there with some force, so you got to kind of get aggressive with them. We've already taken the two bolts out of this because they were also holding the manifold onto the cylinder heads. We should be able to just tap this and have it come off. There we go. As you can see, this is really corroded. That's why it was stuck on there so well. You can see even the thermostat is stuck in there.
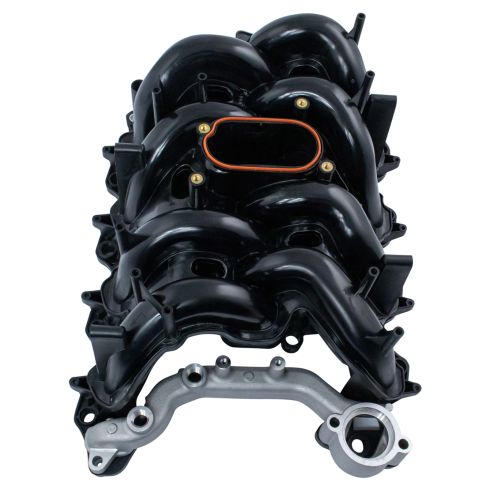
Luckily, we're not reusing that. We have to reuse this piece, so we'll clean this up before we reinstall it. We'll make sure to use a new thermostat and a new thermostat gasket. We want to reuse these two temperature sensors, so we're going to be taking those out with a 19 millimeter wrench. Should be as easy as putting this wrench on and turning it. We'll see if that's the truth, and second one. You'll see that the old manifold and the new manifold look a little different. That's because the new one is made out of plastic. This is the upgraded version with the aluminum crossover pipe but the plastic large section. The parts that you put the thermostat and the temp sensors into is obviously aluminum because that's where all the coolant flow through. That's the section you need to be aluminum.
It comes with a thermostat. It also comes with some parts for the back. In the back where the heater hose goes in, you have two different options. You can plug your heater hose into it, or on some cars, you can actually just put a plug right into it and seal off that heater hose port if yours is not needed. It also comes with brand new gaskets for the top and the bottom, and it will fit and function just like the original. It even comes with the torque specs on it, and each bolt is actually numbered so you know which order to torque all the bolts in.
Lastly, it comes with this, which is if your car has a heater hose in the front, it will screw into one of these ports instead of having a coolant temp sensor there. It really depends on what type of vehicle this is being bolted onto. In our case, for the F150 truck, we're not going to be using this part, because we have temp sensors that go in each port. We're now ready to install the two temperature sensors in this crossover pipe. I'm going to put a little thread sealant on the threads of the temp sensor and begin to screw it in. I'm going to do the same with this one. Then make sure you start by just threading it in by hand so you make sure it goes in straight.
Then you can use a wrench to tighten it up. The new manifold comes with a new thermostat. We're going to wait until we get this installed in the truck so that we can tighten the two thermostat housing bolts down and torque down to spec. On the rear passenger side of the manifold it comes with two different fittings. One is a plus, so if your heater hose goes in the front of the manifold then you'll just use this plug. It actually comes with a rubber O-ring for it as well. In our case, we're putting the heater hose on the rear. So this just sits right here. It acts like a grooved end of a hose so you can just put the hose on, put a clamp on, and then you're good to go.
On the bottom side of the manifold, since this manifold actually fits many different Ford cars and trucks it comes with two different size dowel pins that sit inside these holes. You can see one is longer than the other. Depending on what type of lower intake manifold you have, the part that is still on the vehicle that will tell you which dowels to use. You look at the part number on the lower intake manifold and you match it up to the bag. That'll tell you which ones to use. Our lower intake manifold, the part number starts with F65E in our case, so we're going to be using these set of dowels.
It's easy enough to push them right into the hole, and once they're pressed in, we're ready for the next step. For the cross over pipe, you can use the original screws that were in there. These are the screws that are going to hold in the alternator bracket. For all of the upper screws, it actually comes with brand new self-tapping screws. Since the manifold is plastic it's meant for these self-tapping screws and not the original 10 millimeter ones from the aluminum manifold. Any time you use a plastic manifold you're going to want to use these self-tappers, because they will actually screw in a whole lot better than the normal threaded ones. We're now at a point where we can push the old injectors right back into the manifold.
Ideally, they're just going to slide right in here, but to make the job easier, we're going to take a little bit of oil and put it on the end of the injector just like this. That will hopefully allow us to push this right down into the hole like that. Without the oil, it's a little more difficult to push down. Then we'll just continue popping these into the other side making sure that the seals are lubricated before you push them in to make the job a whole lot easier. You'll also want to do the same with the O-rings that go in the tops of the injectors. I like to put a little oil on them so it'll slip into the injector rail nice and easy. You won't have to fight it. Before putting the intake manifold on you don't want to make the mistake of leaving all these towels in here. Many people have done that. You want to slowly pull these out. You can see some dirt came out with them. We're going to vacuum that up before we put the manifold on. Okay, we're going to take the manifold and drop it onto the engine. We'll have to wiggle some of the vacuum hoses and fuel rails out of the way so it sets down flat. With the manifold sitting on the truck, you can now start installing the eight center lower intake manifold bolts.
On this intake manifold, we need to get these bolts down into these holes, but you need to do it in an organized fashion, so what would normally happen is you would put this in here. You'd put it down in the hole and then the bolt will fall out and it will fall somewhere down in the intake. Then, you have to fish it out. There's a couple ways you can hold the bolt into the socket. The first way is with a piece of tape. Of course, wearing gloves is not helping me. If you take a piece of tape and you kind of put it on the end here and you stuff the bolt in, that will hold it. Then, you can do something like this. Try and line it up as best you can. Then now that it's in there, all you have to do is fish the tape out, which is a little bit easier than finding the bolt, because the bolt, when you put it down in here the bolt is going to fall some place where you can't find it. With the tape, it usually sticks to something right there, so you can grab it with a pair of pliers or sometimes just your fingers.
The other method is a little bit greasier, because it's with actual grease. If you just take some really thick grease and put it on the end of the bolt. Don't be afraid to use a whole lot of it. Then, you stick it in the socket. That will hold it as well. Again, you could drop it down in the hole, line up the hole like so. Get it in there, and then you can just pull it right off. Those are two different methods that you can use to hold the bolt into the socket as you drop it down a blind hole and you don't want to lose it in the intake.
Now we are going to place all of these bolts down these holes one at a time, hopefully not dropping any down below the intake, because that is not much fun to get out. We're going to try the grease method of holding the bolt into the socket, just going to put a whole bunch of grease on the head of the bolt. Stuff it in the socket. Then, hopefully, land it right on the spot where it needs to live. We're now ready to torque the center lower intake plenum bolts, the ones we just dropped into these little holes.
You have to torque them in a specific sequence, which starts over here. You have number one sort of in the center on the passenger side. Then number two. Then number there in this hole. Number four. Number five passenger side. Number six is on the driver side. Number seven is up here in the front. Number eight is the last one right in the back. You have to torque them at 18 inch pounds in that sequence. We'll start right here.
All right, with the first torque sequence done, now we're going to go back and do the same thing but at a higher torque spec. It's going to be 106 inch pounds. Make sure you use inch pounds and not foot pounds, because it's very different. All right, so we'll line up the intake with the holes and the heads. I'll just start dropping the bolts in the holes. Two of the bolts that hold the intake manifold down are the thermostat housing bolts, so we're going to drop in the thermostat. The intake manifold comes with a new thermostat and seal. We're going to drop the seal in. Then, we cleaned up the thermostat housing. This was all covered in corrosion before. I just took a wire brush to it to clean it up and made it a little less gross.
Then the two longest bolts that are in the manifold go through right here. We'll just hand tighten these things to get it in place. Then, we'll come back around and do the whole torque sequence to the intake manifold. Now, we're going to torque the exterior bolts of the intake manifold. These also have a very specific torque sequence. Each one on this manifold is actually numbered, which is really helpful. Right here on the manifold it actually says that you torque it to 18 inch pounds the first time.
Then when you're done torquing all the bolts to 18 inch-pounds, then you do the 18 foot pounds. They do come with a specific order, so right in the center of the passenger side is the first bolt. That's number one. Then, you go to the opposite side, number two. More towards the front on the passenger side is number three. Then, across is number four. Passenger side slightly behind the center is number five. Driver side is number six. Number seven is up front in the crossover plate. Number eight is the driver side most bolt of the thermostat housing. Number nine is all the way in the back passenger side. Number 10 is the driver side far rear. Then, number 11 is this other thermostat housing bolt.
We're going to torque them in that sequence for the first round at 18 inch-pounds. Now we're going to go around for round two, which is 18 foot-pounds. Again, we'll start with the first one, which is number one right over here. We're going to put the fuel rails back on the injectors, but I want to make sure that they go on smoothly, so I'm takin a little oil and I'm putting it on all the injector seals again to make sure they're nice an slippery. That will allow us to push the injector rail right onto the injectors without a whole to of drama. I can now hopefully take this fuel rail and push it down on top of the injectors. Try and do it one at a time. It'll make it a little easier. There we go. Now it's in place.
The new intake manifold comes with new screws for this, because it is a plastic manifold, so they give you these self-tapping screws. We'll take one of these ones, the 10 millimeter head, and we'll put it right in this hole. We'll do the same for the rear right here. Then, we'll take our 10 millimeter socket and ratchet and we'll tighten those up. Of course, making sure the injector rail is pushed all the way down. Same process. We already lubed up all the seals, so now we're going to take the fuel rail, put it on top of the injectors, make sure they're all aligned right.
Start with the rear most one and kind of work your way down the line. Once they're on, you can take your 10 millimeter head screws, make sure you're pushing down on the fuel rail. Tighten it up.
Next we can install the connectors onto the fuel injectors. They simply just push right down onto the injector. The driver side rear is probably the most difficult one to do, so I got that one out of the way first. Then, you can just kind of go down the line and take the connector, push it down on the injector, and you can see it goes on just like that. It only goes on one way. You can see it has a notch on one side of it, so you can't put it on upside down or backwards or anything like that. It only goes down one way.
Now, we'll move onto the passenger side. You can see the injectors actually turn, so we'll just put them kind of in the right position to where they live happily. That's probably about right. The heater hose. Just make sure you have your clamp on it. Goes on right in the back here. It should slide down over the intake manifold. Make sure it's seated on there well. Then, you can slide your clamp over it using an eight millimeter or flat tip screwdriver. This one looks like I have to loosen it a little bit to get it down over this. Then, I can tighten it up.
We're going to be installing the throttle body and throttle body elbow onto the intake manifold next. Before we do that, we have to make sure this is a nice clean sealing surface. You can see it still has some old gasket on it. We're going to take a razor blade and just sort of scrape off the old gasket. After you scraped it with a razor blade, you can go back with an abrasive pad and just kind of go over it one more time to make sure it's nice and clean. Make sure there's no more old gasket left on it. Once you're done cleaning it with the abrasive pad, we'll make sure that we get all the debris out of there. You can use some carb cleaner or brake clean to kind of get it out there. Just make sure you don't get any carb cleaner or brake cleaner near the throttle body itself, because you can actually damage the coating on it.
If you're going to use any sort of cleaner, keep it down here in the elbow itself. Otherwise, you can just kind of use your hands and make sure you get all the debris out. All right, so now we're going to place the throttle body and the throttle body elbow back on the intake. Going to make sure that you hook up the EGR tube, and it belongs right in this hole right here, so we're going to place it in that hole first. Then you can line up the throttle body on the manifold itself. Then, we'll take some of the screws that hold it in and start putting it back in place. With this bolt, we're going to put the ground strap here on the throttle body.
Now, just tighten the throttle body down. You don't have to put a ton of pressure on it, because it's only a plastic intake. Doesn't have a whole lot of pressure going through it anyways, so you can just tighten it down by hand. You should be all right. We're now at a point where we can put the alternator back in place. Have to wiggle this bracket up and out of the way. There's two long bolts. Well, they're longer than the intake bolts at least. 10 millimeter heads.
We're going to slide them through the bottom of the alternator and into the threaded holes of the engine. Now you can take your 10 millimeter socket and ratchet and tighten these bolts up. On top of the alternator you have your three bolts that hold this bracket to the intake manifold, so we can take these bolts right out and then we can bolt in the bracket. With a 10 millimeter socket extension and a ratchet you can put the bolts in and tighten them up.
Now we're going to put the belt back on the alternator. We'll need our half inch drive ratchet to put in the tensioner. Hopefully the belt didn't fall off while you did the intake and it's still in the right place. You can just pop it right back on. If not, you can read the diagram on the sticker under the hood to see the direction of how the belt is installed on the front of the engine.
The two temperature sensors right here need to be plugged in next. We just folded the harness out of the way when we took it apart, so we'll just take these and we'll put them right back to where they belong. Looks like this one is backwards. All right, that one snapped on. Snap this one on next. You'll hear it click as soon as it's on. Then, if you want to give it a little pull to make sure it's snapped on, it's usually a good way to test it.
Now we have this power steering bracket that goes from the power steering reservoir over to the thermostat housing. We'll reinstall that. We'll take these bolts out that we put back in place so we didn't lose them. Luckily we did not lose them. We'll put the bolts right back where they belong. They are eight millimeter bolts, so we'll use a ratchet to tighten them up, and an eight millimeter socket of course. Over here on the throttle body there's actually a few hoses that we need to hook up. The first one is this giant one in the back. It just pops right on.
We need to screw this thing into the EGR valve. This is the EGR crossover pipe is what it's usually called. We need to get it back into its home in the EGR valve. It's going to take some fiddling to get the threads lined up I think. It usually does at least. I'm going to use our adjustable wrench to tighten it up. We're now going to reinstall this bracket with a couple of screws that came with the intake manifold. These are the ones with 10 millimeter heads on them. That means we use a 10 millimeter socket, an extension, and a quarter drive ratchet.
We're now going to connect these two hoses back to the throttle body. We'll take this nut off that we had reinstalled loosely earlier. Slide the rubber hose onto the throttle body, and then slide the bracket over. Then, we'll tighten it up with a 10 millimeter socket, ratchet, and extension. Then we can do this other hose with the green fitting on the end of it, and it goes right up here to the top of the throttle body. Just slides right over.
Next we have this series of vacuum hoses that we need to hook up. On the passenger side there's one plug on the bottom of the throttle body elbow. It just pops right on. Then, we can run the rest of these under this bracket and over to their destination. The green one goes right on top of the EGR valve. Red one goes to the fuel pressure regulator right here. Then, there's a brownish color one that goes up to this valve right here near the brake booster. Now we have the throttle and the cruise control cable that we're going to set into place with a couple new screws from the kit.
We'll start them off by hand just to get us in the right spot. Then, we'll use a 10 millimeter socket and ratchet to tighten them down. Then, with the bracket in place you can hook the throttle body cables back on. There's one. The other one goes up over the top. Then, it clips right into this hole right here just like that. Along with that, there's a spring that needs to be hooked in. That hooks in just like this. That's your return spring for the throttle body. That way when you push your gas pedal the throttle body always snaps back. Over on this side we have to hook the cables into the clips so they're in the right spot.
We have a couple of connectors here that we have to hook up. We'll just push them right into place like that. Give them a little tug to make sure they're clipped in properly. You'll hear the click as soon as you pop them on. All right, here's the radiator hose. You can see we cleaned up the thermostat housing neck, so we're going to slide the radiator hose right over that. Then, we'll use some pliers to set the hose clamp in place. This usually takes a couple of tries. Oh, not bad first try. Okay, maybe that was the second try. Make sure it's nice and tight, and that's right where it should be. It's resting right here on the hose rest, so we know it's in the right spot.
Right here there's a green and white vacuum connection that we actually forgot to hook up earlier, so we'll just snap that into place on this valve. We're now ready to put the intake air hose back on. Right here on the bottom there's a hose that you need to connect, goes over to the valve cover. It's a breather for the valve cover. We want to make sure that is connected before we get everything into place. Then, up here, there's a larger hose right here that we also need to connect. It all kind of needs to fit together at the same time, so it's a little tricky. With that in place, we can tighten up this clamp and then right here we have our intake air temp sensor. Snap that into place.
On the bottom side of this is two little dowels that you need to push into the rubber grommets right here. We'll align those and snap them into place. All right, we're going to put the cover on so we can take these screws out that we put back in here earlier. Set this gently into place. Once they're all finger tight, you can use your 10 socket and ratchet to tighten it up. Now we can reconnect the battery. You can use your 11 millimeter socket to tighten it up, although yours might actually be a different size depending on the terminals that are on your battery. This is where you're going to put your new antifreeze when you need to fill the engine back up again.
We are actually going to use ours empty because we're going to be doing some other work to this car, but you'll want to fill it up and run the vehicle with the cap off. That will let the air bubbles come out. Then, once it's starting to get warm, you can cap it off, shut the vehicle off, let it cool down. As you start it, warm it up, and turn it off, you'll work out all the air bubbles. You may need to add a little bit of antifreeze in the future once it burps out all the bubbles. Just keep an eye on it in the days ahead, and at that point you should be all set.
Thanks for watching. Visit us at 1AAuto.com for quality auto parts, fast and free shipping, and the best customer service in the industry.
Shop Products

How to Replace Intake Manifold 1999-2006 Chevy Silverado
Watch this video and learn how to replace the intake manifold on your 99-06 Chevy Silverado. You can do it yourself with help from 1A Auto.
