How To Replace Upper Control Arm 2004-09 Ford F-150
Created on: 2014-12-08
See the steps involved in replacing the upper control arm in your 04-09 Ford F-150.
-
It's recommended to seek an alignment after finishing this repair
step 1 :Removing the Wheel
- Pry off the center cap with a flat blade screwdriver
- Loosen the 21mm lug nuts with the vehicle on the ground
- Raise the vehicle with a floor jack
- Secure the vehicle on jack stands
- Remove the lug nuts
- Pull off the wheel
-
step 2 :Loosening the Outer Tie Rod
- Turn the wheel
- Remove the 21mm nut from the outer tie rod
- Leave the 21mm nut on a couple threads
- Hammer the knuckle until the outer tie rod loosens
- Set the outer tie rod off to the side
-
step 3 :Loosening the Strut
- Remove the 18mm nut below the sway bar link with an 18mm wrench and an 8mm socket and ratchet
- Hold the 20mm nut on the bottom of the strut with a 27mm socket and ratchet
- Loosen the 30mm nut on the bottom of the strut with a breaker bar and piece of pipe
- Remove two of the 15mm nuts on the top of the strut
- Leave the other 15mm nut on the top of the strut by a few threads
-
step 4 :Loosening the Axle
- Remove the hub nut cap with a pair of pliers
- Remove the 13mm hub nut
- Replace the 13mm nut by a few threads and tap the nut with a hammer to push the axle through
- Remove the nut
- Have an assistant hold the brakes
- Remove the 12mm bolts from the axle with a 12mm 12-point socket
-
step 5 :Removing the Axle
- Remove the 21mm nut from the bottom of the upper control arm
- Thread the 21mm nut on
- Loosen the upper control arm with a hammer
- Remove the nut
- Manuever the wheel knuckle to the side without straining the brake lines
- Remove the axle
-
step 6 :Removing the Strut
- Jack up underneath the control arm
- Remove the bolt on the bottom of the strut
- Pry the strut out and remove it
-
step 7 :Removing the Control Arm
- Remove the nuts on either side of the upper control arm with a 21mm wrench and 21mm socket and ratchet
- Leave the 21mm bolts on by a thread
- Hold the upper control arm in place and remove the bolts
- Remove the control arm
- Step 8: Installing the Upper Control Arm [7:26]
- Insert the upper control arm into place
- Insert the 21mm control arm bolts in place
- Preliminarily tighten the 21mm nuts
-
step 8 :Installing the Strut
- Insert the strut into place
- Insert the 15mm nuts to the strut to hold it in place
- Pry the strut into the lower control arm
- Insert the bolt into the strut
- Preliminarily tighten the nut on the bolt
- Tighten the 15mm nuts
-
step 9 :Reinstalling the Axle
- Insert the axle into place
- Insert the upper control arm into the wheel knuckle
- Tighten the 21mm nut
- Tighten the 12mm bolts into the axle
- Torque the 12mm nuts to 60 foot-pounds in a crossing pattern
- Tighten 13mm hub nut
- Torque the hub nut to 20 foot-pounds
- Tap the hub nut cap into place
- Re-clip and realign any lines that may have come undone
-
step 10 :Reinstalling the Outer Tie Rod
- Push the outer tie-rod up through the wheel knuckle
- Replace the 21mm nut
- Torque the 21mm nut to 111 foot-pounds
- Tighten the bolt on the upper control arm
- Torque the upper control arm 21mm nut to 111 foot-pounds
- Tighten the 18mm nut to the sway bar link
- Jack underneath the control arm
- Torque the lower strut bolt to 150 foot-pounds
-
step 11 :Reattaching the Wheel
- Slide the wheel into place
- Start the lug nuts by hand
- Tighten the lug nuts preliminarily
- Lower the vehicle to the ground
- Tighten the lug nuts to 120 foot-pounds in a crossing or star pattern
- Reattach the center cap
Tools needed
-
13mm Socket
A Piece of Pipe (for leverage)
Torque Wrench
Hammer
15mm Socket
Rust Penetrant
Pry Bar
Jack Stands
27mm socket
Flat Blade Screwdriver
12mm 12-Point Socket
8mm Socket
30mm Socket
Ratchet
Floor Jack
Brought to you by 1AAuto.com, your source for quality replacement parts and the best service on the Internet.
Hi, I'm Mike from 1A Auto. I hope this how-to video helps you out, and next time you need parts for your vehicle, think of 1AAuto.com. Thanks.
In this video, we're going to show you how to replace the front struts. This is a 2005 Ford F-150. It's exactly the same for any 2004, the new body style, through the 2008, and probably the same for 2009 and up. We show you on the driver's side, but the passenger's side is the same procedure and we do recommend you replace them in pairs. You'll need new front struts from www.1aauto.com, sockets from 8mm up to 30mm, a pipe or a breaker bar for leverage, a 12mm 12-point socket, 18mm and 21mm wrenches, pliers, pry bar, flat blade screwdriver, torque wrench, hammer and jack and jack stands.
Start off by prying off the hubcap. Then loosen up these lug nuts using a 21mm socket and ratchet and a piece of pipe for some extra leverage. Then raise the vehicle, and remove them the rest of the way and take the tire off. You want to life the whole front of the car up and put it on jack stands with both wheels off the ground. Now pull the wheel off. Now turn the wheel, and remove this 21mm nut at the top of your outer tire rod. Then once you remove it, you want to just put it back on just a couple threads.
Now hammer the knuckle until the outer tire rod drops down. Now you can remove that nut, and just set your outer tire rod off to the side. Underneath your control arm, on the bottom of the sway bar link you want to just remove that nut. You can try doing it with an 18mm ratchet, but most likely it's going to start spinning, and the solution for that is an 18mm wrench and an 8mm socket and ratchet. Then you can just remove that nut. You want to spray the bolt that holds the bottom of your strut, and then a 30mm socket. I'm using a breaker bar and a piece of pipe and break that free. Then once you get it going, the bolt will most likely spin. Hold the bolt end with the 27mm socket and take that nut off.
Then spray these 15mm nuts at the top of the strut with some penetrating fluid, and remove two of them all the way. The other one, you just want to leave on a few threads. Using a pair of pliers, remove this cap. Then loosen up and remove that 13mm nut. Then you want to just put it back on just a few threads. Tap it with a hammer and make sure it goes through. Then remove the nut the rest of the way. On the other end of the axle, there's a series of 12mm bolts. You just need to use a 12mm 12-point socket, and then a pry bar to hold the wheel. Just loosen those up.
You can also just have a helper get in the vehicle, and hold the brakes to hold the axle in place. When you remove that last one, just push the axle down to the side. Now spray this 21mm nut up here on the bottom of your upper control arm. Then remove that nut, and put it back on just a few threads. Now with the nut back on a few threads, just hammer the wheel knuckle until the upper control arm loosens up. Now just lift up on the wheel knuckle, and then remove that nut. Now you can just set the wheel knuckle off to the side carefully.
You don't want it to strain those brake hoses. Then just tap the axle and pull it out of the wheel knuckle. You want to feed the axle towards the left side towards the front of the vehicle. Then just angle it down, and pull it down and out. Now, we're just going to check up underneath the control arm a little bit. The vehicle is still supported on the jack stands under the frame. Remove the bolt from the bottom of the strut, and you can see the struts in there are still loose. Make sure the nuts on the top of the strut are removed. Pry the strut out.
Up top is the old strut. Below it is the new one from 1A Auto. You can see they're identical and they'll fit exactly the same. Feed your strut up into place. Push those studs through. Then just replace those nuts at the top to just hold it. You don't need to tighten them up right now. You're just putting them there to hold it in place. Then pry the bottom of the strut back into the lower control arm. Then push that bolt back through. You just make sure it's all the way in. Then replace the nut and tighten it up preliminarily. We'll just fast-forward as Mike goes back over those 15mm nuts making sure they're tightened. Then you can remove the jack.
Feed your axle back into place. You want to feed it back in the same way that you pulled it out. Then just angle it back down into the hub and push it in. Now you can take your upper control arm and push it back into the wheel knuckle. Once you push it through, just put that 21mm nut on there to hold it in place. Line up the axle and replace those 12mm bolts. We'll fast-forward as Mike does this. Now tighten each of those to 60 foot-pounds in a crossing pattern. You can see we torqued that one. Then you want to turn the wheel until you get the one on the opposite side. Then torque that one. You want to just repeat this process with each of them. Now replace this 13mm nut and torque it to 20 foot-pounds. Then replace that cap and just tap it into place.
If any of the lines on the back came undone, make sure you push them back in and re-clip them. Then push your outer tire rod up to the wheel knuckle and replace the nut. Then torque that to 111 foot-pounds. Now just tighten up this bolt on your upper control arm. If the stud spins, use a 10mm socket and ratchet. Then you want to torque this to 111 foot-pounds. Then tighten up the nut on the bottom of your sway bar link. Jack up underneath the lower control arm to simulate a wheel being in place. Torque the lower strut bolt to 150 foot-pounds.
Now we'll fast-forward as Mike replaces the wheel and replaces the lug nuts and tightens them preliminarily. Then he lowers the vehicle and tightens them the rest of the way. Then torque each of them in a crossing pattern to 120 foot-pounds. Then just replace your hubcap and you're all set.
We hope this video helps you out. Brought to you by www.1AAuto.com, your source for quality replacement parts and the best service on the Internet. Please feel free to call us toll-free, 888-844-3393. We're the company that's here for you on the Internet and in person.
Shop Products


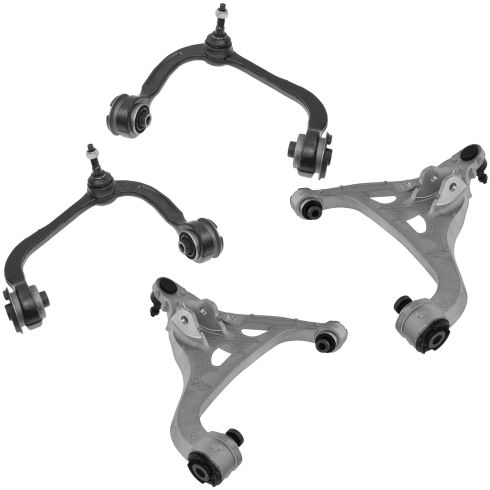
Ford F150 Lincoln Mark LT Front 4 Piece Control Arm with Ball Joint Set TRQ PSA62590
Part Details:
- 4 Piece
- (2) Front Lower Control Arms with Ball Joints
- (2) Front Upper Control Arms with Ball Joints
How to Replace Lower Control Arm 2000-06 Chevy Suburban 1500 SUV
Watch this video to learn how to replace a loose, rusted, or damaged control arm. The experts at 1A Auto will show you how to replace the lower control arm on your 00-06 Chevy Suburban or Silverado, or GMC Yukon or Sierra.
