How To Replace Turn Signal Wiper Switch Chevy Suburban 1988-98 - PART 2
Created on: 2010-07-20
Watch this video to learn how to remove and replace the wiper and turn signal switch on your 88-98 Chevy Suburban. Part 2.
-
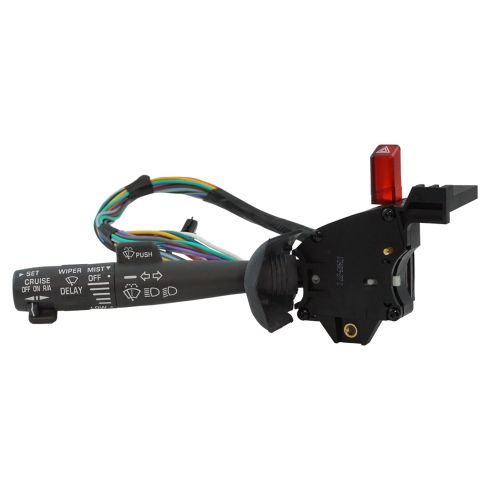
step 1 :Install the new signal wiper switch
- Thread the wiring harness down through the steering column area.
- Hand tighten the screws on the switch just to hold it into place while you work on the wiring.
- Feed the wiring harness down and into place, keeping your wires tidy and well kempt.
- Plug in the switch harness into the main wiring harness.
- Bolt the connector onto the bracket.
- Reconnect the battery terminal with your 8 mm wrench and test all the wiring on the console.
- Disconnect the negative battery terminal with your 8 mm wrench again.
- Use wire tires to tidy up all the wiring prior to reassembly.
- Tighten up the screws for the switch.
-
step 2 :Reassemble the steering column and steering wheel.
- Use your T25 Torx bit to anchor the steering column cover.
- Clip on the bottom plastic console cover and bolt in the four 7 mm screws.
- Thread the air bag harness through the steering wheel and bolt on the 21 mm nut.
- Plug in the horn button.
- Install the air bag, plugging in the harness before clipping it into place.
- Replace the air bag fuse and replace the fuse box cover.
- Reconnect the battery terminal with your 8 mm wrench.
Tools needed
-
Flat Blade Screwdriver
8mm Wrench
7mm Socket
10mm Socket
Ratchet
T25 Torx Driver
4mm Socket
Brought to you by 1AAuto.com, your source for quality replacement parts and the best service on the internet.
Hi, I'm Mike Green. I'm one of the owners of 1A Auto. I want to help you save time and money repairing and maintaining your vehicle. I'm going to use my 20 plus years of experience restoring and repairing cars and trucks like these to show you the correct way to install parts from 1AAuto.com. The right parts installed correctly, that's going to save you time and money. Thank you and enjoy the video.
Part two of two, replacing the multi-function switch on this '99 Suburban, same as basically, any '95 to 2000 truck or heavy duty truck and '95 to '99 SUV. We'll be covering the installation. If you want to see the removal, just check out other videos. A quick look at the tools you'll need, various millimeter wrenches, flat blade screwdriver and a Torx bit.
Okay. Here we are. Here's our original switch, a new switch from 1A Auto. Obviously, it's got this little mesh on here. You see everything is the same, it's going to bolt up all the same. One thing, they did try and do is you can see on our original here, it would appear that you had a bigger harness for that break switch. Actually, I'm just going to pull it out and you can see we got plenty of harness on this switch. I'm going to feed the switch down through. I'm going to actually, roughly bolt this on first, just so I have it right, make sure I have stuff on the right place. Start my upper screw and start my lower screw. I'm going to take my harness, I'm going to feed it along with the other one and see if I can get this conduit back to where it should be. This control wire, you try to find a place. Harness and push in. Got on the other side, take it, push it in so that's all together now.
It's always good to try and put things back together the way they came apart because the factory hasn't had an idea what they were doing, keep were rubbing together, wires were getting chafed or whatever. I'll take my cruise control wire and I'm going to go in front of this. Pull this bar here, push it over. Grab hold of it on the other side of the cone, like push and pull harness stuff and over. Plug in. I have my lock and I'm going to reach up in behind and before I take care of this, I'll video it. Put into place. Now, up underneath here, I'm going to try to take my connector. I'm just kind of working my connector right in to the other end. Now, I'll tighten up that bolt and then bolt it back on to the bracket.
I've bolted my connector back in and I bolted the connector on to the bracket to keep it steady. We've connected the battery and what I'm going to do is do a quick test here, first is the emergency lights. How is it been working. Let me see how this works, the way it works. The watches are working. Okay. High beam. Okay. The one thing I can't really test is the cruise control. First, I'm going to take a couple wire ties and kind of restore this back to the way it was, all wired tied together. This tube up in here first. Make sure that's on well. A 10mm screw, make sure this one goes up into the right spot. The bottom, it kind of goes in and there's two hooks. One of them broken off on this. You kind of go in and make sure it hooks underneath, and make sure the shifts are bolted on there, correctly. That two T25 screws from the bottom here.
I'm going to take this, connects at a dock and then you got basically little pin here that go into slots. A four 7mm screws. Before we put the steering on, we're just going to put the tilt lever back in, pushes right in like that. There's a really small mark, I'm not sure you can see it or not, on the steering column, because you want to line up that arrow with the mark to get wheel straight. It's a whole lot easier to take it off, you just bolt it on, 21mm socket. Take your horn button and you have a little clips on it. Basically, just want to push it in and get it to stay. Now, your airbag, easy enough, clip it on, lock it. Before we connect the battery, we put the fuse back in for the airbag. Put the panel back on. There you go. Now, we'll connect the battery, make sure the horn works. Take it for a test drive, make sure the cruise works and everything is all set.
We hope this helps you out, brought to you by www.1AAuto.com, your source for quality replacement parts and the service on the internet. Please feel free to call us toll-free 888-844-3393. We're the company that serves you on the internet and in person.
Shop Products
How To Replace Rear Wiper Switch 1995-99 Chevy Tahoe
How to repair, install, fix, change or replace a broken, damaged, faded, worn or faulty rear wiper switch on 95, 96, 97, 98, 99, Chevrolet Tahoe, Suburban or GMC Yukon
