How to Replace Turn Signal Wiper Switch 2002-08 Dodge Ram
Created on: 2016-06-03
Watch this video and learn from our experts how to replace the turn signal wiper switch yourself
-
step 1 :Removing the Turn Signal and Wiper Switch
- Tilt up the lever on the bottom left of the steering column
- Remove the three T20 Torx screws on the bottom of the steering column
- Remove the T20 Torx screw at the back of the steering column lever
- Remove the tilt steering column lever
- Remove the gear selector cover
- Remove the upper steering column panel
- Remove the lower steering column panel
- Insert the key into the RUN position without starting the vehicle
- Turn the wheel about 9:00 until it rests
- Remove the two Phillips head screws behind the steering wheel on the column
- Push the safety tab on the multi-function switch and disconnect the wiring harness
- Lift up the switch cover
- Pull the switch out
-
step 2 :Installing the Turn Signal and Wiper Switch
- Snap the switch into place
- Connect the multi-function switch
- Tighten the two Phillips head screws behind the steering wheel on the column
- Turn the key to the RUN position and check the functions
- Insert the upper and lower steering column panels into place
- Insert the tilt column lever into place
- Tighten the T20 Torx screw to the tilt column lever
- Tighten the three T20 Torx screws to the bottom of the steering column panels
- Insert the gear selector boot into place
Tools needed
-
T20 Driver
Phillips Head Screwdriver
Brought to you by 1AAuto.com, your source for quality replacement parts and the best service on the Internet.
Hi, I'm Mike from 1A Auto. I hope this how-to video helps you out, and next time you need parts for your vehicle, think of 1AAuto.com. Thanks.
In this video, we're going to show you how to install a turn signal and wiper switch. This is a 2008 Dodge Ram, but the procedure is pretty much the same for 2002 to 2008. Items you'll need are a new switch from 1AAuto.com, a T20 Torx driver, and a Phillips screwdriver.
Pull the lever on the bottom left only steering column. Tilt it all the way up to access the three T20 Torx screws on the bottom of the cone.
Using a T20 Torx screwdriver, remove the three screws. Remove the T20 Torx screw at the back of the tilt steering column lever. Pull off the tilt steering column lever.
Remove the rubber cover on the gear selector by prying out on the front edge. Slide it up onto the gear selector out of your way.
Carefully separate the upper and lower halves of the clam shell on the steering column. Place them off to the side.
Put the key into the ignition and into the run position without starting the vehicle. Turn the wheel until it will rest facing 9:00. Shut the key off so you can access these two Phillips-head screws, and remove them.
On the back of the multifunction switch, push out on the red safety tab, squeeze it and remove the connector. Lift up on the cover on top of the switch. Pull the switch out to the side.
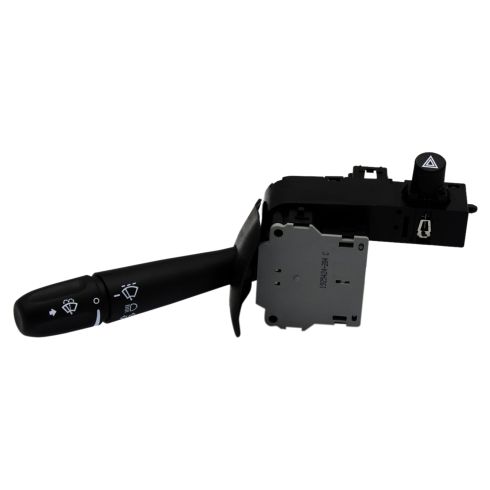
Here we have our old part from the vehicle, and our new part from 1AAuto.com. Exact same part, same size, same mounting locations, the same graphics on the switch. The new switch is a lot brighter, looks nice and fresh.
There's a small difference here with the reset for the turn signals. Ours is a different color, but it still fits in. We have the same connector on the back. This new part from 1A Auto is going to go right in, direct fit like your original part, and will fix you up right.
Line up your new switch. Slide it until it snaps into place. Reconnect the connector on the back of the switch. Pops in, followed by snapping the safety into the locked position.
Reinstall your two Phillips head screws. Just before we go too far reassembling the steering column, we're going to take two seconds to turn the key to the run position. Make sure that all your functions work, turn signals, high beam switch, hazards, windshield washers, and all the various wiper speeds before reinstalling the clam shell on the steering column.
Put the lower half of the steering column clam shell back into position. Make sure it snaps around the ignition cylinder for the key.
Reinstall the top half of the clam shell. Be sure that this dust cover sits inside of the clam shell and your switch, and that the hazard button sticks through properly. This all snap back into place.
Reinstall your tilt column lever. Make sure that the two plastic studs on the back of the lever line up with the holes on the steering column.
Reinstall your T20 screw. Reinstall the three T30 Torx screws.
Reinstall the rubber dust cover for the gear selector by sliding the gear cluster side into the clam shell, snapping the side closest to you back into place.
Thanks for tuning in. We hope this video helped you out. Next time you need parts for your car, please visit 1AAuto.com. Also check out our other helpful how-to and diagnosis videos.
Shop Products

How to Replace Turn Signal Switch 2007-13 Chevy Silverado
Check out this video to learn how to replace the combination turn signal switch on your 07-13 Chevy Silverado!
