How to Replace Turbo Bypass Solenoid 2009-14 Ford F-150 3-5L EcoBoost
Created on: 2019-06-05
Watch this video to learn how to replace a faulty turbo bypass solenoid on your 09-14 Ford F-150 with a 3.5L EcoBoost.
-
step 1 :Removing the Turbo Bypass Solenoid
- Remove the wheel and raise and support the vehicle, if necessary
- The turbo bypass solenoid can be found rearward of the passenger side upper control arm
- Disconnect the solenoid electrical connector
- There are three hoses connected to the solenoid
- Loosen and slide away the hose clamp that is easiest to reach on each of the three hoses using pliers
- Remove each of the three hoses at whichever connection is easiest to reach using a screwdriver to gently slide the hose off the fitting
- Remove the turbo bypass solenoid by sliding it off the mounting tab
- Remove any hoses still connected to the solenoid to transfer them to the replacement solenoid, taking note of which fitting the hose was connected to
- Remove the fabric heat shielding from the solenoid to transfer it to the replacement solenoid
-
step 2 :Installing the Turbo Bypass Solenoid
- Reconnect to the replacement solenoid any hoses that were removed with the old solenoid
- Place the replacement turbo bypass solenoid into the fabric heat shielding
- Reconnect the remaining hose connections
- Replace the turbo bypass solenoid onto the mounting tab
- Reconnect the electrical connector
- Replace the wheel if it was removed
Tools needed
-
Slip-Joint Pliers
Needle nose pliers
Pocket Screwdriver
Hey friends. It's Len here at 1A Auto. Today I'm working on a 2011 Ford F150. We're going to be doing a turbo bypass valve. It's going to be fairly easy. I want to be the guy that shows you how to do it. If you need this part, or any other part, you can always check us out at 1aauto.com.
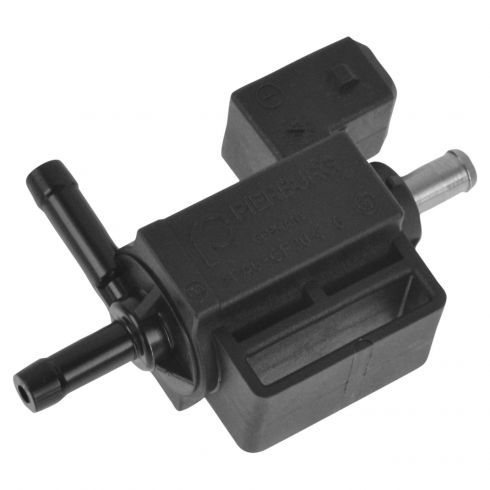
Here's what we're going to be replacing. This is the turbo bypass valve. We've got an electrical connector here. We've got a hose, another hose, another hose, and then this slot right here is what's actually holding it in place. There's just a little bar that comes through. Once we get the hoses off and the electrical connector, we're just going to take it, pull it off. It might be easier to pull it off first. We'll get into that as we go. But essentially, connector, hose, hose, hose, pull it off.
First, what I want to do is I want to try to take off this little clip here for the electrical connector. I'm going to try to push in on it and then pull down, see if that works. There it is. So here we go. This is what I pushed in on. As you could tell, there's the lock right here and there's one down there. When I push it, it relieves pressure. And then I can slide it off. We'll take a peek in here, make sure that we don't see any funny colors, rust, or rainbow colors are bad. Nice, clean, metal looks great, so we know we can reuse that when it comes down to it.
Here's our lower hose. Got a little clamp on this one. And we can't really see this one where it connects it in. But you can feel. Let's see if I can pull it. There is a clamp on that one as well. And then this top one does not look like it has a clamp. So this one probably, oh yeah, it does have a clamp. Cool. All right, so they all have clamps. That's neat. We're going to go ahead and remove those. If you needed to, like I said, you can just go ahead and grab the whole unit and should just slide right off. Here we are.
Now you can try to get to your clamps, whatever makes it easiest for you, take them off in order, and then just remember which way it goes. It should be pretty easy because this faces down. So we'll just go with that. I'm going to grab some pliers so I can squeeze these and pull off our hoses.
Here we go. I just grabbed the long screwdriver. I'm just going to try to push this hose up and off of here without damaging it. I don't want to damage this. I need to have vacuum going through there, okay? All I'm going to do is try to work it a little bit. There we are. Okay. Now we've got our little clamp right here. Holds the lower hose on. It's going to be very easy. I'm just going to grab a pair of pliers. You can use whatever you have access to. Squeeze these. Start pull it down. Let's see. Okay, seems like it's pulled down quite a bit.
Now I'm going to try to pull it off the sensor or valve I should say, sorry. That leaves us one hose left and that one the clamp comes from the back. I'm going to get my light out of the way because it's more annoying than helpful at this point. Let's see if we can see that clamp together. There it is right there.
Grab my pliers again. See if I can get myself in them up in here. Try to squeeze all the ears on the clamp, squeeze them down. I'm trying my darnedest not to damage this clamp because theoretically I would love to be able to put it back on and not replace it. But if it happens, it happens.
Here we go. Here's our old valve. I'm going to try to reuse this. This is the protective layer to keep it from melting due to the heat of the exhaust and everything that runs right along next to it. If you can reuse this, that would be optimal. I'm going to give it a try and we'll put this on to our new valve. We're going to get this other part of the hose off. We'll put this on the new valve as well. And we'll go from there.
Here we go. I'm on a workbench. I've got my pocket screwdriver. I'm trying to get this little boot off of here. This is just the heat boot for our valve. It is stuck on there. Right here there's some kind of glue or adhesive. I'm going to be very careful not to poke myself. I'm just going to try to get it unstuck essentially. Just working around. There we are.
Now I'm going to try to work my valve out of here. Let's see if I can get it. It's pretty easy. There's where the adhesive was. Those look pretty close to the same. So we'll continue. We'll go ahead and take off this clamp real quick. Sometimes using pliers that are a little thicker might work better for this. Or if you have some needle nose pliers, that might work as well. It was just for the application when it was inside the fender well. Getting the needle nose pliers up in there was not going to be very easy for me.
So there we are. We have our two valves. I'll move this stuff out of the way. Here's our original, 2011 Ford F150 turbo bypass valve. It's got hose connections right there. Both match up. We've got where it mounts into the vehicle. Has a little slot. The prong comes up through it. That's what hold it secure. We've got our electrical connector ports. As you can tell, they're both there. They got two prongs. Perfect. Turn them over, exact same. Perfect. Perfect.
I don't see why there wouldn't be any reason why you couldn't use this quality 1A Auto part. If you need this part, or any other part, you can always check us out at 1aauto.com. Thanks.
Now it's time to get this back together. We don't have to really worry too much about the direction that this hose was facing. Maybe you're worried about it, "Oh, no, I spun it around." You don't have to worry too, too much about it. It will still move once, even once we get the clamp on there. And if it doesn't want to move with the clamp on there, we'll just kind of grip it, loosen it, and give it a twist wherever it needs to go. Worry not my friends.
I'm going to grab the three prongs here. Try to squeeze them in. I'm just going to try to line the clamp up back where it went on the hose. You can see the markings on the hose where it was originally. Just try to put it back where it came from. I mean, why not?
I'm going to take my hose, want to come up through there and bring this up here. Here we go. This is nice and covered up again. Everything is going to be safe and secured. We can get our hoses on and then we'll worry about making it look pretty. Let's bring it back over to the vehicle and get it installed.
Time to install my friends. Here we go. We've got our hose connector up here. One down there. And then this one right here. The top one is going to go right up here. There's a little clamp on there. I'm just going to put it in. Slide it. I want to try to make sure that it's bottomed out as possible. I'll just pull down my thing. Looks like I need to go a little bit more. Give it a little wiggle, do whatever you need to do. That looks great. Perfect.
Before I forget, I'm going to go ahead and just put that clamp on. Definitely don't want to forget any of these clamps because, well, then you're not going to have the pressure you need. I'm going to see if I can get my little pliers up in here. Get it over all three of these prongs on the clamp and just try to slide my clamp down towards where it's supposed to be.
Sometimes getting these clamps on is harder than getting them off. I mean, essentially once it gets down on there, you're going to be good to go. Getting it down there might be easier or harder for you. In which case I'm happy or sad for you, whichever way. There we go. And we're on there. Got a little hose right here. We can put that on last. Get this hose right here, get this one on. Slide it in until it bottoms out, just like before, right upon there.
Take my pliers. Let's see if I can get it to squeeze here. Come on. Slide it up on there. Great. That one's good. Put on my third hose, all the way down. Okay. Now I'm just going to mount it to the bracket that's behind there. It should just slide right in. If it doesn't seem like it wants to, maybe you get your little boot that we got on there in the way.
Here we go. Make sure it's in, clicked, feels good. Always give it a little tug. Make sure that our boot is still on there the way it needs to be. This is going to protect from heat from your exhaust, which all runs back here. That feels good. Perfect. All our hoses are connected. Wiring harness is connected. There we are. Whether you have to take off the wheel to do it or not, that's up to you. But that's the way to do it.
Thanks for watching. Visit 1aauto.com for quality auto parts shipped to your door, the place for DIY auto repair. And if you enjoyed this video, please click the Subscribe button.
Shop Products
Lack of Power and Oil Consumption in Turbocharged Car or Truck Symptoms That Your Turbo is Failing
Andy shows you common signs of a failing turbo, and explains why you need to take care of it before more damage happens to your car or truck's engine!
