How to Replace Tensioner 2003-08 Toyota Matrix
Created on: 2020-09-04
This video shows you how to install a new TRQ tensioner pulley in your 2003-2013 Toyota Matrix.
Tools needed
-
13mm Socket
Torque Wrench
Socket Extensions
14mm Socket
Rust Penetrant
17mm Socket
Jack Stands
Socket Driver
Serpentine Belt Tensioner Tool
Vise
Wheel Chocks
10mm Socket
Ratchet
Floor Jack
Swivel
Remove the top engine cover, you'll have a 10-millimeter nut there and you should have one right here. Now, if you were to look down along the passenger side of the engine, you're going to be able to see the tensioner, you're going to see that it's a piston. Following it along, we're going to make our way right over to here. If you were to use a 19-millimeter socket and turn it clockwise, you'll be able to squish this piston, and then, of course, you'll be able to remove the belt from your pulleys. It's kind of a tight space, but you can do it. Okay, I'm gonna turn this nice and slow because it's under pressure. That's compressing the piston. Now, we'll go ahead and get our belt right off of here and slowly release it. Take a quick note of your belt routing. Once you've done that, go ahead and get the belt off of here.
Now, the next thing we're going to have to do is remove the motor mount on the passenger side. But before we do that, we need to have a nice jack with a pad or a piece of wood, something nice and soft. And we're going to go right underneath the oil pan of the car. So I have an oil pan here for you so you can see what I'm talking about. We're going to come underneath this ridged area here, right where it's reinforced, okay? Let's go ahead and slide this under. Line it up with that oil pan and we're only going to apply slight pressure, we don't want to try crushing this oil pan. All right, there's my pressure right there. Let's get back up top. Okay, so now up inside the engine compartment, you're going to see this mount right along the passenger side of the engine. You're going to find three mounting bolts. There's one here, one on the rearward side of it, and then if you were to look underneath this power steering hose, if you just kind of push it out of the way, you'll find another one. We're going to use a 14-millimeter and we're going to remove all three of those mounting bolts. Get that on there. There's one, let's do the same to the rest.
Now, at this point, there's nothing holding the mount to the body of the vehicle. So what we're going to do is we're going to slowly jack up the engine, you want to make sure you don't hear any funny noises, okay? The way we had to do that was to remove this bolt right here. If you don't jack up the engine when you try to remove it, it's just going to bottom out and hit up against the body. Now that this is high enough, we can start removing this, and, of course, we have to remove this nut up here as well. So, using a 17-millimeter socket and my ratchet, I'm just going to try to break this bolt free. There we are. Now that that's broken free, let's do the same to the nut up there, and then we'll start removing the pair.
So, now, we're going to use a 13-millimeter wrench, we're going to use the boxed end. I'm going to go right onto that nut up there. I'm just gonna use my little bar here because that's what I've got, and try to break it free. If you have some penetrant spray, it's probably a great idea. There we are. I'm just going to work it back and forth. Okay. Awesome. Now, let's fully remove this nut. So we've got the whole stud cutting off, so I'll just have to get that off of there. All right, so I've got the stud pulled out as far as I can go for now. So what I'm going to do at this point is move along to taking out that bottom bolt. I'm just gonna hold on to this. Fully remove my bolt. There's that bolt. Let's get the tensioner out of here. Grab that top bolt and stud like that. Come towards the backside of the engine where there's more room. Watch out for any wiring.
There it is, friends. If you took out that nut and you noticed that the stud came out at the same time. I like to just put it inside of ice or, of course, you can use locking pliers. And we're going to fully remove that nut before we reinstall the stud. Awesome. Okay, back over to the vehicle. Let's go ahead and get this stud back in. Make sure it's nice and tight, of course. Okay, that's nice and bottomed out. Get this out of the way.
Okay, friends, now it's time to get ready for our install. You can either come from the backside of the engine or if you wanted to, you could try to slide it down through here. I'm going to start the piston onto the stud real quick. There we are. Now, I've got this arm. Let's go ahead and grab our large bolt for the bottom right there. So, now, we just need to try to find where that hole is, just kind of maneuver it around until you feel the bolt sink in. Okay, so I'm going to lift this tensioner up. There we are, I felt the bolt start in there. Go ahead and start that in by hand. If it feels like it gets snug before it even starts going in at all, you might be cross-threaded, and you definitely don't want to do that. That feels like it's going in. I'm going to start the nut on there, and then we'll bottom both of them out. All right, that's bottomed out. Do the same to the top one.
Now, we're going to go ahead and torque that lower bolt to 51 foot-pounds. There we are, let's get this off of here. All right, so now we're going to do the top nut. To do that, I just pushed the hose down and out of the way. You might need to do something a little different, but go ahead and tighten that to 21 foot-pounds. There it is.
If you took your hose out of its mounting bracket, you obviously need to make sure that it's remounted and it's secure. All right, now the next thing we need to do is go ahead and activate our tensioner piston right here. To do that, if you were to come right here, we're going to go ahead and pivot that clockwise and, in turn, that's going to squeeze this and then we're going to release. We're going to squeeze and release, do that four to five times to make sure it's completely activated. We're gonna do this nice and slow, it's not a race. There we go. Now, I can feel the difference. All right, so we have this tensioner functioning properly. Let's go ahead and get this out of the way.
Now, the next thing we need to do is go ahead and lower down the engine slowly. As we do it, we want to just go down until it touches and then up a tiny bit so we can try to line up our bolt holes. Once we've done that, we'll start in all three of our bolts before we snug them up. That's touching. Go up a tiny bit. Start in our bolts. All right, let's go ahead and bottom all three of these mounting bolts out. Let's go ahead and get the jack out of here. And now, let's torque that mount. Now, let's go ahead and torque these bolts to 38 foot-pounds.
Now, it's time to install the belt in the vehicle. Put it on in the same route that you removed it. Okay, slide that onto the water pump. Perfect. Now, before we go ahead and remove our tool from the tensioner, just double-check the belt, make sure it's sitting inside all the grooves going around the grooved pulleys, and, of course, it's sitting along the top of the smooth pulleys as well, and of course, make sure that everything's settled as it should. This looks really great, so it's time to move along. Let's go ahead and get our cover back on here, just line it up with the studs. Put on your mounting nuts and snug it right up. Do the same to the other one.
Okay, so the next thing we need to do at this point is to go ahead and start up the vehicle. We're going to run it for approximately 10 seconds and then we're going to turn it back off. We want to come back out and make sure the belt's still sitting on all the pulleys as it should. If for some reason you notice that it seems like it's walking off, you need to, of course, fix that before you continue running the vehicle. All right. Now that we've run it, let's go ahead and take a peek at that belt, just make sure it's sitting like it should. This looks great. Next up, take it for a road test.

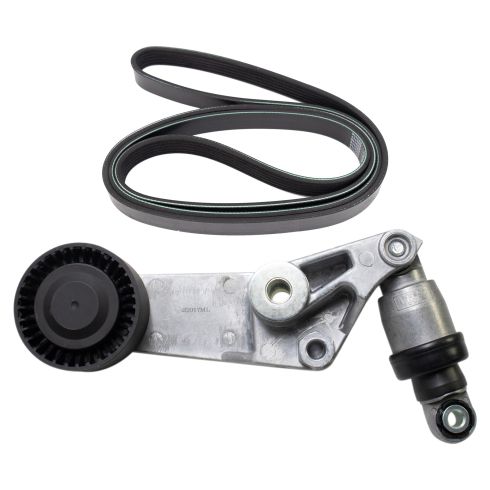
Chevrolet Toyota 2 Piece Serpentine Drive Belt Component Kit TRQ BPA06497
Part Details:
- 2 Piece
- (1) Serpentine Belt
- (1) Accessory Drive Belt Tensioner
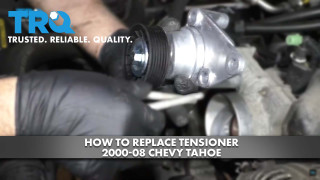
How to Replace Tensioner 2000-08 Chevy Tahoe
Watch this video to learn how to install a new serpentine belt tensioner in your 2000-06 Chevy Tahoe.
