How to Replace Tail Light 1996-2000 Toyota 4Runner
Created on: 2012-03-09
Check out this video for quality and detailed instructions on how to replace or service the tail light and bulbs on your 96-00 Toyota 4Runner.
-
step 1 :Changing a Bulb
- Remove the two Phillips screws securing the taillight.
- Pull the taillight out.
- Twist the socket counterclockwise.
- Pull the bulb straight out.
- Push the new one in.
- Twist the socket clockwise.
-
step 2 :Removing the Taillight Assembly
- Remove the Phillips screw in the luggage shelf bracket.
- Remove the bracket and pull the trim panel straight out.
- Disconnect the harness connection.
- Remove the ground bolt.
- Pull the harness out.
-
step 3 :Replacing the Taillight Assembly
- Push the harness in.
- Line up the taillight and push it into place.
- Replace the two Phillips screws on the taillight.
- Reconnect the harness.
- Replace the bolt through the ground wires.
- Push the trim back into place.
- Replace the bracket and screw.
Tools needed
-
Phillips Head Screwdriver
10mm Wrench
Brought to you by 1AAuto.com, your source for quality replacement parts and the best service on the Internet.
Hi, I'm Mike from 1A Auto. I hope this how-to video helps you out and next time you need parts for your vehicle, think of 1AAuto.com. Thanks.
In this video we're going to show you how to service the tail light on this 1999 Toyota 4Runner. It's pretty easy operation. If you're just looking to change a bulb, alls you're going to need is a Phillips screwdriver. You could also use a 10mm socket with a ratchet and extension. If you need to replace your whole taillight assembly including the wiring harnesses, then you'll need the Phillips screwdriver as well as, you'll need probably a 10mm wrench.
With your tailgate open, there are two screws or bolts right in the back here. You can either use a Phillips screwdriver like I'm using here or a 10mm socket with a ratchet and extension and remove those screws. Okay, the light comes out. If you're just looking to change the bulbs, it's pretty easy. You twist the socket counterclockwise and then pull it out. Okay, these bulbs pull straight out and push back in. Put them back in clockwise to lock. Same with these other ones.
Okay, so here's our new light from 1A Auto, and you can see it comes with the sockets and harness and everything. Two problems can happen. Obviously, you can break a taillight by backing into something or something like that. In that case, you can just remove the sockets from the old light and then remove this harness from the light from 1A Auto and then just replace the lens and tail light assembly itself. A lot of times what can happen is these wires can get frayed or these sockets can get corroded and then you need to replace this whole assembly. So, to replace this whole assembly it's pretty easy. You just have to get back in here to unplug it and remove a ground wire. If you have this luggage shelf, take the shelf out. Remove this screw here that's in this bracket. Okay, this kind of slides forward and out and then you just pull the trim right out. Okay, here's your connection and press down and disconnect. Then you'll need a 10mm wrench to reach back in here and undo the bolt.
Then I'm just going to fast forward through removing that ground bolt. It does take a little bit of force, so maybe having a helper here hold that panel back while you undo the bolt, probably be beneficial. That comes out. Feed this in and put the plug in place. Just kind of force it in. We'll just take our light and push it in. There's two pins right here that go into receptacles there. Push it in. Back to here, we'll pull this out. Pull our harness through. Connect that there. You may need kind of nimble hands. Put your bolt through that there, and then there's actually another ground wire in here. You need to put your bolt through and then find the hole and start it in.
Here's a still shot with that bolt started in and both ground wires hooked onto it. And again we'll speed through putting that bolt in and tightening it up with a 10mm wrench. Remove our clips in here, came off, so we'll put that back on. Just move that out of the way. Okay, put this in, slide it back, put the screw in.
We hope this helps you out. Brought to you by www.1AAuto.com, your source for quality replacement parts and the best service on the Internet. Please feel free to call us toll free, 888-844-3393. We're the company that's here for you on the Internet and in person.
Shop Products
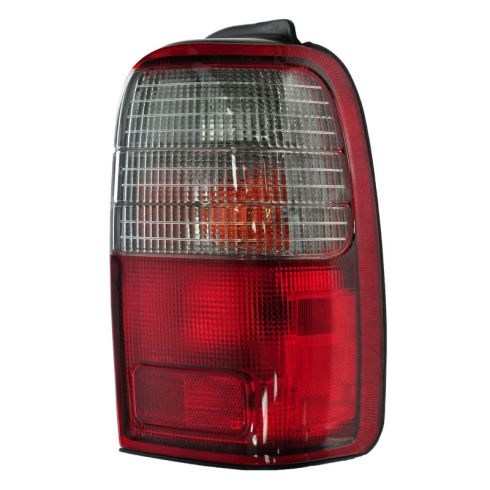
1996-00 Toyota 4Runner Passenger Side Tail Light TRQ LTA79167
Part Details:
- Features and Benefits
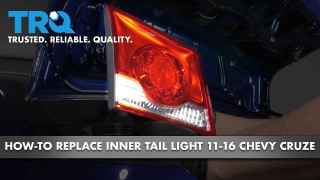
How to Replace Inner Tail Light 2011-16 Chevy Cruze
For one reason or another, you may find yourself needing to replace more than just a bulb. Broken or hazy tail lights reduce your visibility to other drivers. TRQ direct fit tail light assemblies are an affordable option that’s easy to do yourself! How to replace the inner tail light housing on your 2011-16 Chevy Cruze.
