How to Replace Sway Bar Link 1998-2002 Mercury Grand Marquis
Created on: 2012-05-23
Stabilizer link rattling? Follow along with the 1A experts and learn the steps for replacing it with this how-to video
-
step 1 :Removing the Wheel
- Pry off the center cap with a flat blade screwdriver
- Retrieve the center nut key from the glove box
- Remove the center nut with key
- Pry off the wheel cover
- Loosen the lug nuts with the vehicle on the ground
- Raise the vehicle with a floor jack
- Secure the vehicle on jack stands
- Remove the lug nuts
- Pull off the wheel cover bracket
- Pull off the wheel
-
step 2 :Removing the Stabilizer Link
- Apply penetrating oil to the stabilizer link bolts
- Loosen the 15mm bolt on the top of the stabilizer link
- Loosen the 18mm bolt on the bottom of the stabilizer link
- Put a 5mm Allen wrench into the lower stabilizer link bolt
- Hold the Allen wrench as you remove the lower bolt
- Remove the 15mm bolt from the top of the stabilizer link
- Drive the top of the stabilizer link out of the steering knuckle with a hammer and chisel
- Pull off the stabilizer link
-
step 3 :Installing the New Stabilizer Link
- Install the grease fittings into the new stabilizer link
- Push the bottom of the stabilizer link into place
- Raise the lower control arm with a jack
- Push the upper stabilizer bar stud into the steering knuckle
- Thread the 15mm nut onto the top stabilizer bar stud
- Tighten the 15mm nut to 50 - 55 foot-pounds
- Thread the 18mm nut onto the lower stabilizer bar stud
- Tighten the 18mm nut to 65 - 70 foot-pounds
-
step 4 :Reattaching the Wheel
- Slide the wheel into place
- Put the wheel cover bracket into place
- Start the lug nuts by hand
- Tighten the lug nuts preliminarily
- Lower the vehicle to the ground
- Tighten the lug nuts to 100 foot-pounds in a crossing or star pattern
- Put the wheel cover on
- Insert the center nut into the wheel cover with the key
- Reattach the center cap
- Return the center nut key to the glove box
Tools needed
-
15mm Wrench
Torque Wrench
16mm Wrench
Hammer
15mm Socket
17mm Wrench
Rust Penetrant
18mm Wrench
16mm Socket
17mm Socket
Jack Stands
18mm Socket
5mm Hex Wrench
21mm Socket
Chisel
Lug Wrench
Ratchet
Floor Jack
1/2 Inch Breaker Bar
Brought to you by 1AAuto.com, your source for quality replacement parts and the best service on the Internet.
Hi, I'm Mike from 1A Auto. I hope this how-to video helps you out, and next time you need parts for your vehicle, think of 1AAuto.com. Thanks.
In this video, we're going to replace a front stabilizer bar link on this 2000 Mercury Grand Marquis, pretty much the same process for a '98 to 2011 Grand Marquis or Ford Crown Victoria. We do the passenger side. Obviously the driver side is the same procedure. We do recommend that you replace these in pairs. Tools you'll need are Jack and Jack Stands, your tire iron or 21mm Socket with a breaker bar, basically what you need to get the wheel and tire off, 15mm and 18mm wrenches and a 5mm Allen wrench.
Start out by removing the wheel cover. You pry off the center cap then there should be a key somewhere in your car, in the glove compartment. Remove the center nut and then pry the wheel cover off. If you don't have air tools, you'll want to loosen the lug nuts with the wheel on the ground. Then, raise and support the vehicle. We'll loosen them. I'm going to fast forward here as I just remove those lug nuts. Set aside that bracket that holds the hub cap and take the wheel and tire off.
The stabilizer bar is held on, right there, with the bolt. I'll put some penetrating oil on it. There's another bolt down here. On top is a 15mm. I like to put the wrench on there and take another wrench, hook it right in. It's a little tight to get a socket and ratchet on there. We're actually on there with this method. It gives you more leverage. Nice and slow. The bolt should come loose pretty easily. This bolt in here is an 18mm. Do kind of the same thing. Get the wrench on it. Put my 17mm wrench on and pull. Nice and easy. It starts to move. I'm going to look at the stud and see if it's moving. It's starting to move. I'm going to come up through this hole with the 5mm Allen wrench. Put that in there. I'm going to speed up here as I just keep working that wrench with the Allen wrench holding it. It will get difficult to hold that Allen wrench so I'm just giving a shot underneath. I stick a wrench on there to hold the Allen wrench, to give you some more leverage. Just keep fast forwarding here as, like I said, I just work that bolt right off. We'll keep the high speed action going, here, as we go back up to the top and remove that bolt the rest of the way. I go back to using the wrench for some extra leverage as that bolt gets a little more difficult to remove as it gets farther off the stud. I just want to take . I'm using a chisel, and some type of impact tool to drive the top out. It's coming through so far. I'm just using a smaller extension here, to get it the rest of the way out.
The new link from 1A Auto is much easier to use. It has a nut here that you can grab on to with the wrench. This makes it a lot easier to put in. You may want to put in a grease fitting here and a grease fitting down here. Those come with it. Just use a small wrench to put them in. They're already installed. This one points up and away so that's easy to get grease in there.
Here, I basically take the bolts off first, and then, you want to get the bottom in first. What you might need to do is just grab hold of the stud on the bottom and position it so you can get it into the stabilizer bar. Now, use a jack and jack up the lower control arm until you get into a position where you can work the upper stud into the top of the steering knuckle. You can remove your jack and put on the nut on the upper side and use your 15mm wrench to tighten it up and then grab on to a larger wrench, give yourself some extra leverage and get it nice and tight. You don't have to get it incredibly tight. It probably has specifications, around 50-55 ft-lbs but it's pretty hard to get it to work down there so just use a wrench and get it nice and tight. Do the same thing with the lower nut. I was pleasantly surprised on the 1A Auto part, the lock nut was able to go on and it didn't make the stud twist. I was able to get it on, tighten it up and these probably tighten to a spec of 65-70 ft-lbs. It's pretty tough to get any kind of a torque wrench on there. I just got it nice and tight with the wrenches that I had.
Put your wheel and tire back on. Start all the lug nuts with the little bracket for the wheel cover and just preliminary tighten them with the impact wrench or your socket and ratchet. With the wheel on the ground, use a torque wrench and tighten them to about a 100 ft-lbs using a star pattern then put your wheel cover back in place. Put the center safety bolt back in, tighten it up, make sure it's all on there good. Always make sure you put your key back in the glove compartment.
We hope this video helps you out. Brought to you by www.1AAuto.com, your source for quality replacement parts and the best service on the Internet. Please feel free to call us toll-free, 888-844-3393. We're the company that's here for you on the Internet and in person.
Shop Products


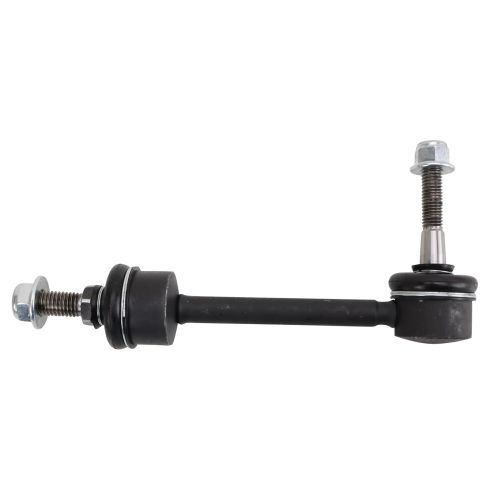
1998-02 Ford Lincoln Mercury Front Sway Bar Link TRQ PSA67775
Part Details:
- Yes
- No
- Male Threaded
- Male Threaded
How to Replace Rear Sway Bar Bushings 2002-08 Audi A4
New Sway Bar Bushing from 1AAuto.com How to remove, replace, and install rear sway bar bushings on 02, 03, 04, 05, 06, 07, 08, Audi, A4, S4
