How to Replace Sway Bar Link 1998-2002 Lincoln Town Car
Created on: 2011-05-18
You can replace the sway bar link on your 98-02 Lincoln Town Car yourself, just watch this video from 1A Auto to see how it's done!
-
step 1 :Raise and secure the vehicle
- Lift and secure your vehicle with its model specific safe support points.
- Make sure your jack stands are set and the correct height on an even surface and your e brake is on if all four wheels aren’t off the ground.
-
step 2 :Remove the stabilizer link
- Use a wrench to remove the nuts on the top and bottom of the stabilizer link.
- Use a second wrench to add leverage to the first one you are using.
- Secure the stabilizer link with the adjustable wrench to secure a Torx bit to remove the nuts the rest of the way with your wrench.
- Continue finessing the wrenches and Torx Bit till your successfully work the stabilizer bar out.
- Remove the stabilizer link.
-
step 3 :install the new stabilizer link
- Thread the stabilizer link, bushings and washers into the steering knuckle and sway bar.
- Use your wrenches to secure the link and a socket and ratchet to tighten it up.
-
step 4 :put the wheel back on
- Put the wheel on and hand tighten the lug nuts.
- Lower the vehicle and torque the lug nuts in a star pattern to 100 ft lbs.
Tools needed
-
Adjustable Wrench
T40 Bit
Jack Stands
Lug Wrench
Ratchet
Complete SAE Wrench Set
Floor Jack
Brought to you by 1AAuto.com, your source for quality replacement parts and the best service on the Internet. Hi, I'm Mike Green. I'm one of the owners of 1A Auto. I want to help you save time and money repairing and maintaining your vehicle. I'm going to use my 20 plus years experience restoring and repairing cars and trucks like this to show you the correct way to install parts from 1AAuto.com. The right parts installed correctly. That's going to save you time and money. Thank you and enjoy the video.
In this video, we're going to show you how to replace the stabilizer, or sway bar end link, on this 2000 Lincoln Town Car, same as any '98 to '02. Tools you'll need are a 13/16th socket and ratchet or your tire iron, jack and jack stands, 15 and 18mm wrenches, T40 Torx bit, an adjustable wrench, and a quarter inch wrench or whatever size to grab on to that T40 Torx bit. We're going to start off. Remove your center cap. If you're using hand tools, you'll want to loosen your lug nuts while the wheel's on the ground first then raise the car off the jack, secure it with the jack stand, and then remove your lug nuts. I have the benefit of air tools. These are 13/16ths lug nuts. We'll just speed it up here as we remove those lug nuts and then remove the wheel and tire. Pull or turn your steering wheel so you can easy access to the tie rod. In order to remove your stabilize link, you then do 2 bolts, one here that is a 18mm and one up here that's a 15mm. What I do on bolts like this that you can only get to with a wrench, put a wrench on it. Then you can hook another wrench on and then carefully push. Gives us more leverage. Loosen it up, same thing down here.
Same thing down here. I'll put this wrench on. I'm going to be pulling this one. I'm going to hook my other wrench. I'm going to pull carefully while it moves. I believe it looks like the whole shaft is spinning. Most likely, this stud is going to spin on you. I going to put the ... and you see right there the wrench is moving and that stud is moving as well. Put the wrench on. This is a T40 Torx bit. I have to give the Lincoln engineers a little bit of grief because this is difficult. They probably have some special tool. Got that T40 Torx bit on there. Now I'm going to put my adjustable wrench on. Tighten it up as much as I can. Now that Torx bit just want to get that one on better here. Sorry you can't really see that probably, but this wrench is holding that Torx bit so I can then spin this here. Eventually it will come apart. What I'm going to have to do is pull this back off, now that it's loose. I'm going to coat this bolt with penetrating oil. 15mm wrench. On this one, I'm going to use a punch. Just punch that right out. Now to continue, I got a quarter-inch wrench here, which is the same size as my Torx bit. I'm going to feed my Torx ... I'm actually going to put my quarter-inch wrench in there, feed my Torx out through the wrench and into the tie rod. I didn't start with this because of the angles.
This actually didn't really work. I had to put it up in there and grab it with the adjustable wrench. Now it does, so I just let the quarter-inch wrench go there. It holds it and I just take the nut off. There's your link out. It's a new link from 1A Auto. You can see it has grease-able fittings. I'm going to put it down in at the bottom first, so get the bottom through. Start my larger nut on and now the top. I'm going to force that into the knuckle. Putting it together is much easier because the link is nice and tight. You can just tighten up the bolts with your wrenches. They probably have Torx specifications, but if you get them nice and tight with the combination wrenches, you'll be good enough. We tighten up the lower one and then tighten up the upper one. Now we're going to fast forward through putting the tire back on. Thread the lug nuts on by hand. I use my impact wrench just to tighten them preliminary then lower it down to the ground, Torx them to 100 foot-pounds using a star pattern, and then put my center cap back on.
We hope this helps you out. Brought to you by www.1AAuto.com, your source for quality replacement parts and the best service on the Internet. Please feel free to call us at toll free, 888-844-3393. We're the company that's here for you on the Internet and in person.
Shop Products


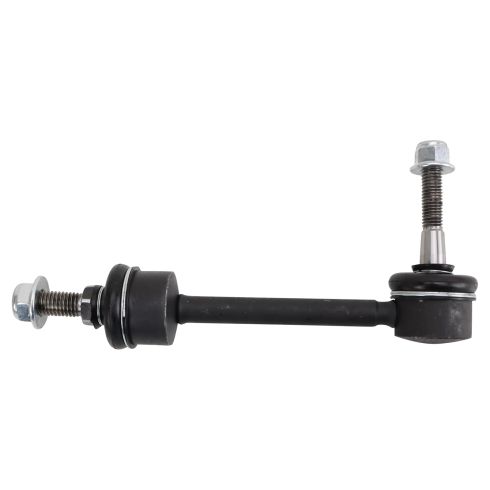
1998-02 Ford Lincoln Mercury Front Sway Bar Link TRQ PSA67775
Part Details:
- Yes
- No
- Male Threaded
- Male Threaded
How to Replace Rear Sway Bar Links 2010-15 Chevy Camaro
How to repair, install, fix, change or replace loose, worn, or rattling sway bar links on 10, 11, 12, 13, 14, 15 Chevy Camaro
