How to Replace Sway Bar Link 2002-05 Mercury Mountaineer
Created on: 2014-10-24
If the sway bar link is rattling or broken, this video will show what steps and tools are needed to replace it.
-
step 1 :Removing the Wheel
- Pry off the center cap with a flat blade screwdriver
- Loosen the 19mm lug nuts with the vehicle on the ground
- Raise the vehicle with a floor jack
- Secure the vehicle on jack stands
- Remove the lug nuts
- Pull off the wheel
-
step 2 :Removing the Stabilizer Link
- Hold the upper stabilizer link stud with a 16mm socket and ratchet
- Remove the upper nut from the stabilizer link with a 15mm socket and ratchet
- Hold the lower stabilizer link stud with a 15mm socket and ratchet
- Remove the lower nut from the stabilizer link 16mm socket and ratchet
- Pull off the stabilizer link
-
step 3 :Reinstalling the Stabilizer Link
- Place a washer and a bushing onto the link
- Push the stabilizer link into place
- Add a bushing, a washer, a tube, a washer, and a bushing
- Push the link through the sway bar
- Add a bushing and a washer
- Preliminarily tighten the 15mm nut by hand
- Raise the wheel with a floor jack to simulate riding positions
- Hold the upper stabilizer link stud with a 16mm socket and ratchet
- Tighten the upper nut to the stabilizer link with a 15mm socket and ratchet
- Hold the lower stabilizer link stud with a 15mm socket and ratchet
- Tighten the lower nut to the stabilizer link 16mm socket and ratchet
-
step 4 :Reattaching the Wheel
- Slide the wheel into place
- Start the lug nuts by hand
- Tighten the lug nuts preliminarily
- Lower the vehicle to the ground
- Tighten the lug nuts to 100 foot-pounds in a crossing or star pattern
- Reattach the center cap
Tools needed
-
Torque Wrench
15mm Socket
16mm Socket
Jack Stands
19mm Socket
Ratchet
Floor Jack
Brought to you by 1AAuto.com, your source for quality replacement parts and the best service on the Internet.
Hi, I'm Mike from 1A Auto. I hope this how-to video helps you out, and next time you need parts for your vehicle, think of 1AAuto.com. Thanks.
In this video, we're going to show you how to replace a rear sway bar link on this 2003 Mercury Mountaineer. We show you on the passenger side, but the driver side is the same procedure. The items you'll need for this include a new rear sway bar link from 1AAuto.com, 15mm, 16mm, and 19mm socket and ratchet, jack and jack stands, and a torque wrench.
Start off by prying off your hubcap. Then remove these 19mm lug nuts. If you don't have air-powered tools, you want to loosen them up while the vehicle's on the ground, raise the vehicle, and remove them the rest of the way. Now just pull the wheel free.
To start off, use some penetrating oil and coat that. The bolt for the stabilizer link is from down here, and it's a 16mm. It's always really good if you can put your wrench on it and turn it. Actually, there's two really good things going on here. You can see I'm turning it and that nut is not moving. The other thing is you're turning it and this plastic isn't moving. Sometimes the hardest part is getting this whole shaft out of the plastic. If you can't turn it or it tends to turn the plastic as well, what you can do is use a hammer and a chisel and break away all the plastic when you get to that point. But as you can see, I was able to turn it with a 16mm. This nut on the original is a 15mm. I'm just going to remove nut. We'll just fast-forward as Mike removes that nut.
Once you remove the nut, it should just pull out, but if the bar still won't pull out from the bottom, just lock onto the plastic with some locking pliers and use a 16mm socket and ratchet, try to get it out that way. If it still only goes so far you can use a hammer and a punch, just knock it out the rest of the way that way. Once you pull it out, the plastic part will just lift up and out. If, after you've tried everything, we just showed and it still won't come out, you can use a hammer and a chisel and just break all the plastic off and then hammer it out the rest of the way after you've done that.
Now take your sway bar and load it up with a washer, then a bushing, then your lower control arm. When it goes through, add a bushing, then a washer, then that tube, and another washer and another bushing, then your sway bar. Just push it up through the sway bar, and then another bushing and a washer, and then that nut. Now tighten the link up preliminarily, and to fully tighten it what you want to do is simulate the vehicle in its riding position, so I've lowered the vehicle down on its three wheels and I'm putting the jack underneath this one and putting it into, like I said, the position it would be in most of the time. Then tighten it up so that the bushings are squeezed enough so that they're the same diameter as the washers.
Now replace the wheel. Then replace the lug nuts. Then we'll fast-forward as Mike tightens those up. You want to tighten them while the vehicle's in the air just preliminarily, then lower the vehicle and tighten them the rest of the way. Then you want to torque each of these to 100 foot-pounds in a crossing pattern. Then take your hubcap, line it up, and hit it back into place.
We hope this video helps you out. Brought to you by www.1AAuto.com, your source for quality replacement parts and the best service on the Internet. Please feel free to call us toll-free, 888-844-3393. We're the company that's here for you on the Internet and in person.
Shop Products


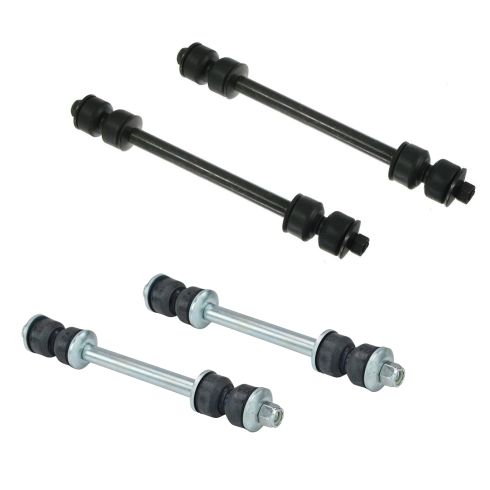
2002-05 Ford Explorer Mercury Mountaineer Front & Rear 4 Piece Sway Bar Link Set TRQ PSA56008
Part Details:
- 4 Piece
- (2) Front Sway Bar Links
- (2) Rear Sway Bar Links
How to Replace Front Sway Bar Links 2002-07 Mazda 6
How to remove, replace, and install a sway bar end link on 07 Mazda 6.
