How to Replace Strut Mount 2000-08 Nissan Maxima
Created on: 2013-05-11
Watch this video to learn how to replace a strut mount on your 00-08 Nissan Maxima.
-
Have the suspension professionally aligned after this repair
step 1 :Removing the Wheel
- Loosen the lug nuts with the vehicle on the ground
- Raise the vehicle with a floor jack
- Secure the vehicle on jack stands
- Remove the lug nuts
- Pull off the wheel
-
step 2 :Removing the Strut
- Remove the two 19mm bolts with 21mm nuts from the bottom of the strut
- Unclip the ABS sensor from the strut
- Remove the brake line clip from the strut with needle nose pliers
- Pry the strut out of the wheel spindle with a flat blade screwdriver
- Apply rust penetrant to the three 14mm strut mount nuts at the top of the strut
- Remove the three 14mm nuts from the strut mount
- Pull the strut down and out
-
step 3 :Removing the Strut Mount
- Put spring compressors onto opposite sides of the spring
- Slowly start to compress the spring, keeping it even on both sides
- Loosen the 19mm nut from the strut mount
- Continue compressing the spring until there is some play between the spring and strut
- Remove the 19mm nut from the strut mount
- Pull off the strut mount
- Pry off the strut mount swivel bearing
-
step 4 :Installing the Strut Mount
- Put on the strut mount swivel bearing
- Put on the strut mount, matching up the key on the strut mount and the strut
- Have an assistant hold the strut as you start the 19mm nut onto the strut mount
- Release the spring pressure slowly with the spring compressors
- Tighten the 19mm nut preliminarily
-
step 5 :Installing the Strut
- Position the "F" on the strut mount facing forward
- Lift the strut into place
- Start the three 14mm nuts onto the strut mount
- Push the strut onto the wheel spindle
- Thread the two 19mm bolts into the bottom of the strut
- Thread the two 21mm nuts onto the 19mm bolts
- Tighten the strut mount nuts to 25 foot-pounds of torque
- Support the suspension with a jack
- Tighten the 19mm nut on the strut mount to 45 to 50 foot-pounds
- Tighten the 21mm nuts at the bottom of the strut to 110 foot-pounds
- Clip the ABS sensor to the strut
- Clip the brake line to the strut
- Tap the clip on with a hammer
-
step 6 :Reattaching the Wheel
- Slide the wheel into place
- Start the lug nuts by hand
- Tighten the lug nuts preliminarily
- Lower the vehicle to the ground
- Tighten the lug nuts to 100 foot-pounds in a crossing or star pattern
Tools needed
-
Torque Wrench
14mm Socket
Hammer
Jack Stands
19mm Socket
Strut Spring Compression Tool
21mm Socket
Flat Blade Screwdriver
Ratchet
Floor Jack
Assistant
Needle nose pliers
1/2 Inch Breaker Bar
Brought to you by 1AAuto.com, your source for quality replacement parts and the best service on the Internet.
Hi, I'm Don from 1A Auto. I hope this how-to video helps you out, and next time you need parts for your vehicle, think of 1AAuto.com. Thanks.
In this video we're going to show you how to replace the upper strut mounts on this 2003 Nissan Maxima. We show you the right side. If your right side's bad, most likely your left side's bad, so we recommend you do these in pairs. It's pretty much the same for any 2000 and 2003 Maxima and pretty much other years, as well as the Altima and the Infinity I30's.
For this you'll need new strut mounts from 1AAuto.com. We always recommend replacing them in pairs. I think I said that before. You'll need jack and jack stands; 14, 19, and 21mm sockets; ratchet and a breaker bar or pipe for some extra leverage; screwdriver; pliers; hammer; torque wrench; and spring compressors. This video will help you if you're replacing those strut mounts, also if you're replacing a pair of unloaded or struts without the springs.
Start out by removing the wheel. You're going to want a 21mm socket and ratchet, or breaker bar, or your tire iron. You'll probably want to start with the wheel on the ground, loosen the lug nuts, then raise and secure the vehicle with jack stands, and then remove the wheel and the tire.
I'm going to remove the 19mm bolt with the 21mm nut. There are two of them at the bottom of the strut. You can always use a pipe over your breaker bar to give you extra leverage. Now that we've shown you how to get them out by hand, we're just going to use the impact wrench to zip them off a little quicker. Now, remove the bolts. Notice that the suspension is not supported, and the vehicle's supported through the body, not the suspension.
I'm going to push the ABS sensor out of the back. We're going to slide the ABS sensor up on the other side. Take needle nose pliers and remove the clip for the brake line. Push that down and slide it out. Pry the strut from the spindle and set it off to the side. Spray the three strut mount nuts, 14mm, with penetrating oil to help loosen them. I'm going to fast forward. You can see Don's able to get the nuts off by hand first. Then, he just resorts to the impact wrench just to, again, speed things up a little bit.
The third one's about to come out. I'm supporting the strut from below so it doesn't fall. Take the strut out.
Set up your spring compressors for your strut on opposite ends of your spring. Tighten them down and then start to compress your spring slowly, going back and forth from side to side. Before you fully compress it, you're going to want to leave enough tension so that you can still take off the 19mm nut at the top. You don't want to take this fully off, you just want to loosen it. You might need a screwdriver to help keep it from twisting. I've loosened it a little bit, and the strut's not spinning. Once you've got a couple threads left on the nut, leave it. Don't take it off fully yet, and go back to compressing the spring. I just fast forwards here. As you see, Don is going back and forth side to side using those spring compressors to compress the spring down. He'll do that until he can kind of shake the spring and there's some play in it. That's basically when the strut mount is loose enough. We've got the spring compressed to the point where there's a little bit of play between the spring and the strut assembly itself, and that's when we'll finish off taking off the 19mm nut at the top. Once this happens, your strut mount will come off.
You can pry off your mount. Pry off the old strut mount swivel bearing and install the new one. Make sure that the surface is clean. Here's the plate and our mount. You'll notice that the top of the strut is keyed, and you're going to want to match that up with the keyed portion inside the new strut mount.
It'll probably take a couple sets of hands here. Put your washer and your nut and get it on there. Thread it to the top, and then we can start releasing the spring pressure and tightening the nut on top at the same time. I'm going to fast forward. Obviously you can use hand tools, Don's just using the impact wrench because it makes it a little bit faster. Just one note, he's not tightening up the nut on top all the way. You wait until you have the spring in the car to tighten that nut up fully. I'm aligning the top of the strut mount. The F, that's going to face forward. You can do that with a screwdriver.
The same way we took it out, it's going to go back in. I'm supporting the strut from below with my left hand and feeding it up through the three holes. I'm just starting to feed the nuts on it. Now Don's just going to put the new nuts on. You'll notice that we actually put the same strut back in. There was nothing wrong with the strut, we just replaced the top strut mount.
Before we tighten the nuts up top, we're going to make sure that we get our bolts down here on the spindle. Fast forward as we put both those nuts on and then tighten them preliminarily. I'm going to torque the upper strut mount nuts to 25 foot-pounds. After we've tightened up the nuts that hold the strut mount, we're putting a torque wrench on the nut that holds the plate to the spring and strut assembly. We actually have a jack underneath the suspension putting weight up on the suspension, and we're tightening this to 45 to 50 foot-pounds. I'm tightening up the lower strut nuts to 110 foot-pounds. Slide the ABS sensor on the left side back into place, and on the right side. Now I'm going to be pulling the brake line through and then up. Once that's seated, I'm putting the clip back on from the back. It might require a little bit of tapping to fully seat it.
Just put the wheel and tire back on, then tighten the lug nuts preliminarily, then put it down on the ground and torque the lug nuts to 100 foot-pounds. It's definitely recommended that you get a front end alignment after this repair.
We hope this video helps you out. Brought to you by www.1AAuto.com, your source for quality replacement parts and the best service on the Internet. Please feel free to call us toll-free, 888-844-3393. We're the company that's here for you on the Internet and in person.
Shop Products

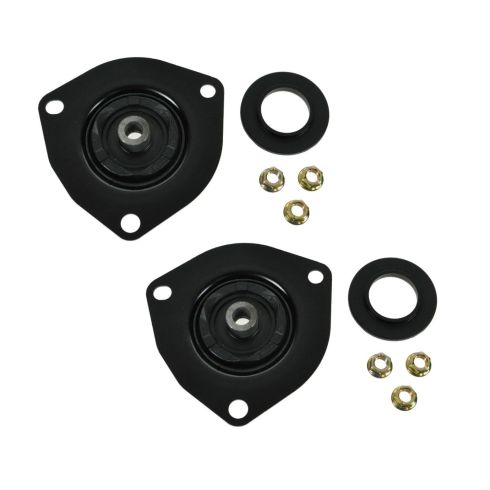
Nissan Infiniti Front Driver & Passenger Side 2 Piece Strut Mount Set TRQ SKA56665
Part Details:
- 2 Piece
- (2) Front Upper Strut Mounts
How to Replace Strut Assembly 2000-05 Ford Focus
Watch this video to learn how to fix a sagging or loose suspension. The experts at 1A Auto show how to replace the front shocks in your 00-05 Ford Focus.
