How to Replace Strut Assembly 2005-10 Chevy Cobalt
Created on: 2012-07-09
Follow along to learn how to replace a front strut assembly on your 05-10 Chevy Cobalt.
-
step 1 :Remove the top of the strut
- Lift the hood and secure it.
- Remove the three 13 mm nuts in the engine bay securing the top of the strut.
- Keep two of them loosely threaded just to keep the strut from flopping around while you work on the bottom half.
-
step 2 :Remove the wheels
- Use a 19 mm lug wrench to loosen the lug nuts.
- Raise and secure the vehicle.
- Remove the lug nuts and set the wheel aside.
-
step 3 :Remove the stabilizer link
- Use an 18 mm wrench and an 18 mm socket and ratchet to remove the stabilizer link.
- A breaker bar can help get it loose, using the wrench to secure the back of the bolt.
-
step 4 :Remove the bottom of the strut
- Apply some penetrating oil to the two 18 mm nuts securing the strut to the steering knuckle.
- Work the bolts out of the steering knuckle and strut.
- Unthread the top two nuts and pull the strut down and out.
-
step 5 :Install the new strut
- Put the strut into place and thread one of the bolts through the bottom of the strut and the steering knuckle.
- This secures the strut so you can secure the top three nuts.
- Torque the two bolts at the bottom to 100 ft lbs.
- Reassemble the stabilizer link.
- Replace the wheel, using a star pattern on the lug nuts.
- Torque the top three nuts to 20 ft lbs.
- Torque the lug nuts to 100 ft lbs.
Tools needed
-
Torque Wrench
14mm Socket
17mm Socket
16mm Socket
Hammer
Ratchet
18mm Wrench
A Piece of Pipe (for leverage)
15mm Socket
Socket Extensions
19mm Socket
1/2 Inch Breaker Bar
13mm Socket
Floor Jack
18mm Socket
Jack Stands
Brought to you by 1A Auto dot com, your source for quality replacement parts, and the best service on the internet. Hi, I'm Mike from 1A Auto. I hope this how to video helps you out, and next time you need parts for your vehicle, think of 1AAuto.com. Thanks.
In this video I'm going to show you front strut replacement on this 2005 Chevy Cobalt. I'll obviously show you the driver's side. You do want to replace your struts in pairs, so replace the driver's side and the passenger's side at the same time. This is the same process for pretty much any '05 to '10 Cobalt, as well as the Pontiac G5. This vehicle does not have ABS brakes, so there would be ... if you have ABS, there's probably just a bracket that's bolted to the strut that you would need to remove. Tools you'll need are a jack and jack stands, thirteen to nineteen millimeter sockets with ratchet and extension, an eighteen millimeter wrench, a hammer. You'll need a breaker bar or a pipe for some extra leverage on a couple of the nuts and bolts, and a torque wrench for reassembly.
Underneath the hood of your car, we're going to start on the driver's side. We'll show you the driver's side. Obviously when you replace struts you want to replace them in pairs, so the passenger's side is basically the same procedure. But there are three nuts that hold the strut at the top. There are fourteen ... or I'm sorry. There are thirteen millimeter nuts. You want to remove one of them completely, and then the other two you can remove, but then just kind of thread them back on, so it holds the strut in place. Use a nineteen millimeter socket or lug wrench, and remove the lug caps and the wheel cover. If you don't have access to air tools, you want to start with the vehicle on the ground. Loosen the lug nuts first, then raise the vehicle, remove the lug nuts. Now use an eighteen millimeter wrench, and you can grab on the back side there, and then an eighteen millimeter socket and ratchet. Remove that nut. A little bit of penetrating oil just to help get that nut off easier.
Now I'm using my eighteen millimeter socket with the ratchet and a piece of pipe. You can use pipe, or if you have a breaker bar. You just need some extra leverage to get that bolt to move some, and then actually grab onto the wrench. Hold the wrench, and just start it loosened, and then you can do it by hand the rest of the way. Once you remove that nut, then you can just knock out or remove the top of that stabilizer link. Now you'll need to remove these two nuts. Also, if you have ABS brakes, there's probably a bracket bolted in up here. These two nuts are eighteen millimeters. I'm just going to shoot them with a little bit of penetrating oil first. Use your 18 mm socket. Use a pipe for some extra leverage. Fast forward here as I remove those nuts the rest of the way. Then what you want to do is you can thread the nut back onto the bolt, probably about four or five turns. That just protects the end of the bolt. Use a hammer, and drive the bolts out. Then obviously take the nut the rest of the way out, and drive it out the rest of the way. On this vehicle, the top one is a little stubborn. It takes a little more force with the hammer, and then I actually use the bottom bolt that drove out.
I use it to help drive the top bolt out the rest of the way. Once you have those bolts out, and the bottom loose, just reach up on the top, and remove the two nuts that you left on the top, and then you'll be able to pull the strut down and out. Take the new strut from 1A Auto, and I actually kind of do this the hard way here. What you want to do is put it up in, and you can either put one of your large bolts through the strut and the steering knuckle, and then start the three nuts up top. I hold it up, and start the three nuts up at the top first. But you start those. Then you get both of the bolts through the bottom and the steering knuckle, and then you can tighten those up. You just want to tighten those up kind of preliminarily, and then you'll torque them. Torque these to a hundred foot pounds. Fast forward through this part. You just take that stabilizer link, put it back into the new strut, and put the nut on, and tighten the nut up. You want to get it nice and tight. If you were to torque it, I guess it would probably be about forty-five to fifty foot pounds.
Also, if you have ABS brakes, you want to reconnect any clips or anything that was connected to the strut. Reinstall the tire. You want to put the lug nuts on by hand first, and then just kind of preliminarily tighten them. You'll torque them when the vehicle's back on the ground. Tighten and torque these to twenty foot pounds. I'll speed up here as I do that. On the inside one, you can't really get a torque wrench on it, so I just used a small combination wrench, and got it nice and tight. Twenty foot pounds is not that tight. You don't want to over tighten them, because you could strip them, and these are not bolts that you want to strip. Now torque your lug nuts to a hundred foot pounds each, and then replace either your wheel cover or the wheel caps and the retainers.
We hope this helps you out. Brought to you by www.1AAuto.com, your source for quality replacement parts, and the best service on the internet. Please feel free to call us toll free 888-844-3393. We're the company that's here for you on the internet and in person.
Shop Products


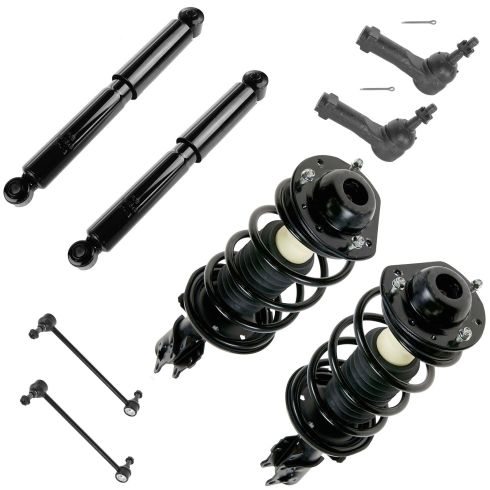
Chevrolet Cobalt HHR Pontiac G5 Front & Rear 8 Piece Steering & Suspension Kit TRQ PSA56179
Part Details:
- (2) Rear Shock Absorbers
- (2) Front Outer Tie Rods
- (2) Front Sway Bar Links
- (2) Front Strut & Spring Assemblies
- 8 Piece

How to Replace Rear Shocks 2007-10 Hyundai Elantra
Check out this video to learn how to replace the rear shock absorbers on your 07-10 Hyundai Elantra. 1A Auto shows you how to do it yourself!
