How to Replace Steering Column Cover 1998-2012 Ford Ranger
Created on: 2016-09-13
How to install and replace a broken, damaged, or cracked upper and lower steering column cover 01 Ford Ranger
-
step 1 :Removing the Steering Column Cover
- Remove the Phillips head screws from the lower steering column cover
- Tilt the column down
- Work off the top half of the cover
- Unscrew the tilt column level
- Remove the lower half of the cover
-
step 2 :Reinstalling the Steering Column Cover
- Insert the upper steering column cover into place
- Insert the lower steering column cover so it snaps with the upper cover
- Tighten the Phillips head screws to the column cover
- Twist the tilt column lever into place
Brought to you by 1AAuto.com, your source for quality replacement parts and the best service on the Internet.
Hi, I'm Mike from 1A Auto. I hope this how-to video helps you out, and next time you need parts for your vehicle, think of 1AAuto.com. Thanks.
In this video, we're going to be working on a 2001 Ford Ranger. We're going to show you how to remove and reinstall the clam shell around the steering column for when you have to access the shifter components, the dimmer switch, the hazard switch, or anything else inside the steering column that you may need to get at.
If you like this video, click subscribe. We have a ton more info on this truck, as well as many other makes and models. If you need any parts for your vehicle, please follow the link in the description over to 1AAuto.com.
You'll need a Phillips head screwdriver for this repair.
Now you'll have to remove these three Phillips head screws on the column. Tilt the column down, and work off the top half of the clam shell. Place the top half out of the way. Unscrew the tilt column level, and remove the lower half of the clam shell.
Reinstall the upper portion of the clam shell, and the lower. These do have little plastic hooks on them. Snap them together. Reinstall your Phillips-head screws. You should have three. Again, our truck is missing one. Screw the tilt column lever back into place.
Thanks for tuning in. We hope this video helped you out. Next time you need parts for your car, please visit 1AAuto.com. Also check out our other helpful how-to and diagnosis videos.
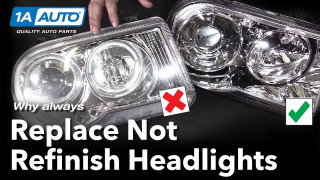
Why you Should Replace Not Restore Headlights
See why replacing your cloudy headlights with new ones is always better than refinishing them Why should you replace your headlights and not clean or refinish them? Three reasons: It's a simple fix, it increases visibility, and it enhances the overall look of your vehicle. Headlights are made from a polycarbonate plastic that can be damaged by UV rays from the sun or suffer pitting caused by road debris light salt and rocks. If you look closely at an old set of headlights, you'll see that the lens is full of micro-cracks. This is called crazing. This crazing, along with pinning, will turn your headlights from crystal clear to hazy yellow and it cuts the output in half, making it very difficult to see at night. It also makes your car look old and dated. With parts from 1AAuto.com and our how-to videos, you can make your vehicle look new and stay safe on the road. To get new headlights for your vehicle, visit 1AAuto.com and visit our YouTube page for do-it-yourself and how-to videos.
