How to Replace Speed Sensor 1995-2009 Chrysler Sebring
Created on: 2013-10-30
This video will show how to remove both the inside speed sensor and the outside speed sensor for the 95-09 Chrysler Sebring
-
step 1 :Removing the Input Speed Sensor
- Loosen the clamp on the air intake hoses.
- Pull the air intake box up and out.
- Disconnect the harness under the transmission lines.
- Use a 1� socket and ratchet to loosen the sensor then twist it out by hand.
-
step 2 :Replacing the Input Speed Sensor
- Twist the new sensor into place.
- Reconnect the harness.
-
step 3 :Removing the Output Speed Sensor
- Disconnect the harness to the right of the transmission lines.
- Use a 1� socket and ratchet to loosen the sensor, then twist it out by hand.
- Remove old O ring if left behind.
-
step 4 :Replacing the Output Speed Sensor
- Twist the new sensor into place.
- Reconnect the harness.
- Line up the air intake box and push it into place.
- Reconnect the intake hose and tighten the clamp.
Tools needed
-
Socket Extensions
Flat Blade Screwdriver
One Inch Socket
Ratchet
Brought to you by 1AAuto.com, your source for quality replacement parts, and the best service on the internet.
Hi. I'm Don from 1A Auto. I hope this how to video helps you out, and the next time you need a part for your vehicle think of 1AAuto.com. Thanks.
In this video, we're going to show you how to replace both the input and the output speed sensors on this 2004 Chrysler Sebring. It has an automatic transmission. This procedure is basically the same for many Chrysler and Dodge vehicles with automatic transmission. You'll need new sensors from 1AAuto.com, a flat blade screwdriver, and a 1"� socket with a ratchet and a small extension.
You're going to remove your air box. Loosen that clamp, there's also usually another bolt down where his forearm is that holds the air box to the frame. You can see, remove the sensor, the hose, and pull the air box up and out. The input sensor is right down below two transmission lines closer to the engine, and you just pull up on a tab and pull it off. Use a one inch socket and a short extension, turn it counter clockwise, and take that sensor out. Then once you get it going, it's usually pretty easy to get into there with your hand and just unscrew it that way. On the left is the new one from 1A Auto an exact match and we'll install and plug in just like the original. Not a whole lot of mystery here. Put your sensor back in place. Make sure the O-ring is on the sensor properly and tighten it up by hand first, and you don't want to over tighten these. You want them around nine to twelve foot pounds. So, put your socket ratchet extension on there, kind of tighten it until you get some resistance, and then tighten is another eighth of a turn or so. Reach down and make sure you securely reconnect the harness. Your output speed sensor is down and kind of closer to the tire on the outside, and there is a connector. Pull back on the tab and disconnect. Use a one inch socket on a ratchet and just pretty much get down in there. It's a little bit tight, but you can pretty much fit it right down in there, and counter clockwise. Once you get the sensor coming out, you can usually grab it by hand and spin it the rest of the way out. The original sensor on top, and the new one from 1A Auto on the bottom exactly the same. Remove the old O-ring if it stays behind. No real mystery here. Thread your new sensor in place. Make sure it has the O-ring correctly installed on the sensor. Tighten it up by hand first, and then like the other one, get it seated, and then tighten it another eighth of a turn or so between eight and twelve foot pounds, and reconnect your connector. You can see with big hands like this you have to plug it in by feel. So, we struggle with it a little bit, but then just get into place and plug it in. Then we'll reinstall our air box, and tighten up the clamp that holds the intake hose to the throttle body. Reconnect the hose and reconnect any of the sensors you might have disconnected.
We hope this helps you out. Brought to you by www.1AAuto.com, your source for quality replacement parts, and the best service on the internet. Please feel free to call us toll free at 888-844-3393. We're the company that's here for you on the internet and in person.
Shop Products


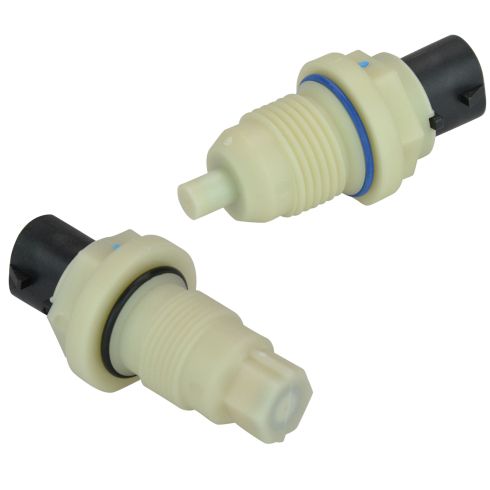
Dodge Chrysler Plymouth Eagle Speed Sensor 2 Piece Set TRQ VSA92593
Part Details:
- 2 Piece Set
- (2) Speed Sensors

How to Replace Speed Sensor Automatic Transmission 1997-2011 Ford Ranger
Watch this video to learn how you can replace the speed sensor on your Automatic Transmission 97-11 Ford Ranger.
