How to Replace Spark Plugs 2007-16 GMC Acadia
Created on: 2020-12-03
This video shows you how to install new spark plugs on your 2007-2016 GMC Acadia.
Tools needed
-
Razor Blade / Gasket Scraper
Torque Wrench
5/8 Inch Spark Plug Socket
Trim Tool Set
Pocket Screwdriver
Air Blow Gun
Vacuum
Socket Driver
Paper Towels
Spark Plug Gapping Tool
8mm Socket
10mm Socket
Ratchet
Okay, friends, to get started on our spark plugs, remove your oil cap, grab this cover, give it a nice little wiggle and remove it. At this point, you're gonna be able to see the front three spark plug coils. On the backside though, right back here, you're not gonna be able to see them because it has the air intake. So we're gonna have to go ahead and get this right out of the way. And since you're gonna be removing the intake, you're gonna wanna make sure that you have the gaskets on hand. You want brand new gaskets for that. Now let's blow off any of this existing dust that's here.
Now that we have this nice and blown off, let's continue on by removing our air intake system here. Go ahead and loosen your clamps. You can go ahead and squeeze on this right here and pull this off of there. That should come right out of the way. Just grab onto this. Give it a nice little wiggle set this aside as well. Now let's follow this right here to its mounting bolt. Take that off of there.
Grab this and just a little wiggle. We're gonna set this aside and start that bolt back in there. Let's move along to this hose right here. I'm just gonna disconnect it at this area right there. See if I can give it a nice little twist to break it free. And that way there, we can set this aside and we don't have to disconnect anything else. Just go ahead and grab that mounting point. Just remember where it goes. Here we are. You just wanna give that a little twist so you can get its ears around its mounting points there.
So now we're just gonna disengage this lock right here. If you were to look on this backside, you can see there's a little hooky do. I'm just gonna push on that and this should come right out a little bit. At this point, I'm gonna push on this tab right there. Give this a little wiggle, give it a peek. Make sure you don't see any funny colors. We'll set it aside. Right up here, there's a 10-millimeter headed bolt. Let's go ahead and remove that. There it is. Set it right back in there so we can't forget about it. This looks great.
There's a little anchor point right here. We're just gonna use a little Forkey tool and pop this up out here. You can also use pliers or whatever you might happen to have. We're just gonna move aside. Now we've got another anchor point down on this side of the intake. You need to make sure you get that off there as well, okay? There we go. With that came on attached. It's good enough. Now let's go ahead and squeeze on this tab right here. We'll get this connector off there as well. There we go. Nice little wiggle, take a peek, set it aside.
Another wiring harness that's anchored in. Pop that up and out of there. Anchor right here. And we're gonna have six mounting bolts that holds the intake to the engine. Remove them all. You can see that these ones are stuck back here. So we'll just leave those where they are. Now let's just go ahead and move these wires a little bit out of our way. We'll give this a nice little shake. there we are. Carefully lift it up. We wanna make sure that we don't drop any debris into the engine because as we lift this up, there's gonna be some open ports into the engine.
Now, under this area, you can see the gasket. Go ahead and set this aside. Now, looking up along here, you can tell that there's a lot of dirt and debris. We need to make sure we get all of this out of here and make sure nothing falls inside any of these ports. It's gonna be super important. Use a vacuum cleaner or whatever you've got.
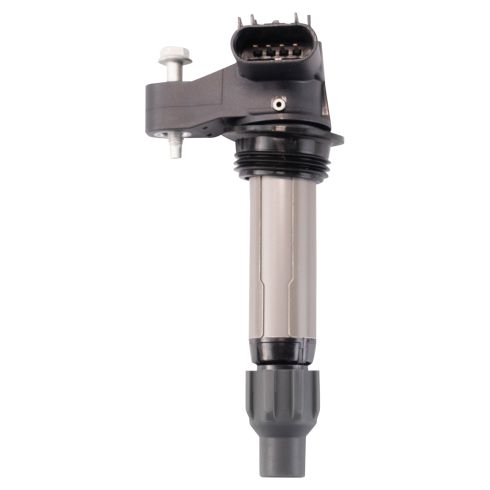
Now that we have this fairly cleaned down, let's continue on by covering up those holes. We wanna make sure that there's no way that anything can make its way down while we're doing our job. Let's continue on by removing our coil wiring. If you press on this tab right here, you should be able to gently pull this off. I always take a peek to make sure I don't see any funny colors. Remove your mounting bolt right here. Go ahead and grab onto that coil. Give it a nice twist and lift it straight up and out of there. Now let's remove our spark plug by using a 5/8 spark plug socket. There's our spark plug, friends.
All right, friends. So now it's gonna be time to install our brand new spark plug. Something that I'd like to mention is this area right here, which is where the electrode is, you want that gap to be approximately 0.043. Essentially just kind of make sure that this piece right here along the bottom isn't bent in due to shipping. Now let's carefully start our spark plug in by hand. We'll go ahead and bottom it out. And now we're gonna torque that to 13 foot-pounds.
Okay friends, now, it's gonna be time to prep the coil. You wanna use a little bit of dielectric grease down here and then a tiny bit up at the electrical area right there. Go ahead and slide this down and over the spark plug, it should fit right in. We'll put on the bolt and then we'll snug it up. Let's get that bolt in there. Now let's torque this to 89 inch-pounds, reconnecting your electrical connector. Make sure it's locked in. Do the same to all the rest. Now that we finished up with all the spark plugs, let's go ahead and get this off of there. And at this point, we need to continue on with a nice razor blade and we're gonna try to clean up the areas where that gasket's gonna ride. Just be careful when you clean it not to force stuff down into these and you definitely wanna make sure you don't drop anything in. If you want to, you can try to stuff it with rags. So I've got these two stuffed. I'll clean those two first and then I'll move along.
Now before we can go ahead and get our intake back on here, we wanna make sure we clean up this lower area the same way. Now that we have this fully cleaned off, I want to talk about the gasket. The gasket is something that you definitely don't wanna reuse. As you can tell along all the rubber areas, they're definitely getting some buildup and they're probably very stiff. Go ahead and put this in the recycling bin and get yourself a new one. Let's go ahead and take that gasket. We're just gonna line it up with the intake here. That looks pretty good.
Now we're gonna put this on top of the engine. I'm just gonna remove my covering, make sure that I have nothing in or around any of my ports. This looks very clean. Go ahead and bring this down and on here. There we are, gasket on there. Perfect. This is setting down good. Let's start on all of our bolts before we snug anything up. Now we're just gonna bottom out these bolts and then we'll torque them to 18 foot-pounds. But before we can do that, I need to let you know how to do it. We're gonna basically make an X pattern. It's gonna be a little bit of a slanted X, but we're gonna start with the center bolts on each bank here and then we're gonna make an X from corner to corner.
Let's go ahead and get this back onto the intake here. Don't forget that you have to just kind of twist it a little bit, slide it down in there, and then lock it in. This is gonna go up like this and it clips on there. Let's go ahead and get this bolt out of here. Now we're gonna get this back on. It's always a good idea to check/replace your gaskets in between anything that you remove. Once you get that started, go ahead and snug it up.
Now let's get our intake back on here. Okay. Make sure it's completely flush on both sides. Go ahead and snug it up. Grab this hose. Slide it into that little rubber boot down there, and then of course clip it in up here. Give it a nice tug. So now let's go ahead and slide our wiring in between this hose area here. Go ahead and connect these together. Make sure it's secure. We'll start that on there.
Now, the next thing we wanna do is secure our wiring so it's not just flopping around. There should be an anchor point right up here where this wire connects onto that would go right into here. And then this one, of course, you've got your other anchor point. Ours is broken. Clip right in here and there should be one right over along the side right there. Now once you have all anchored in, let's go ahead and connect in our sensor here. Give it a nice shake. We're gonna come over to this side, do the same thing to this one. Make sure you lock it in. That's what that red tab is.
Let's go ahead and get our oil cap off of here. Grab our cover, set it right up along the top. Loving bonk to hold it down, make sure it's secure. Put back on your oil cap. All right, so this looks great. The next thing you need to do obviously is close the hood, start it up, watch for a check engine light. Assuming there's no check engine light and you didn't leave anything disconnected, take it for a road test.
Shop Products

How to Replace Spark Plugs 2009-15 Toyota RAV4
Watch this video to learn how to replace the spark plugs on your 09-15 Toyota RAV4. 1A Auto shows you how to do it yourself so you can save money!
