How to Replace Side View Mirror 2006-10 Ford Explorer
Created on: 2015-06-19
Check out this video to learn how to replace the side view mirror on your 06-10 Ford Explorer. 1A Auto shows you how to do it yourself!
-
step 1 :Removing the Mirror Glass
- Push the mirror glass to the side to access behind it
- Loosen the tabs holding the mirror glass
- Remove the mirror glass
-
step 2 :Removing the Mirror Cap
- Pry out from the corner of the side view mirror cap
- Pry up on the tab holding the cap in on the mirror
-
step 3 :Removing the Door Panel
- Pry off the side trim piece next to the window switch panel with a rag and flat blade screwdriver
- Pry up the window switch panel with a flat blade screwdriver
- Disconnect the wiring harnesses
- Pry off the trim piece from the pull handle
- Remove the two 7mm bolts in the switch
- Remove the two 7mm bolts in the door pull
- Remove the two 7mm bolts on the bottom of the door panel
- Pry off the mirror switch with a flat blade screwdriver
- Disconnect the mirror switch wiring harness
- Pull the door panel up and off
- Disconnect the door lock cable with a flat blade screwdriver
- Remove four 6mm screws from the speaker
- Disconnect the speaker wiring lead
- Pull off the speaker
- Carefully peel back the water shield
-
step 4 :Removing the Side Rear View Mirror
- Remove the insulation from the mirror base
- Remove the three 11mm nuts from the mirror
- Firmly hit the mirror to release it from its clip
- Remove the mirror
-
step 5 :Installing the Side Rear View Mirror
- Insert the mirror into place
- Insert the 11mm bolts to the mirror
- Tighten the bolts to the mirror
- Connect the mirror wiring harness
- Push on the insulation
-
step 6 :Installing the Mirror Cap
- Push the mirror cap down on the mirror
- Slide the mirror back to engage the tabs
-
step 7 :Reinstalling the Door Panel
- Put the speaker into place
- Connect the speaker wiring lead
- Insert the four 6mm bolts into the speaker
- Put the water shield into place
- Connect the door lock cable to the door handle
- Lift the door panel into place
- Push in the door panel clips
- Lightly tighten the two 7mm bolts on the bottom of the door panel
- Tighten the two 7mm bolts in the switch
- Tighten the two 7mm bolts in the door pull
- Connect the mirror switch wiring harness
- Push the mirror switch into place
- Connect the wiring harnesses to the window switch panel
- Push the window switch panel into place
- Push on the trim piece next to the window switch panel
- Push on the door pull trim piece
Tools needed
-
Socket Extensions
Flat Blade Screwdriver
6mm Socket
7mm Socket
11mm Socket
Brought to you by 1AAuto.com, your source for quality replacement parts and the best service on the Internet.
Hi, I'm Mike from 1A Auto. I hope this how-to video helps you out, and next time you need parts for your vehicle, think of 1AAuto.com. Thanks.
In this video, we're going to show you how to replace the side rear view mirror on this 2006 Ford Explorer, same for others of this generation Explorer. We'll show you the driver side, but the passenger side's the same procedure. You're going to need a new mirror or pair of mirrors from 1AAuto.com, flat blade screwdriver, and then 7 and 11 millimeter sockets with a ratchet extension.
If you want to save your painted cap, you can remove it without damaging it. You'll want to pull the mirror glass off by pulling back a series of tabs that are in behind, you can see, not the best shot, but I just reach in behind, pull quite hard and firm with my fingers and my thumbs, pull those tabs out to release the glass, speed up here a little bit, and once you get three or four of the tabs on the top and side off, then the mirror glass will come out. Then there's a series of tabs around the side, the top, as well as one in the middle that's the toughest one.
On the side and top you just carefully pry out with a screwdriver, and then once you get the side out, keep pulling the side out and then pry the top to release the top ones. Once the top's released, then you want to release the middle one, it's the most difficult one, you want to pry on, you'll see the painted tab and you'll see a black tab that's part of the mirror, pry up on the black tab while you pull out on the mirror cover and it'll come off.
You can use a flat blade screwdriver, and I'm using a rag just to protect the door panel. I work the screwdriver in under the end of this panel and pry straight out. You don't want to pull up or down. You want to pry straight out to release the clips, and then you pull it off the rest of the way, again, straight out, and remove that panel. The clips come off with the panel. Slide them off to either side, and then replace them in the rectangular slot in the door panel. Then, again, you can use your screwdriver. There are four clips. There are two on each side. You just pry up right near the clip, again, straight up to get the switch plate up and off. Once it comes up and out, there are three harnesses. You just press the tab on each harness to disconnect them. Again, use your screwdriver and pry out the panel on the door pull.
There are six 7mm screws. Two, and then you can see one inside that round part and then another one below it, and then right inside the door pull, and then two more at the bottom. I'll fast-forward as I use a 7mm socket with a ratchet and extension. The two bolts at the top kind of fall down in. That's all right. Once you get the door panel off, you can usually retrieve them. Use the flat blade screwdriver to pry the bottom of your mirror switch, and then pry each side to release the clips. Pull the switch out, and there's a tab on the harness to disconnect it. Push the tab and pull the harness to disconnect.
Pull the door panel up. If you have any problem at this step, it's usually because one of the bolts is not all the way out, and then pull it back. Going behind the disconnect cable, you pry two tabs that hold the cable into the door panel. You pry the inside one there first, and then I push on the outside one as I'm pulling the cable out to release the cable from the door panel clip. Then pull the cable out, then around, and then you pull the head of the cable out of the door handle. When your door panel's off, sometimes the bolts will fall to the floor, or you can shake them out of there if they get stuck. Remove the insulator that covers the mirror base. There are three 11 millimeter nuts that hold the mirror in place, and I'll just fast-forward here as I remove those three nuts and be careful not to drop them down into the door. Then there is a clip at the top, so you can just give the mirror a firm hit and it'll come loose.
New mirror from 1A Auto's on the left; old one on the right. They're exactly the same, we sell them with all kinds of different options, this one happens to be puddle light and power heated. Put the new mirror in place and the top clip should hold it. You may have to pull in pretty firmly on the bottom, and what I do is load the nuts into the socket and then put them into place. I didn't get a very good shot of that. Once you get them started, get all three of the nuts started first and then go around and tighten them up. Be careful not to over tighten them. Once they're tight, reconnect your harness and put the insulator back on. You were able to get your body colored one off and if it's not damaged you can snap that back on.
If you wanted to paint this one to match the color, you can be as crude as going to your hardware store and finding a color that matches, you could also go to an automotive parts store that has a paint department, and they can help match the color and help you get it into an air charge can that you can that you can spray it with. My personal favorite is just take the chrome and snap it on. Then you don't have to worry about matching or anything. Hook our switch back up temporarily and just turn the key on and do a test.
To reinstall, get your door panel close. There are three tabs on the bottom that you can kind of rest the door panel on the door. Put the cable into the handle, and then pull the cable down and clip it into the door panel. You can line up the three bottom clips on the door panel. Kind of rest it in place. Make sure you pull all the harnesses through their correct spots. Make sure you can see the mirror harness. I pull the mirror harness through there, and then just push the door lock knob into the hole. Then press the door panel. Make sure it's flush against the door, and slide it down into place.
To reinstall the two bolts up top, put them into you socket, and then you can look right in there, feed them into place, and put them in. If you want, you can put a little bit of tape or glue on the socket to hold the bolt in place to get it back in there. We'll speed up here. Basically, on these bolts, the bottom two that hold the bottom of the door panel, just tighten those up snug. You don't want to strip out the plastic grommets that they go into, and then the top four you want to be tighter because those are where you pull against the door more. Reconnect your mirror switch and push it into the door and into place. Then the trim panel on the door pull pushes straight on. Reconnect the three harnesses to your switch, and then push that down into place and apply pressure in the four spots where it clips in. Then line up the last panel, and basically tap it into place.
Thanks for tuning in. We hope this video helped you out. Next time you need parts for your car, please visit 1AAuto.com. Also check out our other helpful how-to and diagnosis videos.
Shop Products


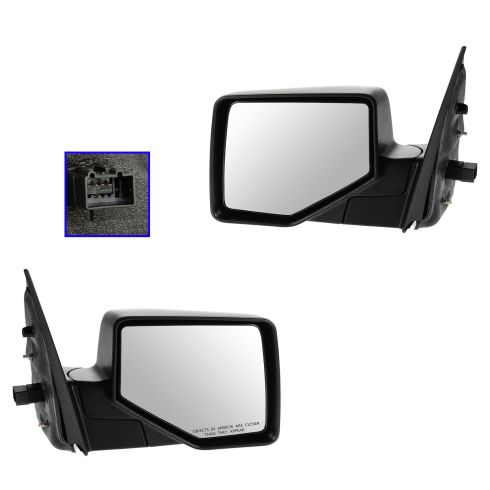
Ford Explorer Explorer Sport Trac Driver & Passenger Side 2 Piece Mirror Set DIY Solutions MIR04332
Part Details:
- Textured Black
- Direct-fit replacement
- Manufactured with high quality materials
- Mirror glass meets or exceeds DOT standards
- 2 Piece
- (1) Passenger Side Mirror
- (1) Driver Side Mirror
- Electric
- Yes
- Black
- Black
- No
- Textured
How To Replace Side Rear View Mirror 2004-08 Ford F-150
Watch this video to learn how to remove and replace a broken, cracked, or smashed side view mirror on your 04-08 Ford F-150. 1A Auto shows you the steps
