How to Replace Side Mirror 92 99 GMC K1500
Created on: 2020-05-27
Watch this video to learn how to install a new side mirror on your 1988-02 GMC Sierra.
Tools needed
-
Socket Extensions
Socket Driver
10mm Socket
Trim Tool Set
So to start replacing the mirror, you're gonna need a nice plastic trim tool so you can get in between the door panel which I have removed. You don't necessarily need to do that, by the way. And this piece right here. All you would do is go right in between the two of them, lift this up and then pull away. And it should pop right up and free. You're gonna see a little hooky-doo there and one right there and that's just how it's gonna go back on sliding down nice and easy. Once you have that removed, you can use that same plastic trim tool and just get this foam out of here. I try not to ruin it because I'm gonna put it back in when I'm done.
At this point, we can see the wiring. Just lift that up to approximately where you can get to it and then you're gonna see this little tab right there. you would just wanna pull that away and separate the two pieces. Those look good. I'll set that down in there right now. Set this aside. Next you wanna remove your three mounting nuts. There's gonna be nuts that hold on to the studs that are part of the mirror. We'll take all three of those out of there and then we can draw the mirror out. To remove these, you can use something as simple as a ratchet with a socket or, of course, you can use a nice ratcheting wrench which you'll probably have to use because it's gonna be a kinda tight space right here. So I would just go with the ratchet wrench. Put that on there.
Come on, baby. There's one. Do the same to the rest. Before I go ahead and take this one off, I just wanna let you know that I started one of the top nuts on there just a teeny bit just to keep the mirror from falling down while I take off this last nut. There it is. So now I'm just gonna hold that mirror from the outside and I'm gonna remove this nut. And I'm just going to carefully draw it right out of the door. There it is, friends.
So we're gonna take our new mirror. We're gonna take this nice rubber pad. I'll slide this through there. And then of course, get it lined up. And then I like to just kinda press it in, get everything nice and situated. That looks great. Now let's go ahead and slide this through the door panel from the outside and have our nuts ready to start them all on. So I'm just coming up right and along here. And put the wiring through first. Now get those studs lined up. You wanna be very careful for the pane, of course. I have to come underneath my window louver. I'll just slide this in. There we are. All right. Starting those nuts. Okay. All three are started. Our wire is nice and out in the open. There's no way that it can get pinched anywhere. Let's go ahead and snug them up.
Okay. All three of those are nice and tight. I'm just gonna grab that mirror, give it a nice shake, make sure it's nice and secure and also make sure it's seated all the way along the door. This looks perfect. The next thing we're gonna do is connect in our wiring. Just gonna find that little harness. Just compare the two. This looks good. Slide it in. Perfect. Let's go ahead and tuck this down in there so it's nice and safe. Make sure there's no areas where anything could get caught on or put a tug on any wires. Now we're gonna put this back in here. That sits there perfect. Now it's gonna be time to get this little triangular piece on here. If you look right along there, that's gonna be the area that needs to run along the ridge of your door panel which, like I said, isn't necessarily on here now but you'll have to imagine it. Then this right here is gonna have to slide down over that. So you just come over the top of everything, look down, line everything up and then press down. That should lock in nice and secure. Give it a nice tug. Make sure it doesn't fall off. The next thing we wanna do is of course test the mirror to make sure it's functioning like it should. So I'm gonna set my switch to the left mirror because that's the one I replaced. Go left, right, down, up. This works perfectly. The next thing you'd wanna do of course is to set it to the height that you need it for optimal viewing purposes.
Shop Products


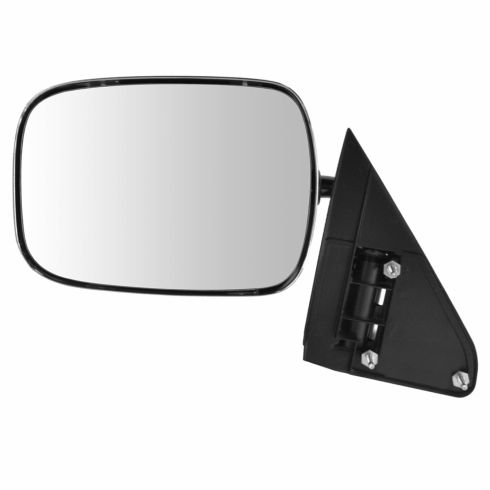
Chevrolet GMC Cadillac Driver Side Mirror TRQ MRA06335
Part Details:
- Pedestal Style
- Manual
- Chrome
- Chrome
- No
- No
- Clear
- No
- Flat
- No
- 3
- Stainless Steel
- No
- No
- No
- No
- No
- No
- No
- No
- Manual
- No
- No
- No
- No
- Smooth
- Smooth
- No

How To Replace Side Rear View Mirror 1998-2002 Honda Accord
Check out this video tutorial by 1A Auto, and you can learn how to replace the side mirrors on your 98-02 Honda Accord!
