How to Replace Side Mirror 2004-10 Toyota Sienna
Created on: 2013-03-07
Check out this video to learn how to replace the side mirror on your 04-10 Toyota Sienna with the help of 1A Auto in this video.
-
step 1 :Removing the Door Panel
- Pry off the plastic trim at the top of the door panel.
- Pry between the lock and bezel behind the door handle and remove the bezel.
- Remove the three Phillips screws in the door panel.
- Pry out and turn the Phillips head center on the clip on the side of the door panel.
- Lift the door armrest up and off.
- Disconnect the switch panel harness.
- Remove the uncovered Phillips screws and remove the cup.
- Remove the Phillips screw under the cup.
- Pry out the door panel starting at the lower inside corner. Release the clips around the door panel.
- Lift the door panel up and out.
- Disconnect the harnesses and the door handle rod.
-
step 2 :Removing the Side Mirror
- Disconnect the harness.
- Remove the three 10mm nuts.
- Pull the mirror off.
-
step 3 :Replacing the Side Mirror
- Put the harness down through the door.
- Line up the mirror and push it into place.
- Replace the 10mm nuts.
- Connect the mirror harness.
-
step 4 :Replacing the Door Panel
- Reconnect the harnesses and the door handle cable.
- Push the panel down into place.
- Line up the clips and hit them into place.
- Replace the Phillips screw in the door cup hole.
- Replace the door cup and screws.
- Replace the screw behind the door handle.
- Reconnect the switch panel.
- Push the armrest panel into place front first.
- Replace the screws.
- Replace the clip on the side of the door panel.
- Replace the door handle bezel.
- Replace the trim panel at the top of the door panel.
Tools needed
-
Flat Blade Screwdriver
Phillips Head Screwdriver
10mm Socket
Ratchet
Brought to you by 1AAuto.com. Your source for quality replacement parts and the best service on the internet.
Hi. I'm Mike from 1A Auto. I hope this how to video helps you out, and next time you need parts for your vehicle think of 1AAuto.com. Thanks.
In this video we're going to show you how to replace a side mirror. You'll see the owner of this van accidentally kind of broke their side mirror and fixed up with some nice pink duct tape. Pretty easy procedure. This is a 2008 Toyota Sienna. This procedure is basically the same for any 2004 to 2010. We'll show you the driver side, passenger side. It's obviously very similar procedure. The only tools you'll need are a Phillips screwdriver, flat-blade screwdriver, and either a 10mm wrench or a 10mm socket with a ratchet.
Okay, so you can see here the owner was going for maybe some style points actually they were just looking to keep their mirror on there until their new one from 1A Auto came in. The pink duct tape does the job but let's be real it's not really what you want to have holding your car together for the long term. You need to open up, and the first thing you're going to need to do is remove the duct tape first, and after that then you're going to want to remove your inside door panel. This piece of plastic trim comes right off. You just have to pull firmly at the top, it's up and out, and then pull your inside door handle back and pry between the lock and this bezel and that bezel comes right out. Now there's three screws to remove. They are all Phillips, one right in there, one down here, and then one here, and then you're going to pry out and use your Phillips screwdriver to get this plug out in the back here. I'm just going to fast forward as I remove those three Phillips screws. The small plug on the end you need to kind of pry it, pull it out a little bit then use the screwdriver to unscrew the small center plug and then it should come out.
Grab back here firmly, work fingernails underneath or your fingers underneath and pull up firm there and then pull this back up and out, and your switch disconnects right here. Unplug this, there's a tab here, push on the tab and hold back just on the plastic ears here. Let me show you how this works. It's already reset, but this whole thing actually slides back, so once you take it apart make sure you pull this back as far as it will go. Now you see two Phillips screws right here, remove those. This cap lifts up and out of the way. There's another Phillips screw right here, remove that, and go down to the bottom here basically grab this corner, kind of lift up and out with this end down here and this end. Nice and firm. Now it comes up.
There's two cables here. Take them out of that pin there. Looking in behind here there are a little hard to film but you just pull these cables out and they rotate and come up and out, and there's one last connection right here, press the little tab. Our mirror is plugged in right here. There's a little tab, push, unplug, and actually remove the most part of the mirror. Okay, busted mirror with the pink duct tape off. Okay still you have to remove these three 10mm nuts and remove the remaining base off. Any 10mm wrench would work just fine. I prefer 10mm socket ratchet. Hold the back side. Okay, new mirror from 1A Auto one obvious benefit is the fact that the mirror and base are all one piece it's going to go on there, it's going to plug in just like the original. The other benefit or maybe you'd like the pink duct tape, but there's no pink duct tape on this one, and it's just going to right install just like the reverse. Make sure you put the harness through. It has the rubber pad and gasket, just make sure you pull the harness all the way through, it doesn't get pinched, and that the studs go in, and it comes with new bolts. Thread those on.
Okay and then tighten them up, just tighten them to get them firm, but you don't want to over tighten them. Once you basically feel it's getting tight that's when you stop, and bring this down. Make sure that's hooked back up on there, plug in the harness, and see the keys are here. Okay outside, inside, down, up it's all working correctly. Okay reinstall the door panel. Let's connect our courtesy light first, now these cables, pull them over and you put them down in first and then flip them around and lock them in place, okay, down and first. Lock in place, just test to make sure you hook them up correctly. Get the door panel closer and put the cables in to the little clip here. First make sure you push the panel against the window and slide it down in place. If it lines up there that's good, just around the edge and set the clips back in to place.
Okay now we can put it back together. This large screw's first. While tightening that just to make sure that our window switch harness is up through. Connect this piece of trim next. I'll put this screw in for the door handle. Okay now you're going to reinstall this, like I said before make sure this is pulled all the way back and the plug should go in kind of put it in but don't get in some pressure on the wires and then push the whole cage right in, and work the harness down in, put the front end first and then bring the rear down into place, snap it in. Okay now it's just a matter of two more screws. Just make sure you pull the center out away, push it in and just push that to lock it in place, and then your trim panel put it back, lock it in and then this panel, it's got a tab right here that goes down and then push it in place.
We hope this helps you out. Brought to you by www.1AAuto.com your source for quality replacement parts and the best service on the internet. Please feel free to call us toll free 888-844-3393. We're the company that's here for you on the internet and in person.
Shop Products


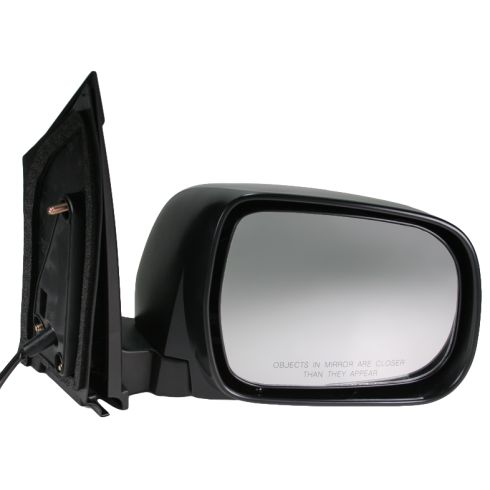
2004-10 Toyota Sienna Passenger Side Power Paint to Match Mirror TRQ MRA05625
Part Details:
- Paint to Match
- Electric
- No
- No
- Clear
- No
- Textured
- Curved
- Yes
- 3
- Black
- No
- No
- No
- No
- No
- No
- No
- Manual
- Yes
- No
- No
- Black
- Textured
- No
- 3
- Plastic
- 11.02 in
- No
- No

How to Replace Side Mirrors 2002-07 Subaru Impreza WRX
How to repair, install, fix, change or replace a broken, smashed, cracked, or shattered side view mirror on 02, 03, 04, 05, 06, 07 Subaru Impreza WRX
