How to Replace Side Mirror 2013-14 Subaru Crosstrek
Created on: 2018-02-12
New Mirror from 1AAuto.com How to repair, install, fix, change or replace a broken, smashed, cracked, or shattered side view mirror on 13, 14 Subaru Crosstrek
-
step 1 :Removing the Front Door Panel
- Pry out the trap door in the door pull with a flat blade screwdriver
- Pry out the trap door in the door handle with a flat blade screwdriver
- Remove the Phillips screw from the door pull
- Pry out the clips along the door panel with a trim removal tool
- Lift the door panel straight up and off
- Unclip the cables from the door handle
- Remove the cables from the door handle
- Disconnect the power window switch wiring harness
- Remove the door panel
-
step 2 :Removing the Mirror
- Carefully loosen the vapor barrier with a razor blade
- Remove the 10mm bolts from the mirror
- Disconnect the wiring harness
- Remove the mirror
-
step 3 :Swapping the Mirror Cap
- Pry off the lower cover with a trim tool
- Pry off the upper cover with a trim tool
- Press the cover onto the new mirror
-
step 4 :Installing the Mirror
- Insert the mirror into place
- Tighten the 10mm bolts
- Connect the wiring harness
- Press the vapor barrier into place
-
step 5 :Installing the Front Door Panel
- Connect the power window switch wiring harness
- Connect the cables to the door handle
- Lift the door panel onto the door
- Press in the clips on the door panel
- Tighten the Phillips screw to the door pull
- Tighten the Phillips screw to the door handle
- Press on the trim piece to the door pull
- Press on the trim piece to the door handle
Tools needed
-
Razor Blade / Gasket Scraper
Socket Extensions
Flat Blade Screwdriver
Phillips Head Screwdriver
10mm Socket
Ratchet
Trim Tool Set
Hi, I’m Mike from 1A Auto. We’ve been selling auto parts for over 30 years!
There are two screws. One behind this cap here and one down inside the door pull opening. Take a small flat bladed screwdriver and pop them open. They won't come off. They'll just flip open and do the same for both. Use a Phillips head screwdriver remove the screw. Put those aside. Do the same for this one. Once the screws are removed, the rest of the door panel is held on with clips along the outside edge. You need a plastic prying tool. You can buy these from 1aauto.com. Going to wedge it underneath the edge. You can user the thinner tool. Just work that in there. Bring it down though. With a good strong pull, it's going to pop it off. Just work your way around the door. Once those are all free, door panel should lift straight up off.
Unclip the door pull and the lock cable. Pull them straight out like that. It's hard to see, but you're going to slide this little lead weighted ball that looks like a lead fishing weight. It pops out of the door lock. Do the same for the other one. Just pop it out. Now go down underneath. Find the door lock button and the window switch. Find the lock. I'm working on them upside down. This one has a lock on the inside. It's a very small push tab here to unlock it. It's on the inside. I'm going to do the same for the other one. It's really hard to push with my finger. I'm going to use this small flat bladed screwdriver and push in on the lock and then pull the connector out. I'm going to put the door panel aside so it doesn't get damaged.
We need to remove the vapor barrier to get to the screws. To get to the 10 millimeter bolts that are inside the door panel that are holding the mirror on. This stuff's really sticky and gross. It's why I'm wearing gloves. You can take a razor blade, and if you need to, you can just cut along it here. This stuff's real sticky. It should be able to be reused and just stuck back into place. But the razor blade by just gently pulling and just cutting away at the black. This is called butyl tape. See how sticky it remains. We can reuse this vapor barrier without tearing it or putting holes in it. It might tear a little bit. If it does, it's not a big deal.
I'm going to have to unclip the connector. This is for the mirror. Push in on the lock and use that small flat bladed screwdriver. Push in on the lock and pull it out. Slide it in there, the other side of this vapor barrier. That should be enough space for me to get to the two bolts up in here, 10 millimeter, and one that's up here. It's that one and those two there. I'm going to use the 10 millimeter socket and extension and a ratchet. I'm going to go up in here, start with this bottom most one, 10 millimeter bolt. I will remove it. Carefully pull it out. Don't drop it inside the door. It's pretty loose. Put that aside to reuse it. The mirror is going to start to come loose. I'm going to switch to just extension. Hold on to the mirror. Pull the bolt out and pull the mirror away from the door. This rubber did come with it. Also going to have to feed the harness down and inside, and just got it out. Didn't quite fit that way so just turn it, it'll come right out. There we have our old mirror that's broken.
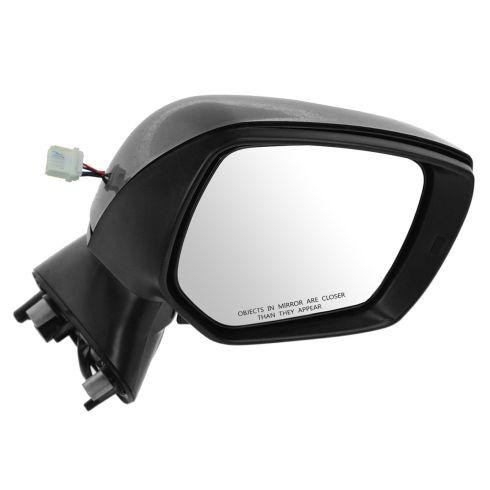
Here's our original passenger side mirror from our vehicle. This one is broken and busted. That's why we're replacing it. A brand new one from 1aauto.com. Let's see. It's an exact match. It's also heated. It has a cover that can be painted to match. You could take this to a body shop, have it painted, or you can install it as is if you want to save some money. This part is also separate. This is how it comes to you. You'd have to snap this cover into place first and then snap this into place. Then you can install it on the vehicle. This will work great and fit great and we're going to swap over this painted cap because it's in good shape and put it onto our new mirror.
This lower part should pull right off. You can get a small prying tool but this one's already kind of broken. See right there, it'll pop right off. It just got some clips. Just put that aside. We're not going to reuse it. Now I do want to reuse our painted cap. It does have a little snap there. Take our plastic prying tool. There's a little tab there. I want to just push the tab out, at the same time pop it off. There's our painted cap. It's in really good shape. We can save some more money. We don't have to have our new one painted. We're going to reuse this one.
Here's our new mirror. This will snap right into place. We'll take our new bottom piece and then we'll install right over it. Get this, it's the tab here, get that lined up on this side, slid down, and it'll snap into place. And we have the mirror ready to be installed on the vehicle. Feed our wiring harness through the opening. There are some rubber guide pins. That's going to go in down there. This one's going to go into the one up top here. I want it to hold that position and to fish the harness out of here I'm might have to pull this down some more.
Right here is the window run channel. On this side where my finger is pointing is where the window would go up and down. So you want to make sure the wiring harness is routed outside of that, otherwise you'll put the window down, it'll break this harness. It's going to stay on the outside just like this. I'm going to hold on to the mirror. I'm going to take our bolt, and I don't want it to fall, so I'm going to grab just a little bit of this butyl tape on here so you can get it to stick. That little bit of butyl tape it's going to be sticky, it's going to hold this into the socket, keep it from falling out. Now I'm still holding on to this. I don't want the mirror to fall, so I'm doing this one-handed. I'm going to capture this bolt here first because I can see it easily. That's captured enough and now I can let go of it and I get my two hands back. Take the ratchet, tighten these down. You don't have to kill them, just when you feel a good tight just stop. Do the same for all of them.
Okay, going to run the harness up, I'm actually going to go on the other side of this dual harness here, it's going to go through this opening in the plastic and it will plug in this way. We can reinstall the vapor barrier. My best to stick it back into place. This stuff is real sticky, so we should be able to just push it back in place.
When I removed the door panel these trim clips stayed behind in the door. I'm just going to use a panel clip tool to pull them out, just kind of slide behind them, pop them out. Do the same for all of them. If that rubber piece stays, that's okay, you just put it back on. These clips that popped out the top part will just slide right in, lock in. Just do that for all of them.
Reinstall the door panel and connect the door lock and the window switch. Push them in, snap and click when they're in place. Then reconnect these. Start with the bottom one. It's kind of hard to see. This comes out and there's a little opening. Lay it in there and then snap this into place. That'll be our door release. This one at the top is for the door lock. Where is it? There it is.
There's an opening here and it goes in there. Then you slide it over and it clips into place. We're going to hang the door on this edge here. It might be easier to put the window down. Or we can have it up if we prefer. Push it down just like that. Then, we're going to just go along, push the clips back in, they'll snap when they're in place. All right. Door panels clipped back in place. Reinstall the Phillips head screws. This one goes up in here. Push that little door back. That was a quick clip down. Do this one in here. Door panel is reinstalled.
Thanks for watching. Visit us at 1AAuto.com for quality auto parts, fast and free shipping, and the best customer service in the industry.
Shop Products


Subaru Impreza XV Crosstrek Passenger Side Mirror TRQ MRA06565
Part Details:
- No
- Black
- 5
- No
- No
- Curved
- No
- Plastic
- Yes
- Black
- No
- No
- No
- Smooth
- No
- No
- No
- No
- Manual
- No
- Clear
- No
- 3
- Yes
- Electric
- Smooth
- No
- No
- 12.99 in
- Yes

How To Replace Side Rear View Mirror 1998-2002 Honda Accord
Check out this video tutorial by 1A Auto, and you can learn how to replace the side mirrors on your 98-02 Honda Accord!
