How to Replace Serpentine Drive Belt Tensioner 2001-07 Toyota Highlander L4 2-4L
Created on: 2018-03-28
How to repair, install, fix, change or replace a broken, noisy, squeaky, worn or groaning serpentine belt tensioner on 01, 02, 03, 04, 05, 06, 07 Toyota Highlander.
-
step 1 :Removing the Serpentine Belt
- Familiarize yourself with the route of the serpentine belt
- Insert a breaker bar and 19mm socket into the tensioner
- Slowly turn the tensioner clockwise to loosen the belt
- Pull the belt off the alternator
- Slowly release the tensioner
- Remove the serpentine belt
-
step 2 :Removing the Front Passenger Side Wheel
- Loosen the lug nuts with the vehicle on the ground
- Raise and support the vehicle
- Remove the lug nuts
- Pry off the center cap with a flat blade screwdriver
- Apply rust penetrant to the wheel studs
- Thread two lug nuts lightly onto the studs
- Strike the tire with a rubber mallet or dead blow hammer to loosen the wheel
- Remove the two lug nuts
- Pull the wheel off the studs
-
step 3 :Removing the Serpentine Belt Tensioner
- Remove the fasteners from the belt shield
- Pull off the belt shield
- Loosen the 14mm nut at the bottom of the tensioner
- Loosen the 14mm bolt at the top of the tensioner
- Remove the 14mm nut
- Remove the tensioner from the engine
-
step 4 :Installing the Serpentine Belt Tensioner
- Thread the 14mm bolt through the top of the tensioner
- Maneuver the tensioner into place on the engine
- Line up the bottom of the tensioner with the stud
- Push the tensioner onto the stud with a pry bar
- Start the 14mm bolt
- Fasten the 14mm nut onto the stud
- Tighten the 14mm bolt
-
step 5 :Reinstalling the Serpentine Belt
- Loop the belt around the crank pulley
- Bring it around the power steering pulley
- Bring it around the water pump
- Bring it around the A/C Pulley
- Bring it around the crank shaft pulley
- Bring it around the belt tensioner
- Slowly pull the tensioner clockwise with a 19mm socket and breaker bar
- Pull the belt over the alternator
- Slowly release the tensioner
-
step 6 :Installing the Wheel
- Lift the wheel onto the studs
- Start the lug nuts by hand
- Lower the vehicle to the ground
- Torque the lug nuts to 76 foot-pounds in a crossing pattern
- Clip the center cap onto the wheel
Tools needed
-
14mm Wrench
Torque Wrench
Rust Penetrant
Pry Bar
Jack Stands
19mm Socket
21mm Socket
Rubber Mallet
Flat Blade Screwdriver
Dead Blow Hammer
Ratchet
Floor Jack
1/2 Inch Breaker Bar
Hi. I'm Mike from 1AAuto. We've been selling auto parts for over 30 years!
To open the hood, we have to pull the release from inside of the car. It's just inside, right around your left knee on the driver's side. You need to release the secondary or safety release. Just kind of feel around for it. This one is right here. Squeeze up. The alternator is located here, in front of the engine, right on the top.
You need to remove the belt from the pulley. I'm going to use a serpentine belt tool to loosen the tensioner. It's not spring loaded. It's got a shock on it. There's a 19 millimeter, like welded on, or it's a nut part, a hex drive that's part of the tensioner. When you pull down on this, you basically just have to slowly compress it. It's like a shock that you can see. So you don't pull really fast and hard, because you'll break the tab off on the tensioner. You just sort of pull gently and slowly, and you'll feel it compress, and the belt will get looser. See how the belts getting loose, and then you pull it off the pulley.
If you don't have access to a serpentine belt tool, take this out of here. You can use a breaker bar with a 19 millimeter socket. I'm using a 12-point to give me a little bit more range. Or you can use a large ratchet so you can have more movement. It's going to be a little bit trickier to get down here, so I want to feed the breaker bar and the socket down in there. You've got a bracket here, and there's this brake line that comes out, and you just have to kind of be careful not to bend them too much. You're going to do the same exact thing, just reach in here gently, and pull it, and it will compress.
I’ve got to push this out of the way a little bit. So you're pulling the front of the engine. I'm going to carefully put a pipe over the end of this wrench over the end of this breaker bar to give me some more leverage. And then just gently pull down and compress the tensioner. See the belt releasing? I think that's as far as it's going to go. Reach down and lock it right off the pulley. Release the tensioner. Now you can remove the breaker bar from the tensioner, and feed the belt off the rest of the pulleys.
I'm going to use a 21 millimeter deep socket and a breaker bar. We'll loosen the lug nuts with the vehicle on the ground. This way, the wheel doesn't move on you. We'll raise and support the vehicle. Remove the lug nuts. Take the tire and wheel off. We're using our two post lift, but you can use a jack and a jack stands. Use the socket and remove the rest of the lug nuts. See if this wheel comes free. It is a steel wheel, of course the rotor that is touching is also steel, so there's a good possibility that these have rusted together. Yeah, it's on there pretty good. What I'm going to do is pop this center cap off. Take a large flat bladed screwdriver. There's a little slot right here. It'll pop right out.
This is the hub. Obviously these are the wheel studs. There's a lot of corrosion and rust in here. That's basically where it seized up. I will take some rust penetrant, I'm going to spray it along the edge here. I'm going to spray some into these lug openings to try to get some hopefully between the wheel and the brake rotor. Take two lug nuts. You can use one, but I like to use two. Just thread them on real lightly, because now, to get this free I'm going to take a large mallet, a dead blow mallet, and I'm going to hit along the tire and try to pop this wheel free. The lug nuts are on there so the wheel doesn't fall off. Sometimes it takes one hit, sometimes it takes 10 hits. You just got to hit it until it breaks free. Now you take the wheel off.
Normally there's a plastic shield here to protect the belts. Ours is missing. If you have it, there would be two screws here, possibly some clips underneath. You would remove it and take it out of the way. The belt tensioner, it's an auto-tensioner with, like, it looks like a little shock absorber here. That's what puts tension on the belt. There's a mounting nut here and a mounting bolt up here. They are both 14 millimeter. I'm going to use a 14 millimeter box wrench here, I'll loosen this up. It's got a lot of grease and oil on it, so we’ll see if it comes loose. It came loose pretty easily. We'll get it loosened up. I won't take it all the way off just yet.
I'm going to reach up and loosen the other one. This is a bolt. See, it's starting to come loose. It's a little too tight to get a socket and ratchet in here. If you have access to it, a ratcheting wrench will work great in this space. It's going to go up against the frame rail, so I won't come all the way out, so it's going to sit there loose up against the frame rail. Take off this nut down here and put that aside. Pull off the stud and then slide this all the way out and just work it out, just like that.
This is our original belt tensioner from our vehicle and our brand new one from 1AAuto.com. It’s the same exact design: it has a little shock that provides the tension, comes with a new pulley, comes with a new part to put your ratchet on there and compress it. Sometimes these can break off on the old ones. Same exact design. This'll fit great and work great for you.
For this hole here, where the upper bolt is going to go into, I’m going to have to do some maneuvering in here to get this in, because the tensioner, I've taken the old bolt, I'm going to reuse it. I'm going to put it in here first and then just do my best to get it up into position. It’s going to take some creative maneuvering and finesse. Just be patient and work it in between the engine and the frame rail. There it is. You kind of have to find, there's a gap here on the engine block. You can just find the right angle and it will slide up into place.
Then I'm going to have to maneuver the bolt out just slightly, and at the same time kind of twist this thing. It's almost in the hole. I'm going to use a large pry bar and I'm going to carefully line the pry bar up here on the edge at the bottom of the engine and then gently pry it over. I just need a little bit of clearance to get the bolt up into the hole. Just like that, it's in the hole. We'll put it over the lower stud. I can let the engine go. I'm going to get this top bolt started. I'm using the open end of the ratchet to get it started until there's enough clearance I can get the ratcheting end on there. You're just going to struggle with this for a while. It's not easy to access, but it can be done. I’m going to tighten this down. Put the lower nut on. We'll tighten it up. Once I feel it get tight I'll stop, and I'll do the same for the one up top.
The drive belt goes around the power steering pulley, up and around the alternator pulley, around the water pump, down around the AC compressor pulley, around the crank, and then up over the tensioner pulley.
Put the belt line up on the pulleys. Put out bar back on here, and then gently compress the tensioner again. It feels like it's bottom out, so I pull tight on the belt. Slide it onto the alternator pulley. Pull the pipe off. Release the tensioner slowly to let the tension come back. It won't spring back because it's like a shock—it comes out a little slower, and then the belt is on there perfectly.
Reinstall the wheel. Thread the lug nuts on by hand. They do have a cone seat, they'll line up the wheel. Tighten them down with a socket and seat them. Now you lower the vehicle to the ground and torque the lug nuts. I’m going to torque the lug nuts in a cross pattern to 76 foot-pounds. Now you can reinstall the center cap. It just clips into place.
Thanks for watching. Visit us at 1AAuto.com for quality auto parts, fast and free shipping, and the best customer service in the industry.
Shop Products

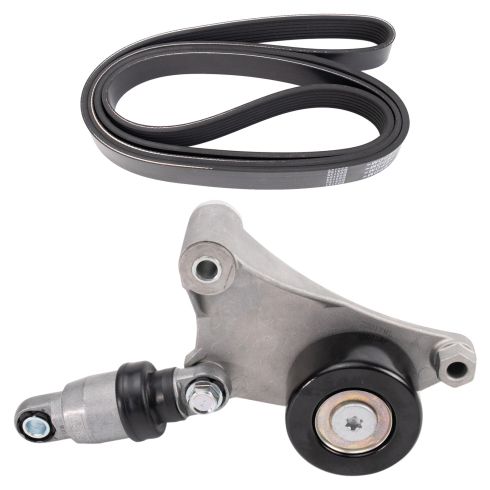
Toyota Scion 2 Piece Serpentine Drive Belt Component Kit TRQ BPA06491
Part Details:
- 2 Piece
- (1) Serpentine Belt
- (1) Accessory Drive Belt Tensioner

How to Replace Serpentine Belt Tensioner 1992-2000 Chevy Tahoe
This video shows you how to install a new belt tensioner in your 1992-2000 Chevy Tahoe.
