How to Replace Serpentine Belt Tensioner with Pulley 2006-11 Chevy Impala
Created on: 2013-09-08
Use the belt diagram and detailed instructions provided in this video to help you replace the serpentine belt and pulley on your 06-11 Chevy Impala.
-
step 1 :Removing the Coolant Bottle
- Remove the two 10mm nuts that hold the coolant overflow tank
- Pull the coolant tank up and out
-
step 2 :Removing the Serpentine Belt
- Remove the 13mm nut from the tensioner bracket
- Familiarize yourself with the route of the serpentine belt
- Insert the 3/8 inch drive ratchet into the tensioner
- Turn the tensioner clockwise to loosen the belt
- Pull the belt off the alternator
- Release the tensioner
- Pull the belt off by hand
-
step 3 :Removing the Tensioner
- Loosen the 15mm bolt holding the tensioner with a 3/8" breaker bar or 3/8" drive ratchet with a piece of pipe for leverage
- Remove the 15mm bolt holding the tensioner
- Remove the tensioner
-
step 4 :Installing the Tensioner
- Place the bolt in its proper hole
- Align the pin on the tensioner with the hole on the engine block
- Hand thread the 15mm bolt as far as possible
- Tighten the bolt between 40 and 45 foot-pounds
-
step 5 :Reinstalling the Serpentine Belt
- Familiarize yourself with the diagram of the serpentine belt
- Loop the belt around the crank pulley and A/C Pulley
- Bring it around the power steering pulley
- Bring it around the water pump
- Bring it around the idler pulley
- Bring it around the belt tensioner
- Pull the tensioner clockwise with the 3/8 inch ratchet
- Pull the belt over the alternator
- Release the tensioner
- Check that the belt is on correctly on all the pulleys
- Place the 13mm bolt back into the bracket
-
step 6 :Reinstalling the Coolant Bottle
- Insert the coolant bottle into place
- Tighten the 10mm nuts to the coolant bottle
Tools needed
-
13mm Socket
A Piece of Pipe (for leverage)
15mm Socket
10mm Socket
Ratchet
3/8 Inch Drive Ratchet
3/8 Inch Breaker Bar
Brought to you by 1AAuto.com, your source for quality replacement parts and the best service on the Internet.
Hi, I'm Don from 1A Auto. I hope this how-to video helps you out, and the next time you need a part for your vehicle, think of 1AAuto.com. Thanks.
In this video, we're going to show you how to replace an engine serpentine belt tensioner on this 2006 Chevy Impala with a 3.5 liter V6. It's pretty much the same for any 2006 to 2012 Impala with a 3.5 liter V6. You'll need a new serpentine belt tensioner from 1A Auto, 10mm, 13mm, and 15mm sockets with a ratchet, and a 3/8 drive breaker bar. You can also use a 3/8 drive ratchet with a pipe for some extra leverage.
To start, there are two 10mm nuts that hold the coolant overflow tank, and we'll remove those. With those removed, just pull the coolant tank up and out, and just put it to the back out of the way. If you want to remove the belt fully, you'll need to remove this bracket here with a 13mm. We'll just fast-forward as we take that out. You just have to unbolt that bracket and let it hang free.
Tensioner is located right here, and it actually has a square hole in the middle of it. Right here we're demonstrating on the new tensioner. You put a 3/8 drive bar or ratchet in to move the tensioner. Now you can see Don's putting that 3/8 inch breaker bar right down in and getting it into the hole in the tensioner, and then he'll push clockwise on the tensioner and reach back in and flip the belt off the alternator. Slowly remove the tension from the tensioner, remove your wrench, and then the belt is just a little bit, it's just wrapped around all the pulleys so you have to give it some slack and pull it up and off of the pulleys.
Here we are removing the belt fully, but if you're just replacing your tensioner, you do not have to remove the belt all the way. There's a 15mm bolt that holds the tensioner on, and we'll loosen it up with a breaker bar first, and then I'll fast-forward as we just remove that bolt and then take the tensioner out.
New tensioner from 1A Auto on the left; the original tensioner is on the right. You can see the new tensioner from 1A Auto is exactly the same, and it's going to bolt in just like the original did. Obviously, the bolt goes through the tensioner, and then there's a line up pin that goes into a hole. Can't really unfortunately show it to you because we can't get the camera in there, but you want to obviously make sure that the bolt goes into the proper hole and then that pin goes into the indentation on the block.
Once you get it lined up, then we recommend hand threading the bolt in as far as you can. Then when you tighten it up, you want to tighten it up to about 40 to 45 foot-pounds. Here's the new tensioner installed. Now this is very important. This is a diagram for your belt, and what you'll want to do is you'll want to feed it down around the crank in the A/C pulleys first, and then you're going to try and pull it in towards the middle on the left side, and then up and around. There's really no great way to video this, so we're just going to watch Don as he puts it down in.
He'll feed the belt way down and through that clip that you unbolted, and he'll feed it way down and get it like I said on the lower pulleys first. You can see he gets it on the side pulley with his right hand and then he feeds it way down in to the crank pulley down below. Now once he's got it down in, he's now pulling it into towards the middle, so he's got a loop down around the lower pulleys and he's pulling a loop into the middle to get it onto the water pump. Now he's got it up and around, and so at this point we'll go back to the diagram. He's got the belt on the lower two pulleys and that middle one and also on the right side. Now he's going to feed it up. I'm going to fast-forward here as Don keeps working with that belt.
Basically, what he's doing is he's getting properly aligned onto all the pulleys except for the alternator (which is the top left as you're looking at the engine from the passenger's side). It's the top left accessory. He gets the belt onto all the pulleys except for the alternator.
Now he's just taking a lot of care and make sure that the belt's on properly and pulls that tensioner counterclockwise. He's got the wrench in there, pulls it clockwise, and gets the belt up onto the alternator. Then he'll do a check of all the pulleys to make sure that the belt is on correctly. Now you can put that 13mm bolt back into the bracket. Now re-install your radiator bottle, there's a groove and a pin down at the bottom. Just make sure that goes on and the two top tabs go over the studs and tighten up those 10mm nuts.
We hope this video helps you out. Brought to you by www.1AAuto.com, your source for quality replacement parts and the best service on the Internet. Please feel free to call us toll-free, 888-844-3393. We're the company that's here for you on the Internet and in person.
Shop Products
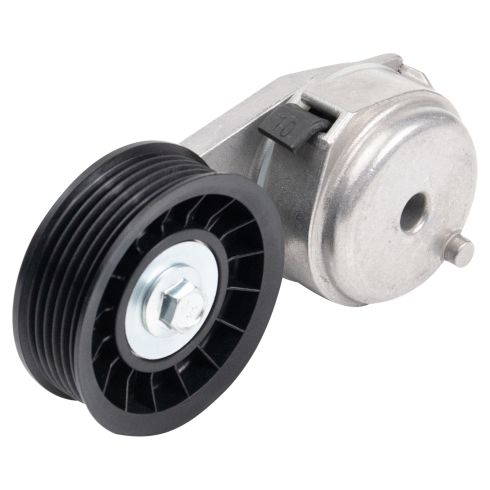
Chevrolet Buick Pontiac Saturn Accessory Drive Belt Tensioner TRQ BPA03844
Part Details:
- Pulley
- 17 mm
- 1
- 1.06 in
- Silver; Black
- 17 mm
- 74.7 mm
- 27 mm
- 0.67 in
- 0.67 in
- Grooved
- Aluminum & Thermoplastic
- 2.94 in

How to Replace Serpentine Belt Tensioner 1999-2014 Chevy Silverado 1500
Learn how to replace the serpentine belt tensioner in your 99-06 Chevy Silverado with this 1A Auto video.
