How To Replace Serpentine Belt Tensioner Ford 1992-96 F-150 F-250 F-350
Created on: 2012-12-19
In this video, 1A Auto shows you how to replace a broken, noisy, squeaky, worn or groaning serpentine belt tensioner in 92-96 Ford F-150s, F-250s and F-350s.
-
step 1 :Removing the Serpentine Belt
- Familiarize yourself with the belt routing diagram
- Attach a 15mm socket and ratchet to the belt tensioner
- Pull the tensioner counterclockwise to loosen the belt
- Pull the belt off the idler pulley
- Pull the belt off and out
-
step 2 :Removing the Belt Tensioner
- Remove the T50 Torx bolt from the tensioner
- Pull off the tensioner
-
step 3 :Installing the New Belt Tensioner
- Put the tensioner into place sliding the tab between the spring and the tensioner body
- Insert the T50 Torx bolt into the tensioner
-
step 4 :Installing the New Serpentine Belt
- Loop the belt around the crankshaft pulley
- Bring it around the air pump
- Bring it around the power steering pump
- Bring it around the A/C pulley
- Bring it around the alternator pulley
- Bring it around the tensioner pulley
- Attach a 15mm socket and ratchet to the belt tensioner
- Pull the tensioner counterclockwise to loosen the belt
- Pull the belt on to the idler pulley
- Check that the belt is routed correctly
Tools needed
-
15mm Socket
Ratchet
T50 Socket
Brought to you by 1AAuto.com, your source for quality replacement parts and the best service on the Internet.
Hi, I'm Mike from 1A Auto. I hope this how-to video helps you out, and next time you need parts for your vehicle, think of 1AAuto.com. Thanks.
In this video, we're going to show you how to replace a belt tensioner, the serpentine belt tensioner, on this '96 Ford F-150. It's pretty much the same procedure for the 5-liter engine, which is what this vehicle has, as well as the 5.8 liter V8. The only tools you'll need are a 15mm socket with a ratchet, and you'll also need a T50 Torx socket.
This truck has the 5-liter V8 engine in it. Your serpentine belt is right here. The first thing you want to do, though, is you want to make sure your belt diagram right here is intact. That's going to be a big help when you're putting the belt back on. It actually gives you a little diagram of how to do it. You'll need a 15mm socket on a ratchet. You take the socket and ratchet, put it right down here. Put it right down on here on your tensioner bolt. Then you pull this counterclockwise and you can see that the belt loosens up when you do that. I pulled the wrench that way and then you just slip it right off this idler pulley here, and slowly let your wrench back. Take it off. Then just pull the belt off. Pull it right up. You'll have to reach down and pull it off of the crank pulley, and the belt comes right up and out.
Your tensioner is right down underneath here. There's a bolt right in the center of it. I have a T50 Torx driver. I take that and just illustrate for you. I have the Torx driver right in that center bolt, just below the tensioner pulley. I'm just going to speed up here as a take my ratchet handle, put it onto that T50 Torx driver and start to loosen up that bolt. I get a little impatient with the hand tools, so I just pull out the air ratchet just to get the bolt out a little faster.
Here's my old tensioner and the new tensioner from 1A Auto. It's exactly the same. It's going to go in there all the same. When you put the tensioner in you want this tab here to go right in between the spring and the tensioner body. I'll take it and feed it down in. Then you can see, find that, the hole. You can see the spring actually goes over that tab on the engine bracket. I'll just hold it as straight as I can. Start the bolt in, by hand first. Then I'll put the Torx socket on my wrench. Make sure it's going the right way. Again, here I'm using an air ratchet. Obviously, a regular ratchet will help. This just makes things go quite a bit faster. Get it in there snug. I always tighten it by hand.
To put the belt back on, what you're going to do is take a loop and feed it down and get it on this crankshaft pulley first, then up around this air pump. Then you're going to kind of flop it over down here to the power steering pump, up to the A/C and then across. We'll put it on the alternator and keep it off the idler pulley first. Here's a new belt from 1A Auto. We'll put it down and then reach down on the other side of the motor and pull a loop down onto the crankshaft pulley. Pull some of the slack out. Then you take a loop and go down to the power steering pulley way over here on the other side. Bring it up onto the A/C pulley. Bring this up. Actually it comes down. It goes down around. It comes up from the crankshaft pulley to the air pulley. Then it goes the tensioner, then around the alternator. This belt is a little bit tighter, so what I'm going to do is put it around the alternator first. What I'm actually going to do is put the socket on. I've got the belt around the socket here. Take some tension off with this wrench. First I'll get it right on the tensioner pulley. Now it's actually right on the tensioner pulley. So it's on everything correctly. It's on the A/C. It's on the power steering. It's here on the water pump. It's way down underneath the crank and everything. Now I can pull the tensioner back and take it and push it underneath this idler pulley. Let the tensioner off. And it's all set.
We hope this video helps you out. Brought to you by www.1AAuto.com, your source for quality replacement parts and the best service on the Internet. Please feel free to call us toll-free, 888-844-3393. We're the company that's here for you on the Internet and in person.

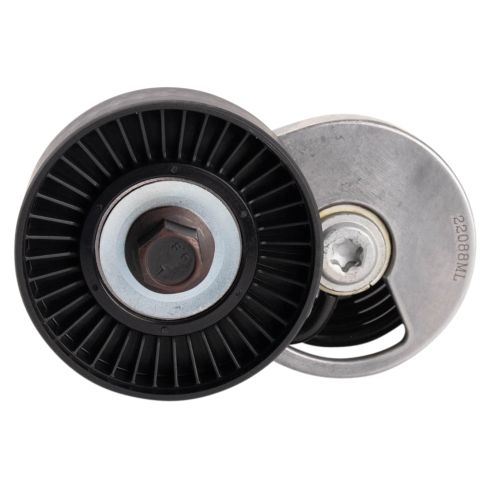
Ford Accessory Drive Belt Tensioner TRQ BPA03829
Part Details:
- 17 mm
- 26 mm
- Silver; Black
- 17 mm
- Smooth
- 2.99 in
- 0.67 in
- 0.67 in
- 1.02 in
- Aluminum & Thermoplastic
- 76 mm
How to Replace AC Belt Tensioner 1999-2008 Chevy Silverado
This video shows you how to install a new serpentine belt tensioner on your 1999-2008 Chevy Silverado.
