How to Replace Serpentine Belt Tensioner 1996-2000 Chevy Tahoe
Created on: 2014-03-10
This video will show how to remove and reinstall the serpentine belt and the serp belt tensioner for an easier install
-
step 1 :Removing the Shroud Panel
- Unclip the wire from the shroud panel
- Remove the series of 10mm bolts along the shroud panel
- Pull the shroud panel up and out
-
step 2 :Removing the Serpentine Belt
- Familiarize yourself with the route of the serpentine belt
- Insert the 3/8 inch drive ratchet into the tensioner
- Turn the tensioner clockwise to loosen the belt
- Pull the belt off the alternator
- Release the tensioner
- Pull the belt off by hand
-
step 3 :Removing the Tensioner
- Remove the bolt securing the tensioner with a 13mm socket and ratchet
- Pull the tensioner off
-
step 4 :Installing the New Tensioner
- Line up the tab with the slot and push the tensioner into place
- Insert and tighten the 13mm bolt into the tensioner
-
step 5 :Reinstalling the Serpentine Belt
- Familiarize yourself with the route of the serpentine belt and follow the diagram
- Pull the tensioner clockwise with the 3/8 inch ratchet
- Pull the belt over the alternator
- Release the tensioner
-
step 6 :Reinstalling the Shroud Panel
- Insert the shroud panel into place
- Insert and tighten the 10mm bolts to the shroud panel
- Clip the wire on to the shroud panel
Tools needed
-
13mm Socket
Socket Extensions
17mm Socket
10mm Socket
3/8 Inch Drive Ratchet
Brought to you by 1AAuto.com, your source for quality replacement parts and the best service on the Internet.
Hi, I'm Don from 1A Auto. I hope this how-to video helps you out, and the next time you need a part for your vehicle, think of 1AAuto.com. Thanks.
In this video, we're going to show you how to replace the serpentine belt tensioner on this 1996 Chevy Tahoe with the 5.7-liter V8 engine. It's the same part and similar process on a large variety of GM vehicles, and it fits the Tahoes from 1996 to 2000. The items you'll need for this include a new serpentine belt tensioner from 1AAuto.com, a 10mm, 13mm, and 17mm socket and ratchet with an extension, and a 3/8 inch ratchet.
First, we need to just remove this cable. Just push back on that tab and pull the harness up and out. Next, you want to remove the series of 10mm bolts that line this panel. We'll just fast-forward as Don removes each of those. Now, lift that shroud up and off.
Now, using your 3/8 inch ratchet, just push it into that square hole, and then when you push down on it, it will loosen up the tension on the belt allowing you to pull it free. Just start off by pulling off the alternator. Then, carefully let the ratchet up and pull it out. Then remove your belt the rest of the way and pull it over that fan.
Now, using a 13 mm socket and ratchet, you just want to remove this bolt that secures the tensioner, and we'll fast-forward as Don removes that. Now, the tensioner will just pull right off.
On the left is the old serpentine belt tensioner; on the right is the new one from 1A Auto. You can see they're identical, and they're going to mount exactly the same. Now, you want to line up this tab into the slot right here, push your tensioner back into place, and replace that 13mm bolt.
Now, to put the serpentine belt back on, you're going to want to use this belt routing diagram, and if you don't have A/C you follow the dash line. If you do, then you're going to follow the solid line. You just want to follow this and put your belts on in this order. It's kind of hard to show Don doing it, so we're just going to fast-forward as he fits it over each of the pulleys.
All that's left is your alternator. Put that 3/8 inch ratchet back into your tensioner. Push down and put the belt up onto the alternator, and then carefully release the ratchet and pull it out. Now, fit that shroud back down into place and make sure all of your holes are lining up. We'll just fast-forward as Don replaces that series of 10mm bolts. Now, just push that harness back into that clip and push it down into place.
We hope this video helps you out. Brought to you by www.1AAuto.com, your source for quality replacement parts and the best service on the Internet. Please feel free to call us toll-free, 888-844-3393. We're the company that's here for you on the Internet and in person.

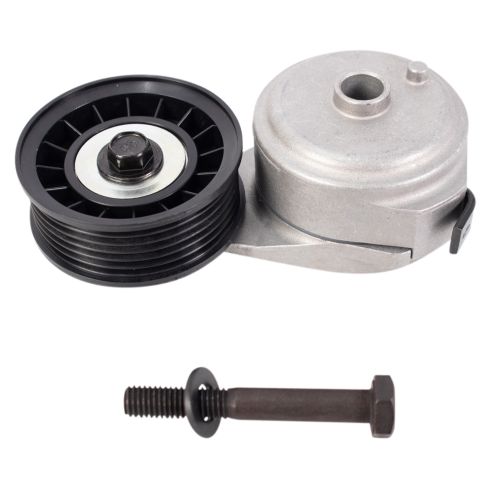
Accessory Drive Belt Tensioner TRQ BPA03800
Part Details:
- Pulley
- 1.12 in
- 17 mm
- 1
- Silver; Black
- 17 mm
- 2.71 in
- 0.67 in
- 0.67 in
- 28.4 mm
- Grooved
- Aluminum & Thermoplastic
- 68.8 mm
How To Replace Serpentine Belt Tensioner 1999-2004 GMC Sierra 2500
Watch this video and learn how to replace the serpentine belt tensioner on your 99-04 GMC Sierra 2500
