How To Replace Serpentine Belt Tensioner 2005-09 Chevy Equinox
Created on: 2012-02-01
This video will show what steps are needed to properly remove and install the serpentine belt tensioner on the 05-09 Chevy Equinox
-
step 1 :Removing the Air Intake
- Disconnect the vacuum hose from the air intake hose
- Loosen the hose clamp closes to the engine
- Remove the air intake hose from the engine
- Disconnect the air sensor
- Pull out the clips on the air box
- Disconnect the wiring harness from the air box cover
- Remove the 10mm bolt from the air box
- Remove the air filter
- Remove the air box
- Disconnect the wiring harness from the air box
-
step 2 :Removing the Engine Mount
- Place a floor jack underneath the engine
- Remove the 18mm bolt on the outside of the engine mount
- Jack up the engine
- Remove the 15mm bolts on the inside of the engine mount
- Remove the engine mount
-
step 3 :Removing the Serpentine Belt Tensioner
- Insert the 3/8 inch drive ratchet into the tensioner
- Turn the tensioner clockwise to loosen the belt
- Pull the belt off the alternator
- Release the tensioner
- Remove the tensioner with a 15mm socket and ratchet
-
step 4 :Reinstalling the Serpentine Belt Tensioner
- Align the studs on the tensioner with the holes on the engine
- Insert the tensioner into place
- Tighten the 15mm bolt to the tensioner
- Torque the bolt between 25 and 30 foot-pounds
- If you removed the belt, familiarize yourself with the route of the serpentine belt
- Reinstall the belt following the diagram
- Pull the tensioner clockwise with the 3/8 inch ratchet
- Pull the belt over the alternator
- Release the tensioner
-
step 5 :Reinstalling the Engine Mount
- Insert the engine mount into place
- Lower the jack
- Preliminarily tighten the 15mm bolts on the inside of the engine mount
- Lower the jack
- Preliminarily tighten the 18mm bolts on the outside of the engine mount
- Torque the 18mm bolts to 85 foot-pounds
- Torque the 15mm bolts to 45 foot-pounds
-
step 6 :Reinstalling the Air Intake
- Insert the air box into place
- Connect the wiring harnesses to the box
- Insert the air filter
- Insert the 10mm bolt from to air box
- Connect the wiring harness to the air box cover
- Push on the clips on the air box
- Attach the air intake hose to the engine
- Tighten the clamps on the air intake hose with a flat blade screwdriver
- Connect the air sensor
- Connect the vacuum hose from the air intake hose
Tools needed
-
Socket Extensions
Flat Blade Screwdriver
15mm Socket
18mm Socket
10mm Socket
3/8 Inch Drive Ratchet
Floor Jack
Brought to you by 1AAuto.com, your source for quality replacement parts and the best service on the Internet.
Hi, I'm Mike from 1A Auto. I hope this how-to video helps you out, and next time you need parts for your vehicle, think of 1AAuto.com. Thanks.
In this video, we're going to show you how to replace the serpentine belt tensioner on this 2008 Chevy Equinox. The process is basically the same for any Equinox or Torrent of this vintage with the 3.4-liter V6. If your tensioner is going bad, you'll notice some squeaking when you turn on accessories such as your air conditioning. Mostly when your air conditioning compressor comes on you'll hear some squeaking because the belt is not tight enough. The tools you'll need are a flat blade screwdriver; 10mm, 15mm and 18mm sockets with ratchets and extensions; a 3/8 drive ratchet or flex handle.
To get to it you do have remove the intake tube, not too difficult. There's a plug here. You just take a little tab move it to the side, pull that off, and then there are two clamps to loosen. Okay, I'm going to speed this up a little bit. What I found actually is you only need to loosen up the clamp that's on the engine side, or closer to the engine, and then you pull the tube off the engine.
Now there are a couple of clips you just pull off with your thumbs. You can lift this up to get your air box up and off. There's a little safety clamp here that you'll want to remove carefully, and then you can disconnect this harness, pull this right out, and your 10mm bolt right back here, remove that. Probably take your air cleaner out, now your air box will come right up. Pull it back. There is a harness right here, just pull that. Now take your air box out.
You'll want to put a jack right underneath the engine. Now with the air box out of the way, you want to basically unbolt your engine mount, and it's 18mm bolts on the outside and then the inner ones are 15mm. Before you undo the inner ones, you want to just jack up your engine a little bit enough so that you see that mount start moving up, and then you can remove the three 15mm bolts.
In this next part it's a little difficult to see what I'm doing, so I kind of drew an arrow. The arrow points to your belt tensioner, and you can see down at the bottom if you're looking at it in good enough resolution that the tensioner has a small 3/8 square hole in it, so you take a 3/8 drive flex handle. If you jack up the engine enough you can probably get a regular ratchet handle on there and you put it into that square hole and you'll see what you do with it.
Okay, now here's your tensioner, and you're going to need kind of some flexible handle like this. Basically you just want to put the handle in, flex that into the tensioner, and then push it in. Then you're going to pull up on your handle. Okay, let the tension off the belt to get the belt off. Slowly let your handle back down. In the next shot you may notice that the belt is gone, that you do not have to remove your belt to replace the belt tensioner. If you do remove your belt, I have a belt tensioner diagram that you'll see later in the video. Let's remove the belt tensioner with a 15mm socket and ratchet which will remove the bolt here.
Okay, we're going down here and looking at that surface where it mounts. You can see there's a little hole right here. I'm going to make sure with our new tensioner that this little tab goes right into that hole. Bolt it in, and you kind of look down into that tab go in and start our bolt in. Okay, just fast-forward as I put the bolt in, and then use my 15mm ratchet and socket, tighten it up. Tighten it to about 25 to 30 foot-pounds. You don't want to go too tight because it is going into aluminum and you could strip the threads.
Next up we're going to put the belt back on. I am going to pick it up just from having the belt preliminarily routed. Here is a diagram to help you route it if you either took your belt off or if it fell off a couple pulleys and you weren't sure how to get it back on. Put your bar in and pull up on your tensioner. Put your bolt down onto this idler pulley. Make sure your alternator won't off. Let your tensioner go. With your engine jacked up high enough you can get that right out.
Put your belt back on and start the bolts. Okay, you can let your engine down some. Make sure you get the bolts started first. Okay, speed it up here some. I'll start those bolts in. Just make sure the jack is positioned so that the engine is just barely lifting up on that mount and preliminarily tighten those bolts and those are 15mm bolts. Then let the engine down some, put on the 18mm nuts, and then preliminarily tighten them. Then I'm going to tighten the 18mm nuts to 85 foot-pounds and then I'm going to tighten the 15mm bolts to 45 foot-pounds.
Now I'll put my air box down in and my wiring harnesses go up above. Now there's two kind of rubber plugs that go in the holes in the front. Slide them in place and push them forward. Tighten up that bolt nice and firm, and then make sure you put the pin for the wiring harness back in place. Put the air cleaner back in. Make sure it's seated correctly and it does have a little tab here so it goes in the right way. I'm going to put the outside of the air box in first and make sure the harnesses don't get in your way. Down in place, pop that one back on, pop that one back on, make sure that's all back. Tighten up. Be sure to reconnect that hose and that right here and this little lock inserts from the back.
We hope this video helps you out. Brought to you by www.1AAuto.com, your source for quality replacement parts and the best service on the Internet. Please feel free to call us toll-free, 888-844-3393. We're the company that's here for you on the Internet and in person.
Shop Products
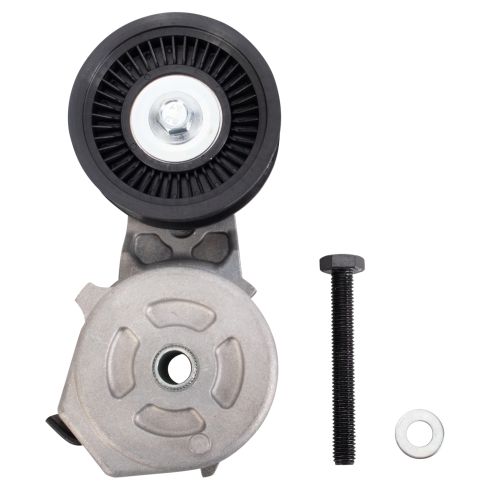
Accessory Drive Belt Tensioner TRQ BPA03819
Part Details:
- Pulley
- 1.1 in
- 17 mm
- 1
- Silver; Black
- 17 mm
- 2.99 in
- 28 mm
- 0.67 in
- 0.67 in
- Grooved
- Aluminum & Thermoplastic
- 76 mm
How to Replace Serpentine Belt Tensioner 1997-98 Chevy Venture
Watch this video to learn the steps needed to replace the serpentine belt tensioner on your 97-98 Chevy Venture.
