How to Replace Serpentine Belt 2004-09 Audi A4
Created on: 2016-04-06
Use the belt diagram and step-by-step instructions provided in this video to help you replace the serpentine belt on your 04-09 Audi A4.
-
step 1 :Loosening the Serpentine Belt
- Insert the 18mm wrench into the tensioner
- Turn the tensioner clockwise to loosen the belt
- Pull the belt off the alternator
- Release the tensioner
-
step 2 :Removing the Serpentine Belt
- Secure the vehicle on jack and jack stands
- Remove the flat blade fasteners from the splash shield
- Remove the splash shield
- Pull the serpentine belt from the bottom and remove it
-
step 3 :Reinstalling the Serpentine Belt
- Loop the belt around the power steering pulley
- Bring it underneath the belt tensioner
- Bring it around the crank pulley
- Bring it around the A/C Pulley
- Bring it around the idler pulley
- Pull the tensioner clockwise with the 18mm wrench
- Pull the belt over the alternator
- Release the tensioner
- Insert the splash shield into place
- Reinstall the flat blade fasteners
Tools needed
-
Socket Extensions
Flat Blade Screwdriver
Phillips Head Screwdriver
18mm Wrench
18mm Socket
Ratchet
Brought to you by 1AAuto.com, your source for quality replacement parts and the best service on the Internet.
Hi, I'm Mike from 1A Auto. I hope this how-to video helps you out, and next time you need parts for your vehicle, think of 1AAuto.com. Thanks!
In this video, we're going to be showing you how to replace the serpentine belt on this 2007 Audi A4. This has the 2.0-liter T motor with a 2.0-liter turbo, and this procedure should be about the same for '02 to '08 with either the 1.8 or the 2.0-liter turbo models. Items you'll need include a new serpentine belt from 1AAuto.com, 18mm wrench, Phillips screwdriver, flat blade screwdriver, and you could do it without lifting up the front of the car, but it is easier if you use jack and jack stands and lift up the front of the car, and you'll see why.
The belt tensioner is right here at the front of the engine. Your 18mm wrench, put it right onto that big tab right there, pull on the tensioner, slip the belt off, and release the tensioner slowly.
You'll want to raise and support your vehicle, and you need to remove this panel. Each side there's a Phillips screw here. Then there's a series of flat blade fasteners, and all you do to remove them is turn them a quarter of a turn and pull them out. There's one in the wheel well there and then there are quite a few just around the perimeter.
Here, this vehicle's missing some of them: here, and here, again, the Phillips screw here as well as the one back up in here, and there's three more along the back of the panel, closer to the engine. Once all the fasteners are removed, you should just be able to pull this panel right down.
Once you have the belt off on the top, it's easiest actually to pull it from the bottom, pull it down, pull it off this idler pulley, reach up a little higher, and get it off of your power steering pulley. If you can imagine, this is the front of your engine. We can't really see up in there because it's so tight, so I'm just going to try and illustrate it. To get the belt back on, just work the belt up so it's up on top of your power steering pulley, which is on the driver side, and then you can work it around so it's also around the crank.
Then, the second part is you would just work it so it's underneath that tensioner but around the crank and the power steering, and then the third step would be that you work a loop right into that idler around your AC and crank.
Basically, you would have the belt hanging there, and it's around your power steering, down through your tensioner, around your crank, hanging loose down here at the bottom, which is okay, up around the AC and around the idler.
Then, the last thing you do is come up from the top, you pull on your tensioner, and you pull the belt up and around the alternator and down.18mm wrench, put it on your tensioner, reach down, grab your belt, bring it up close to the alternator, pull your tensioner, and flip the belt on, release it slowly.
It's on the alternator correctly. I can see it's on the power steering pump correctly, and from the bottom side you can see it's on the AC, the crank pulley, and this idler pulley all correctly. Put your panel back up in place, need to make sure that these go on the front side of your inner fenders and this stays underneath on both sides.
Feed the front in first. Make sure that goes up correctly. This side in front there, just take a fastener with you and put it in place to hold it.
Thanks for tuning in. We hope this video helped you out. Next time you need parts for your car, please visit 1AAuto.com. Also check out our other helpful how-to and diagnosis videos.
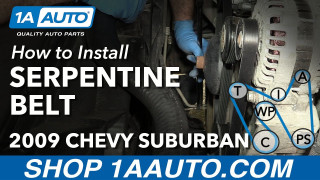
How to Replace Serpentine Belt 2007-13 Chevy Suburban
How to repair, install, fix, change or replace a broken, noisy, squeaky, worn or groaning serpentine belt on 07, 08, 09, 10, 11, 12, 13 Chevy Suburban
