How To Replace Rear Window Regulator 2000-06 Chevy Tahoe
Created on: 2020-06-15
Watch this video to learn how to install a new TRQ rear window regulator on your 2000-06 Chevy Tahoe.
Tools needed
-
Flat Blade Screwdriver
7mm Socket
Bent Nose Pliers
10mm Socket
Painter's Tape
Trim Tool Set
Pocket Screwdriver
Take this lock cover right here, just use a screwdriver or a straight blade screwdriver. Slide that off. Take this cover off right here, just use a trim tool. Get underneath here, take that off. And there's a screw in here, use a 7-millimeter socket, take that one out. And just use a magnet to take that one out. There's another screw underneath here, use the same 7-millimeter socket. And just grab the door handle and slide it up. Doesn't pull out, just make sure it slides up. And there's a connector right here, take a pocket screwdriver. And there's a little tab on the connector with the pushing on the tab and slide it up just right there. Disconnect that, set it aside.
Now, I'm gonna take this vapor barrier off. Before I do that, I'll just take the handle off so that I can pull it off a little more. Use a 10-millimeter socket to take this bolt out. Disconnect this rod right here. Just slide this tab over, this retainer, slide it over, and we should be able to slide the rod out. And then the handle slides forward, slides up. And take the vapor barrier and just peel it off.
If you have to, you can use a razor blade to cut some of this butyl tape. And you should be able to re-stick it afterwards or you can add some more butyl tape. All right. So pull that off, set that aside. Now, the speaker housing is gonna be in the way, so I'm gonna use a 10-millimeter socket to take those bolts out. And slide the speaker up. And you can disconnect the speaker. Just push on that tab, disconnect it, set it aside.
All right. Now, I'm gonna tape up the window, use some masking tape. Now, there's two nuts right here and right here, you're gonna loosen those up. Use a 10-millimeter socket. So with these nuts loose, the glass was still stuck to the bracket. So, if you just take a straight blade screwdriver, just be careful not to break the glass, and I'm gonna go in between the two brackets just to break it free from the glass.
There we go. So, that's broken free from the glass. Slowly, I'm gonna try to hold the glass from coming down. Put the window regulator down. You only have to slide it down a little bit, you don't have to go too far. Now, I turn the key off, and now I can disconnect this switch again and set that aside.
Now, disconnect this connector. Just use a straight blade screwdriver. Just get the wires out of the way. Pull this retainer off. And there's a bolt right here, take this one out, 10-millimeter bolt. Then take the bolt out and these two nuts. All right. Now we can grab the regulator. Slide this part out. And just slide this part out. Here we go. There it is. Now, take the new regulator and just slide it in same way the old one came out. And just line these studs up and get these nuts started.
And the bolt, it goes right there. Then you can get this bracket lined up and get the bolts started. Okay. Before we tighten these bolts up, the speaker actually goes right here. But before we do that, this bracket has these little tabs and you have to bend these tabs down and that's just gonna hold that position for when you go to tighten that up, so when you go to put the speaker in, then these are in the correct location.
There we go. Just bend it like that. Try to do the same with this one. And then it'll hold right there. And this actually wasn't the right bolt for this one. Now, we can put this bolt in here. Take your socket, tighten up the nuts and those two bolts. Just snug them up good, plug in the motor.
All right. Now, I turn the key on, and I'm gonna reconnect the switch and just raise the regulator. Now, you might have to loosen up these nuts that are on the regulator before you get this bracket up to the window. Just watch your fingers. See if you lined it up with the window. And it's good. Go all the way up. Now, disconnect this.
Disconnect the connector and shut the key off. Tighten these nuts up. And now you can torque these nuts to 80 inch-pounds. Make sure you're on inch-pounds, not foot-pounds. It's good. Good. Now, we can take the speaker, plug it in, and put it in position. Get the bolts lined up. And snug those down. At this point, we're gonna take the tape off. Now, we can put the vapor barrier back on. Just slide this wiring harness in the proper hole. Just try to line it up how it came off. And then this rod is gonna go through here. Looks good.
All right. There's these three tabs that need to go in those slots. Make sure you get those positioned first. Push it in and slide it. And before you slide it all the way, you can just get the rod lined up. And that's good. You can lock the rod down. Get the bolts started and tighten the bolt up and just snug it. It's good. All right. Take the door panel, you can connect the electrical connector for the window switch.
Just line that up and lock it in place. Now, slide the door panel over the handle first. Just push and make sure it's flat, and then you slide it down. It looks good. Let's go all around. It looks good. Now, take these two screws. And one goes right here, get that lined up. And then there's another one that goes down here. Line that up. All right. Take this cover.
Now, you want the red part towards the back or towards the outside of the door. And this little clip is gonna go in just like that. Just make sure it works. And then you take this cover, go over the handle and then slide the front part in first, and then slide this bottom part, and then the top.
Shop Products


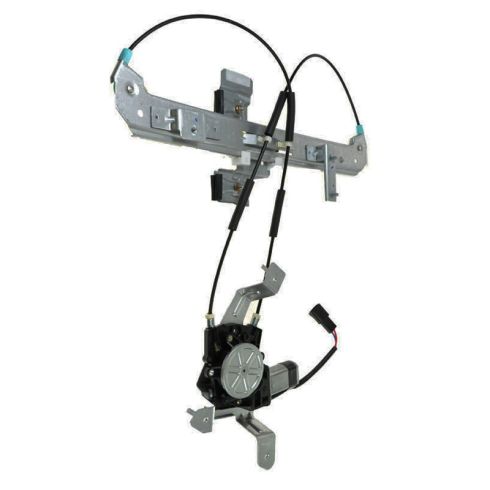
Chevrolet GMC Cadillac Rear Passenger Side Power Power Window Motor & Regulator Assembly TRQ WRA52104
Part Details:
- Power
- 2
- No
- No
- Galvanized Steel
- Nylon
- Yes
- 6
- No

How to Replace Front Window Regulator 2010-15 Cadillac SRX
How to repair, install, fix, change or replace a slow, stuck, cracked or damaged window regulator on 10, 11, 12, 13, 14, 15 Cadillac SRX
