How to Replace Rear Window Regulator 2007-13 GMC Acadia
Created on: 2016-10-27
New Window Regulator from 1AAuto.com How to repair, install, fix, change or replace a slow, stuck, cracked or damaged rear window regulator on 07, 08, 09, 10, 11, 12, 13 GMC Acadia
-
step 1 :Removing the Door Panel
- Pry off the trim piece inside the door pull with a pick
- Pry off the wood trim piece on the door handle with a pick
- Remove the T30 Torx screw from the door handle
- Remove the two T30 Torx screws from the door pull
- Remove the trim from the door lock with a pick
- Pry out the door panel with a door panel clip tool or putty knife
- Lift the door panel up
- Press the door latch cable tabs and remove it from the opening
- Slide the cable through the notch and remove ball from the release
- Disconnect the door panel wiring harnesses and clips
-
step 2 :Removing the Window Regulator
- Pry off the plastic clips from the foam pad
- Remove the foam pad
- Remove the weathershield
- Remove the two plugs from the door
- Remove the two 10mm bolts that hold the window to the regulator
- Raise the window by hand
- Hold the window in place with painter's tape
- Disconnect the window motor lead
- Remove the two 10mm bolts from the window motor
- Remove the two 10mm bolts from the regulator
- Pull the window regulator out through the door
-
step 3 :Reinstalling the Regulator
- Insert one of the bolts into the window regulator
- Push the regulator into the door
- Hang the regulator by its bolt
- Insert the two 10mm bolts into the regulator
- Insert the 10mm bolt into the window motor
- Remove the painter's tape from the window
- Lower the window onto the regulator
- Insert the two 10mm bolts that hold the window to the regulator
- Insert the two plugs into the door
- Replace the weathershield
- Insert the foam insulator into place
- Tighten the clips to the foam
-
step 4 :Installing the Door Panel
- Press the door panel connectors into the door
- Connect the door panel wiring harnesses
- Insert the door latch cable into the opening
- Set the retainer into the latch
- Line the panel up
- Snap the retainers into the door
- Tighten the T30 Torx screw to the door handle
- Tighten the T30 Torx screws in the door pull
- Press on the trim piece in the door pull
- Press on the trim piece inside the door handle
- Press on the lock cover
Tools needed
-
Socket Extensions
Flat Blade Screwdriver
T15 Torx Driver
T30 Driver
Painter's Tape
10mm Socket
Ratchet
T25 Torx Socket
Pick
Hi, I'm Mike from 1AAuto. We've been selling auto parts for over 30 years! We're dedicated to delivering quality auto parts, expert customer service, and fast and free shipping, all backed by our 100% satisfaction guarantee. We've created thousands of videos to help you install our parts with confidence. That saves you time and money, so visit us at 1AAuto.com, your trusted source for quality auto parts.
In this video we're going to be working with our 2012 GMC Acadia. We're going to show you how to remove and replace the rear window regulator and motor. We happen to be working on the driver side, but this process is exactly the same on the passenger side.
If you like this video, please click subscribe. We have a ton more information on this vehicle, as well as many other makes and models. If you need this part for your car, you can follow the link down in the description over to 1AAuto.com.
Here are the items you'll need for this repair: 10mm socket, ratchet, socket extension, T15-T30 Torx, flat head screwdriver, painter’s tape, pick tools
On the bottom side of the door panel, right about in the center, you'll find this notch, which allows us to use another one of our non-marring pry tools to reach up behind the clip for the door panel. You want to get the fork on either side. Pry out.
As you pop these out, you'll want to either wedge another one of the pry tools in there to keep it from going back together. The more of these you pop out, the easier they get. There are also a few clips behind this upper piece, here. You'll have to make sure you get those out, as well, and along the other side. Once all your tabs have been popped out, lift up and remove your door panel. Push down on the tabs that anchor the latch cable into its slot. We're going to use a small flat blade to get a little more leverage on them. Once it's through, pull the bare wire through the opening, line it up with the slot, and pull the ball out of the interior door latch. Lay the panel out. Pull down on the safety tab for the window switch connector, and then remove it.
We'll use a non-marring pry tool, here, to remove the plastic clips for this foam pad. You could also do this with a pair of side cutters or screwdrivers, but these are usually a pretty good way of getting the clips up. Once the clips are out, remove the foam from this insulator. The adhesive used on these particular weather shields are pretty strong, so we're going to use a razor blade to cut through the middle of the adhesive. As long as you keep this stuff clean and get a nice clean cut on it, it'll re-adhere nicely without us having to change it all out. Make sure you keep tension away from it. Otherwise, it'll stick back together and you'll have to start over.
Once you've cut through all the adhesive, make sure to lay the panel down this way so the adhesive is facing up in a clean dry place so we can reuse it rather than have to peel all this off and reapply.
Remove these plugs in the door panel here. This upper one reveals the top bolt for our window regulator, and the lower one will allow us access to the second bolt securing our window onto the regulator. We'll have to reconnect our door panel and turn the key on to run this up until we can access that 10mm bolt through this opening. Bring the window up until you can access that 10mm bolt easily through the opening. Then we'll redisconnect the window switch, set our panel off to the side, and turn our key off. Remove the two 10mm bolts at the bottom of the window. We're going to use a 10mm socket, ratchet and extension.
Now there's two methods to secure the window up and out of the way. We're going to use folded cardboard and wedge it in between the weatherstrip and the window itself. Or you can wrap tape from one side of the window over the top of the door panel and onto the other side of the glass, which works better as long as it's warm enough out for you to be doing it with the tape and still have it adhere.
We recommend you use painter's tape for that because duct tape or anything else will leave a residue on your paint that you'll have a hard time cleaning off. Lift the window all the way up and out of the way. Fold strips of cardboard in half and then wedge them in between the weather strip and the glass. Disconnect the electrical connector on the window motor. Remove this 10mm bolt, this 10mm nut, and loosen this one about half way so you can slide it out of the slot in the top. After loosening the top bolt a couple of turns, push it up and pull back to release it from the slot. Lay the window regulator down and remove it from the vehicle.
When reinstalling or installing a new window regulator and motor, install the top bolt a couple of threads and make sure the motor faces you when you install it, as this stud will go through this hole here. Be careful not to bend or twist it in any way when installing it into the door. The regulator stays between you and the window. Place that top bolt you started into the slot at the top. Then pull it down into the keyhole.
Line up the stud. Start the nut and bolt at the bottom. Then you can tighten up all your 10mm hardware with your socket and ratchet. Reconnect the electrical connector on your motor. Now we reinstalled our old regulator, so this is at the right height that we can drop our glass back down onto it and reinstall the bolts. But if you're using a new one or a junkyard one that isn't in that same place, you'll have to reconnect your door panel the way we showed you earlier and use the switch to bring it up and down until you can get through the access hole. Support the glass with one hand and remove your cardboard wedges. You can then lower the glass back down carefully and set it back onto the regulator.
Be sure that these hook over this steel plate. We can reinstall one of our 10mm bolts here easily. If you don't have a magnetic socket for the other side, what you can do is put a little bit of brake grease, wheel bearing grease, white lithium, or anything you have handy onto the head of the other bolt. That way, when we put it into our 10mm socket it will stay in there nice and tight while we line it up. Once everything's back in place, snap those rubber covers back into the holes.
Reinstall the weather shielding. Make sure the holes for the Styrofoam's clips line up. Then you should just be able to put a little pressure on the adhesive and get it to seal back up as long as you cut it nice and keep it clean. Line up the clips, and reinstall the foam insulator.
Reinstall the electrical connector for the power window switch, and lock the safety back into place. Reinstall the ball on the end of the cable into the door handle. Lay it into the groove, and then snap the anchor back in. Line up the door lock rod into its slot. Snap the top tabs in, and lay the top of the door into its channel. You can then begin snapping in the plastic clips on the back. Using your T30 Torx screwdriver, reinstall the three screws. Reinstall the screw covers behind the door handle and over this door pull. With the wooden trim, you'll want to set the top into place first, and then line up the rest until it snaps in. Reinstall the door lock cover as far down as it'll go. Be sure the lock rod is all the way up when you do this. Then snap the cover in, and make sure it moves up and down smoothly.
Thanks for watching. Visit us at 1AAuto.com for quality auto parts, fast and free shipping, and the best customer service in the industry.
Shop Products


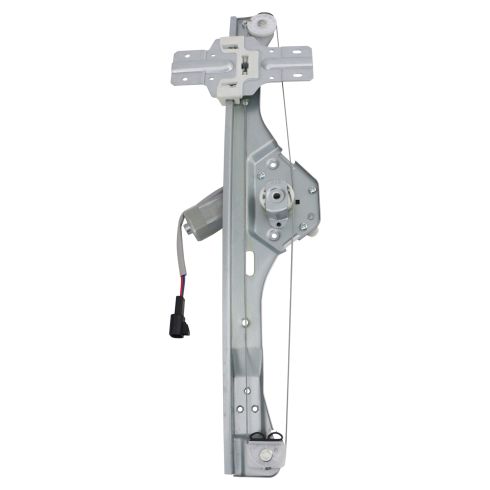
Chevrolet GMC Buick Saturn Rear Passenger Side Power Power Window Motor & Regulator Assembly TRQ WRA52263
Part Details:
- Power
- 2
- No
- No
- Galvanized Steel
- Nylon
- Yes
- 7.87 in
- No
- 8

How to Replace Front Window Regulator 2010-15 Cadillac SRX
How to repair, install, fix, change or replace a slow, stuck, cracked or damaged window regulator on 10, 11, 12, 13, 14, 15 Cadillac SRX
