How to Replace Rear Window Regulator 2007-13 Chevy Suburban
Created on: 2017-08-03
How to repair, install, fix, change or replace a slow, stuck, cracked or damaged window regulator on 09 Chevy Suburban
-
step 1 :Removing the Front Door Panel
- Press the DOME OFF button
- Pry off the sail panel with a plastic trim tool
- Pry off the trim panel behind the door panel with a flat blade screwdriver
- Pry off the trim panel behind the door pull with a flat blade screwdriver
- Pull up the door lock
- Pry off the trim door on the door lock
- Remove the door lock tab
- Pry up the master switch panel with a trim tool
- Disconnect the wiring harnesses
- Remove the 10mm bolt behind the door handle
- Remove the two 10mm bolts behind the door pull
- Pry the door panel out around the edges
- Lift the door panel up
- Press the tab on the door latch cable
- Rotate the cable and press the second tab
- Remove the cable
-
step 2 :Removing the Window Regulator
- Peel off the water shield
- Raise the window by hand
- Hold the window in place with painter's tape
- Disconnect the window motor lead
- Loosen the two 10mm bolts that hold the window to the regulator
- Loosen the four 10mm bolts from the regulator
- Loosen the 10mm bolt from the window motor
- Pull the window regulator out through the door
-
step 3 :Reinstalling the Regulator
- Insert one of the bolts into the window regulator
- Push the regulator into the door
- Hang the regulator by its bolt
- Insert the four 10mm bolts into the regulator
- Insert the 10mm bolt into the window motor
- Connect the window motor lead
- Remove the painter's tape from the window
- Lower the window onto the regulator
- Insert the two 10mm bolts that hold the window to the regulator
- Connect the master switch
- Turn the ignition on
- Test the regulator
- Turn the ignition off
- Disconnect the master switch
- Replace the water shield
-
step 4 :Reinstalling the Front Door Panel
- Clip in the door latch cable
- Lift the door panel up onto the door
- Press in the clips
- Tighten the two 10mm bolts behind the door pull
- Tighten the 10mm bolt behind the door handle
- Connect the wiring harnesses to the master switch panel
- Press the master switch panel into the door
- Press on the trim behind the door handle
- Press on the trim behind the door pull
- Press on the sail panel
- Clip on the lock tab and trim piece
Tools needed
-
Side Cutters
Socket Extensions
Flat Blade Screwdriver
Wire Ties
Painter's Tape
10mm Socket
Ratchet
Needle nose pliers
I'm just going to hit the dome lamp override switch to shut off dome lights, just so we don't run the battery down. Open up your door, and using small flat blade screwdriver or a small trim tool, remove a couple panels: one in behind your door handle—just twist lightly and pull that out; there's one right back in here, right in the middle—pull out and off; then the door lock knob, pull up on it lightly, and try and pry this center clip out at same time. Comes up and off. If you have good fingernails sometimes you can just pull up and off on that. You could also use a trim tool available on 1aauto.com. Put it underneath, pull straight up, make sure you pull up on the front. Somebody was not that careful on this one, and you can see they actually broke off the tab from the trim. Then you'll want to disconnect your power window switch, just a little tab here. Pull and disconnect. Then we'll remove three 10 millimeter bolts: one here and then two down underneath where your door pull is. 10 millimeter bolts, remove them with a 10 millimeter socket ratchet and extension. A lot of times these ones won't come all the way out, and that's okay. You can retrieve them when you get the door panel all the way off.
You'll want to use a trim tool. Once you get in there, you can see in behind there and see where the clips are. Got one here, roughly here and here. Pull out firmly, and work your way around. Then my bolts have popped out here, so I'll make sure I collect those. Once I'm sure I'm all the way around, lift up, and out. Then on here there's a couple of little tabs. I'm going to push the tab, pull out a little bit, twist it around, push the other tab. Push that through and out, and my door panel comes out. You can see there's actually clips on the padding here. It's still clipped on in a couple of spots. Just push those off.
Okay, we're going to remove the outer rear door handle on the Suburban. You could probably do it by just folding this vapor barrier down and getting in here, but we're going to pull it back so we can make sure you can see it. To pull this vapor barrier off, it's got some butyl tape on here. Sometimes it'll peel off real easily, if it doesn't, I've got a razor blade here to help just cut it off a little bit. There you go. Put this aside so it doesn't get destroyed.
To take the window regulator out, we're going to start by supporting the window with some masking tape, because you'll have to loosen the window and you don't want to fall down while you're working on it.
Start by unplugging the window motor. You may need a small flat-headed screwdriver. Push in, there you go. Now we take our 10-millimeter socket, we're going to loosen this bolt here and this bolt here, and that's what holds the glass. Once that's loose, you can just sort of reach up here, you can feel that it's, the clamp part has released from around the window. That way you should be all set when you go to take the regulator out, the window's not attached anymore. Then do the other side the same way. It's nice and loose, the window will slide out of there.
We're going to start with the top bolts. I haven't taken the bolts completely out yet because I still want to loosen them. I'm going to take out the bolt that's at the motor. If it helps, you can hold the motor here. I'm going to loosen the bottom nuts and studs. Now I'm just going to take them off by hand. See if these are loose enough, nope. I'm going to use the ratchet a little bit more. Now we need to fish the regulator out of the door cavity. It helps to push the studs in. Start with one half of it, grab the other half.
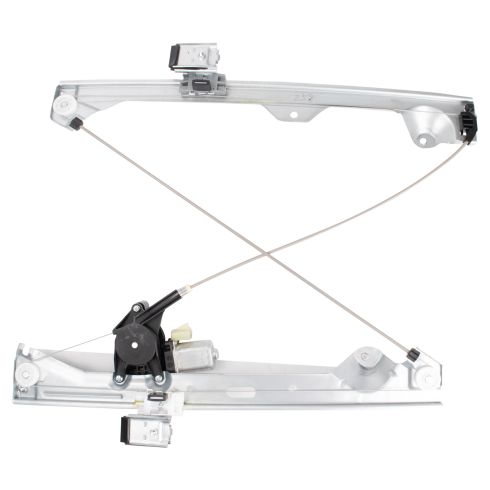
There's your old window regulator. This is our old window regulator. This is our new one from 1AAuto.com. As you can see it's virtually identical. It's got two studs at the bottom, threaded holes at the top. Comes with the motor. It's a little bit different, this harness is a little longer but the connector is the same. The same connector that's on this motor. This is in a different position because we removed it with the window at the very top, so we're going to install this and then we're going to have to lift the motor up by plugging it in, so that we can get the window seated in these little lift parts.
Our new regulator, I'm going to start with one end. It's a little tricky, you just got to figure it out. Now we're going to feed the other side in. Be careful of your window glass because that is in there. Locate the bottom stud first. Put one of these nuts on here loosely to hold it. One of the top bolts in to hold this side. Put the motor bolt in. Everything can be left loose right now, to position the other side. Now that I've got the window regulator in the right position, I'm going to take my 10-millimeter socket and tighten it down. Now we're going to reconnect the motor, and slide this wire down here. We'll just put a zip-tie around it just to secure it. Trim the excess zip-tie with some side-cutters.
Okay, with the key turned on and our window switch plugged back in, we need to bring the window regulator up to meet the window glass. Now I've already made sure that those clamp pieces are loose, so I'm just going to watch, make sure they go up there nicely. Right there. Now I'm going to take my 10-millimeter socket, tighten them down.
All right, we're going to pull our tape off. With our tape pulled off, I'm just going to make sure the window goes up and down nice. We're all set. Now that we're all set working inside the door, we can reinstall the water vapor barrier. I'm just going to feed the wires through. Sort of find the general area as where it was. The butyl tape on there was still pretty sticky, so I'm just going to push it back down. Mike:
You have these longer, larger basically kind of teeth that hook into the square holes down there. Preliminary line everything up. Just make sure your harness goes up and through, and then reconnect your door handle cable in. and pull it out, push it in.
Again, just make sure that that harness is up through. You want this groove to go into the channel here, so lift up. Lift up, push down, and make sure your door lock is up through, your harness is up through, and then you should be able to see it nice and close to the door. There's a large line of pin up here. Once everything is good it'll go in about that far away, and then you can just set all the pins. You just need a pair of pliers, reach in, bring your lock back up. Put your three 10 millimeter bolts back in. One here, and then these two, and load into your socket. If you put some tape or painters tape on it might help hold them in place. I'll just put those in place. Reconnect the switch, feed the harness down in, and make sure you put this in correctly. Then your three pieces of trim, the one in behind the door handle, snap it in place. This one can just go down in place. This one make sure that the little tab is out. Put it down on, lock into place. That's all set.
Thanks for watching. Visit us at 1AAuto.com for quality auto parts, fast and free shipping, and the best customer service in the industry.
Shop Products


Chevrolet GMC Cadillac Rear Driver Side Power Power Window Motor & Regulator Assembly TRQ WRA51602
Part Details:
- Power
- No
- 2
- No
- No
- Galvanized Steel
- Nylon
- 6
- Yes

How to Replace Window Motor Regulator 1996-2000 Nissan Pathfinder
New Window Regulator from 1AAuto.com How to repair, install, fix, change or replace a weak, noisy, damaged or defective power window motor on 00 Nissan Pathfinder
