How to Replace Rear Wheel Bearing 2010-14 Subaru Outback
Created on: 2019-06-06
Watch this video to learn how to replace the rear wheel hub and bearing assembly in your 10-14 Subaru Outback.
-
step 1 :Removing the Wheel
- Loosen the 19 mm lug nuts with the vehicle on the ground
- Raise the vehicle with a floor jack
- Secure the vehicle on jack stands
- Remove the lug nuts
- Pull off the wheel
-
step 2 :Removing the Brakes
- Remove the 14 mm caliper slide bolts
- Remove the brake caliper and hang it to relieve tension from the brake hose
- Remove the two 14 mm caliper bracket mounting bolts
- Remove the brake caliper mounting bracket
- Remove the brake rotor
- If the hand brake shoes are tight against the rotor you can remove the rubber cover and loosen the shoes with the adjuster
-
step 3 :Removing the Hub and Bearing
- Remove the 32 mm axle nut
- Remove the four 14 mm bolts at the rear of the knuckle
- Remove the wheel hub and bearing assembly
-
step 4 :Some Tips For Removing a Stuck Hub Assembly
- Apply rust penetrant around the hub assembly where it meets the backing plate
- Hit it with a hammer
- Apply heat around the hub assembly with a torch
- Replace one of the mounting bolts not bottomed out all the way, and hammer that to push the hub assembly forward
- Pry the hub assembly away using a pry bar and hammer
- Remove the entire backing plate and hammer the hub assembly out from behind
-
step 5 :Installing the Wheel Hub and Bearing Assembly
- Apply anti-seize to the knuckle and axle splines
- Insert the 14 mm mounting bolts through the mounting holes
- Seat the backing plate on the bolts if it came off
- Insert the hub assembly onto the axle
- Start all four of the 14 mm bolts into the hub assembly by hand
- Tighten the 14 mm bolts in a cross pattern
- Torque the 14 mm bolts in a cross pattern to 48 ft-lb
-
step 6 :Replacing the Handbrake Hardware (Optional)
- If you did not need to remove the handbrake hardware to remove your wheel hub, you can skip this step
- Apply brake grease to the brake shoe contact surfaces on the backing plate
- Connect the front facing brake shoe to the handbrake cable
- Place the shoe retaining pin through the backing plate and through the shoe, and the locking bracket
- Turn the pin to lock it in place with the locking bracket
- Seat the front facing brake shoe in place
- Mount the rear facing brake shoe onto its retaining pin and lock it in place in the same fashion
- Seat the rear facing brake shoe in place
- Insert the top brake shoe bridge plate by first inserting its spring into the front facing brake shoe
- Connect a shoe spring from the rear facing pad to the top ear
- Connect a shoe spring from the front facing pad to the top ear
- Insert the adjuster between the two shoes at the bottom
- Connect the two shoes at the bottom with the long spring
-
step 7 :Replacing the Brakes
- Replace the brake rotor onto the wheel studs
- Adjust the brake shoes with the adjuster if the rotor does not fit
- Replace the brake caliper bracket with two 14 mm bolts
- Torque the brake caliper bracket bolts to 49 ft-lb
- Replace the brake caliper
- Replace the two 14 mm caliper slider bolts
- Hold the caliper slider with pliers if it spins
- Torque the 14 mm caliper slider bolts to 20 ft-lb
- Pump the brakes to compress the caliper into position
- Replace the 32 mm axle nut
- Torque the 32 mm axle nut to 77 ft-lbs
- Peen over the thin edge of the axle nut into the groove in the axle
-
step 8 :Replacing the Wheel
- Slide the wheel into place
- Start the lug nuts by hand
- Tighten the 19 mm lug nuts preliminarily
- Lower the vehicle partially to the ground
- Tighten the lug nuts to 85 ft-lb in a star pattern
- Lower the vehicle completely
Tools needed
-
14mm Wrench
Socket Extensions
Torque Wrench
14mm Socket
Hammer
Rust Penetrant
Pry Bar
Jack Stands
19mm Socket
32mm Socket
Side Cutters
Rubber Mallet
Blowtorch
10mm Socket
Ratchet
Floor Jack
Needle nose pliers
1/2 Inch Breaker Bar
Hey, friends. It's Len here at 1A Auto. Today, we're working on a 2013 Subaru Outback. We're going to be doing rear wheel bearings. It's going to be a fun, interesting job. I want to be the guy that shows you how to do it. If you need any parts, you can always check us out at 1aauto.com.
All right, everyone, I'm going to be taking my 19mm socket and I'm going to put it on my lug nuts. What I'm going to do is I'm going to loosen these up just a little bit. I don't want to go too far and make it so the wheel can wobble around. I have the majority of the weight of the vehicle off the ground, but the wheel is still on the ground to make sure that it doesn't spin while I do this. I'm going to take my 19mm, I'm going to turn it to the left. I'm just going to break them free.
I'm going to continue by removing all these lug nuts. What I'm going to do is I'm going to start this one. I'm going to leave it a couple of threads. Now, I can remove the other four. The reason why I'm leaving that one loose like that is just so the wheel doesn't come completely off and fall down and hurt me somehow. Safety first is the number one concern here at 1A Auto.
I'm going to hold the wheel so it can't fall off. Remove my last lug nut. There it is. I'm going to carefully lower this to the ground. I'll wheel it out of the way. The next thing we're going to do, we're going to take our 14mm wrench or a ratchet with a socket, whatever you're using, it's your preference. You do you, Boo Boo. I'm going to put it on. I'm going to try to loosen this bolt right here, loosen this bolt right there.
Once they're both loose, I can go ahead and remove them. Remove my caliper out of the way, and that will give us view of our caliper bracket. Here we go. I'm just going to give it a little bonk. Find my other bolt, do the same thing. Now, these are very loose. I can go ahead and remove them by hand. I am wearing safety on my hands because there's brake fluid here. You could try to wipe it down and make sure it's as clean as possible if you're not wearing gloves. I would recommend gloves and always safety glasses.
There we go. Here's our caliper, there's our piston, this is the muscle. What you want to do is you want to make sure that you don't see any wetness or fluid coming out of there. If you do, your caliper is bad. Your caliper is bad, you can always order one up. This one looks fine, so that's great. We're going to just wipe it down a little bit and we'll rest it aside. You don't want to let it hang anyplace because you could put a tug on your hose. If you do that, you're going to end up buying yourself a new hose. If you have any defective parts on your hose, just replace it. It's high pressure. I'll set those bolts aside. I'm going to continue with my 14mm wrench.
There's two caliper bracket mounting bolts here, one there, one there. These are usually a little bit tighter than the other bolts, so you could try to whack it with your hands and try to loosen it up. You might hurt yourself. I'm going to go with safety. I'm going to use a rubber mallet. Just loosen it up, easy peasy. Do this one, get it one there nice and tight. It's pretty loose. If you're using a long handle ratchet, it might be a little bit easier. There we go. Both of those are loose. Now, we can go ahead and remove one. Once that one is almost all the way out, we'll leave it in a couple of threads. We'll fully remove the second one, and then we can just relieve the last couple of threads on the last one and remove it.
This one's pretty much almost all the way loose, so I'll just leave it in a couple of threads like I said. I'm going to go back down to the bottom. This one I'm going to remove completely. That's what it looks like. We'll grab the second one while I'm holding the brackets so it doesn't fall. Now, we've removed our caliper bracket and we have our two bolts. As you can tell, they're both the same. You don't have to worry about mixing them up, so that's great. We'll set this aside.
Here's our rotor. This is part of our friction material. Generally speaking, you'll have your pads that will sit inside your caliper bracket. You got your caliper over those. When you step on your brake, its squeezes the muscle, the piston, makes the pads go up against the rotor, causes friction, slows you down. You can check out the condition of your rotor, see how it looks. There's probably a reason why you're replacing it. We'll just go with whatever you're doing it for. I'm going to grab it. Just wiggle it, try to pull it off. If it doesn't come off for you, maybe it's stuck on there, it could be because your emergency brake shoes are too tight, in which case you just pull this little rubber out. If I had my pocket screwdriver I'd do it real quick. You check that and make sure that it's de-adjusted and you can spin this a little bit.
Once that's de-adjusted and you know you can spin it and it's still stuck, if you are replacing this rotor, you can go ahead and whack it with a hammer. If you weren't replacing the rotor, you'd want to use a couple of little bolts right here, one there and one there. You can just drive those in and they'll pull the rotor away from the hub for you. This is already nice and loose. I got lucky with this one.
Okay, friends, so here we go. We're going to start taking off this bearing now. What we're going to do is if you have access to a long pry bar and you wanted to put this down along the ground so that'll hold the wheel bearing from spinning while you remove this, you're going to use a 32mm socket and a long ratchet. Turn it to the left, take that right off. For me, I'm just going to use an air gun. Still using my 32mm socket, like I said. Much easier than caveman style. Now, we can move along. Axle pushes through. That's great. All we pretty much have left to do is there's going to be four bolts coming through from the back side to the front. Feels like there... my guess would be a 14. Here's hoping. We'll see how those come out.
All right, friends, we're going to be coming from the back side of this knuckle now. There's four bolts like I said. They come through from the rear to the front. We're going to use a 14mm socket. I like to use a little bit of a wobble extension on there. It makes it great because I can move things around a little bit. I'm going to see if I can get my hand back here to find where the bolt is. I'm shooting blind, so you're seeing me do something kind of weird. Here we go. Make sure it's on. Bonk, bonk. Feels good. I'm going to turn it to the left, counterclockwise. It's going to fall off just like that, but I did get it loose because I can spin it now, so that's nice. I'm going to leave it in just a little bit, and I'm going to go ahead, I'm going to remove the other three. Once I have the other three off, I'll continue removing this one all the way off, and then we can go ahead and remove the wheel bearing.
We'll take our last bolt, there it is, we'll put it aside. Now, we can go ahead. We're going to come from the outside here and we're going to try to take this bearing out of the backing plate knuckle area. I'm going to take some of my penetrant, I'm just going to spray it around where the wheel bearing goes up against the backing plate area. My hope is, is that I'll be able to get the wheel bearing off of the backing plate and not the wheel bearing and the backing plate off of the knuckle. That's my hope. Life is full of it, isn't it? I've got my big, fabulous hammer. I'm going to try to hit right on here without hitting on here or on my axle. I'm just going to try to hit right here. We'll try to make magic happen.
There we go. This right here is just part of where the e-brake shoe. It's very easy to put back. I'll just push it, but as for now, I'm just going to look at where I'm at. Looks like it could probably use a couple of more whacks. Let's see. Make sure that the backing plate isn't separating from the knuckle. Looks like we're still doing okay.
There we go. I'm just going to take this right out of the way. It's easy to put back. I'm really not worried about it. I'll show you how to do it. It looks like it doesn't really want to come free doing it like this, so what I'm going to do now is I'm going to grab my cutting pliers. I'm going to grab this spring without trying to cut. I don't want to cut it. All I want to do is grab it, pull it off so I can bring my e-brake shoe out and away. Then, I'm going to try to use a chisel or a punch and I'm going to try to just spin the wheel bearing inside here. Hopefully, break it free. Hopefully, it will want to come out.
I've got my little cutting pliers. I'm going to be very careful, like I said, not to cut this spring. I just want to use them to grab it. Pull it away just like that. I'll remove the spring, put it aside. This right here is my e-brake adjustment. I can put that aside. Now, I can move this shoe around a little bit. If I wanted to, like I said, I could try to use a punch. Let me grab a punch. I want to go right up against that ear right there. Bonk, bonk with my hammer. See if I can get the wheel bearing to spin the brake free. If it doesn't, well, then I'll have to try something else. What I'm actually physically going to do is I'm going to use my air hammer, because I have access to it, and it's going to make my life a little bit easier and I'm going to try it that way.
I'm using my air chisel. Like I said, I'm just going to try to spin this wheel bearing at its base. I'm not reusing this wheel bearing, so that's why I was okay to hit on it and I'm okay to do this. If I was reusing it, obviously I wouldn't want to do something to mess it up. Since I'm replacing it, that's the purpose of this video, I'm not really too worried about it. I'm wearing my safety glasses. Let's see if I can get it to walk a little bit.
Now, what I'm going to try is I put one of these bolts back in. I put it in a whole bunch of threads, but not completely bottomed out. Not just a couple of threads, either. It has to be quite a few threads in. I'm going to take the right-sized tool for the job, that's a 14mm. This is an impact socket, not a chrome, so I don't have to worry about it blowing up on me. I have this little thing, 1/2-inch drive. My 1/2-inch socket goes on, it's great. This is an air chisel. I'm going to put it on the back side of that bolt and hopefully it's going to help me walk this wheel bearing out, at least that's the idea. I got it on there. I got my safety glasses. Let's try again.
Let's check it. Boy, this one is really on there. Now what I'm going to do, I'm going to try to heat up the area. I'm going to pay special attention to the fact that there is an ABS wire and an ABS sensor on the back side here, so when I'm heating, I don't want to spend too much time up where the sensor is going to be. I'll come down here along this side, along the bottom. I can even hit it from the back as well, along the bottom, along the sides. I'm going to stay away from the top and try to keep as much heat away from that sensor as possible.
If you have access to this, you can use this. You don't, you can use something like MAPP gas. Just be very careful. If you have a fuel leak in your car, it's probably not the best idea to do this, and of course, wear your safety glasses. These right here are special protection. They're not just basic safety glasses, FYI.
I'm pretty much just going to heat this up kind of along the bearings/backing plate area. Just trying to heat things up, see if I can get anything to free up. A lot of times, you get rust and rot buildup in there, causes things to swell and get stuck together, so I'm just going to spend a little bit of time heating it. I'm not in too much of a rush, but like I said, I want to be careful not to get too much heat around where that sensor is, and also if there's any springs, you don't want to obviously heat up your springs because they'll lose their retention.
I'm still keeping right along the same area of where the bearing connects onto the backing plate. I'm hoping that I can heat up that area enough that when I spray it with a little bit more penetrant, which I'm going to have to be careful with as well because it's going to create smoke. I don't want to inhale that, but a penetrant will want to soak right in and do its job. I don't have a cutting head on this, so I'm not trying to cut the backing plate in any way. I don't need it to be glowing red, either. Seems like it's pretty good. Like I said, I'm going to spray penetrant. It's going to cause smoke. Try not to breathe in that smoke. I probably don't have to tell you that. I'm keeping my face away.
I'm going to switch to my other safety glasses now.
It looks like it might be starting to budge. Nice. Like barely starting if it is, though. Since it moved a little bit, I'm going to try to get some more penetrant in there. Now is the time to do it. Hopefully it'll seep into that big old crack that I just tried to make. Come on, penetrant, do your job. You have one job.
It still looks like it's just about the same as it was before, so if it had moved, it pretty much found where it's going to end. If it didn't move and I'm just seeing, well, then it's still where it was originally. My next step for me personally would be I'm going to full remove these e-brake shoes. That'll give me more room to swing my hammer and I'm going to try to whack this thing. I'm going to go Babe Ruth on it.
What we're going to do now is we're going to try to push in on this clip right here. This right here is a little pin. It comes from the back side of the backing plate, so I'm going to use my cutters. I'm not going to try to cut it. All I'm going to do is grab it and try to twist it. Some people will use pliers. You can do that as well. I just found I get better grip with the cutters and I don't try to cut it, obviously. Here we go. We got our spring on there. You can take it off, whatever. I'll just leave it on. I'll put it aside. There we go. We got our little pin here. We can take that out. We'll put this aside, too, because odds are when we're doing some hammering, it's going to either go flying out someplace or to the floor. It's going to basically not stay where it's supposed to be.
We're going to do the same thing. We're going to push in on that clip, grab this with my cutters, give it a little twist. Easy peasy. I'm going to take out my pin, if I can get it out. There it is. Put it with my clip, put them aside. Does seem like it's adding a whole bunch of extra work and hopefully you want have to do all of this. If your wheel bearing came out on its own and you really didn't have to do all the heating and beating and all the fun stuff that I get to deal with here, well, lucky you. Maybe you should do a video and show me how.
Now, I've got a pretty clear view of everything. I can get right in here. I've got my big, fabulous hammer. I've got my safety glasses on. I always want to make sure that I'm safe. I'm going to try to come from like this, try to go this way and out because, what do I want to do? I want to try to knock this off. I want it off. That's what I'm here for. I'm trying to take it off. Get mad about it. Move my cart out of the way.
You're enjoying this, aren't you? We've got the backing plate separating from the knuckle at this point, so that just means that the bearing is sticking inside the backing plate essentially, and of course, it's also sticking inside the knuckle. Something we want to think about is the probable removal of this ABS wire right here with the sensor, because if all of this is moving around, we want to make sure that our sensor is safe so we don't have to replace it if we don't need to. I'm going to grab a 10mm socket, I'm going to remove the bolt that holds it on. I'm going to spray it with some lubricant or penetrant, see if I can get it to move and hopefully pull it out. If it doesn't seem like it wants to come out and you're going to fight it too much, obviously, let's not break it. Just use your best judgment.
We've got our 10mm head right here. I'm going to use a socket and a ratchet. I'm just going to push it on, turn it to the left. I'm going to remove that fully, if I can get my socket back off. Get this right out of the way. There it is. We're going to spray it with some penetrant. There we go, nice and wet. Cool. I'm going to take our hammer and I like to use a small pry bar. I'm just basically going to try to push up against this and try to rock it that way, then, I'm going to come from this side, try to go this way just a little bit. All I want to do is try to free up the sensor from inside the knuckle.
Seems pretty good. It's moving pretty well here. I'm going to take it, pull it right out. I'm going to put it someplace safe. Wherever you choose is safe, you put it there. I'll just tuck it in there for now. Now, I'm not too worried about that sensor anymore. What's going to happen now, I'm going to be hitting this. Like I said, the wheel bearing is stuck inside the backing plate, so this whole unit right here is just... when it does finally come free, it's going to say, "I'm free", and go flying. It's going to come swinging down.
We've got an e-brake cable. The e-brake cable is going to hold it from going too far, but it will swing down. If you're swinging lefty or whatever it might be, it might come down, hurt yourself, so you need to be very careful. Safety first, number one concern. If you're super worried about it, you can go ahead and put your axle nut on a little bit, and that'll just make it so that when it does try to come out, it won't come too far. It's really up to you. I'm going to take this bolt completely out at this point. The last one that we had back there, I'll show you it. This holds the wheel bearing to the knuckle. We'll just put it with the other ones. We got a nice pile of stuff. Yard sale, anybody want anything? I got my big, fabulous hammer again. It's hammer time. Here we go. Like I said, when it comes free, meh. I might not want to because I got my axle nut on there. That's my dream.
Boy, if you're doing this on the ground, you're doing better than me, I got AC in here. I'm sweating. We've got that like that now. We can pull this whole thing away if we want to. We can get a pretty clear view of what's going on. Right in here, this little ring right here, this is actually the back side of the wheel bearing where it comes through the backing plate. That's why it's stuck. What was so hard to do was we were trying to get this ring out of the knuckle back here. Boy, that was frozen in there. I need to catch my breath for a second, really, but I'll keep talking because, why not?
I put a little bit more penetrant along here and along the back side, and now what I'm going to do is I've got my axle nut, I'm going to try to push it in my axle a little bit. I'm just going to grab on. Doesn't need to be too much, just a couple of threads. Now, right where this crack is between my wheel bearing and my backing plate, I'm going to go ahead and stick in my little pry bar. It's a pry bar, it's also got the hammering tip, so you don't have to worry about me hammering on plastic and poking my eye out, and of course, I'm wearing my safety glasses.
I'm going to switch sides here, come over. I'm just going to see if I can get in between there. If it doesn't seem like it wants to, we're going to have to do something a little different, and that's okay. It's part of the fun of it. This is why we all love working on cars.
Let's say that that's not working, because it's not. I'm going to take off my axle nut again, put it aside. Now, what I'm going to try to do is I'm going to try to get this whole thing out and away from my axle. We can get a clear view of everything now. This is garbage. I'm really not worried about the old one. What I'm going to do, I'm going to hold on to my backing plate and I'm going to try bashing on this with my hammer. Bang, bang, get out. If you had something you can rest it on, maybe a cart of some sort or whatever you can think of, you can go with that. For what I'm doing now, I'm just going to do it. I'm just going to whack it.
Being very careful not to actually hit my fingers or anything, you have to remember that basically the e-brake cable is holding up the other side. You could try to do something like this. Maybe somehow if you can figure out how to get it held up there, you do your Boo Boo. Whatever you want to do. I'm just going to do it this way.
See if it's moving. Looks like we got a bigger crack. Let's keep going. Babe Ruth. When this comes off, it's going to want to go flying. Watch out, camera guy. I love this part. Take that, e-brake shoe. There it goes, so here we are. We've got our backing plate. We got this extra part. We'll throw that in the recycling receptacle. This is just going to go back on here. We're not going to do that yet. What we are going to do, though, is we're going to remove our axle, or move it I should say, clean up all in here the best we can. Make sure it's nice and clean. We're going to make a nice bonding surface for our new wheel bearing, then we're going to go ahead and we're going to get everything put back together. First, let's get things cleaned up.
All I'm doing is I'm using my small screwdriver. You can use whatever you have access to. The reason why I'm using a small screwdriver is, firstly, because it's small and I can get in here, secondly, because it's technically sharp enough that I can scrape off all the big, heavy stuff. Then, I can go ahead and use my little wire brush, make it nice and clean and pretty. For now, I'm just going to keep going with this. I'm going to get off as much of the big chunks as I can so I'll have a nice clean surface for my new wheel bearing.
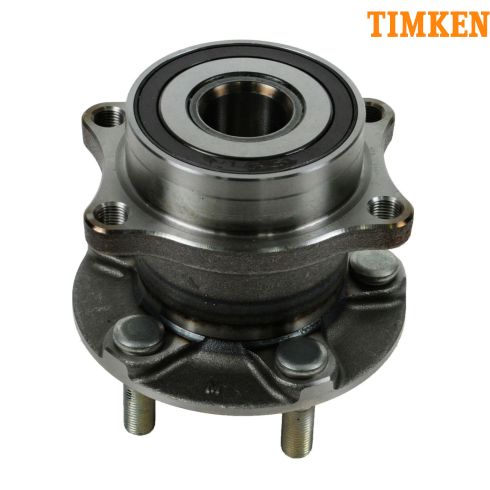
Here we go, friends. We have another product comparison for you. We have our old wheel bearing from our 2013 Subaru Outback, and we have our brand new quality 1A Auto part right here. As you can tell, they're both the exact same, in exception this one looks like it's much better, this one looks like it got beat up a little bit trying to come out. We've got four mounting holes, four mounting holes. Five lug studs, if you don't count... or if you do count the one that accidentally came out. Whatever, we're not worried about that. This one is going in the recycling bin. This quality part is going into the vehicle. If you need this or any other quality part, you can always check us out at 1aauto.com.
Here we go. I've got this nice and cleaned up, as good as it needs to get. I've got all the big flakies off of there. The bearing is going to sit in nice and beautifully. Now, what I want to do is I want to make sure that I hit this with some copper never seize. Someday, maybe hundred thousand miles from now, I might need to do this wheel bearing again. I'm going to be using my big, fabulous hammer. I want it to come right off. Copper never seize, I'm just going to go in here like that, try to get in where the bearing is going to ride, along the outside where the bearing is also going to sit, and then right inside this hole where the ABS sensor is.
Next, I'm going to take my parts cleaner over my receptacle. I'm going to make sure that my face is far enough away. I'm just going to clean this up a little bit, get it ready to go. We'll let that dry off into our recycling receptacle. While we've got the wheel bearing off, I'm just going to hit along these lines right here. I don't need to get onto the threads right there. That's not something that we really need to be able to loosen up or anything over time. I'm going to want to put maybe a little bit of threadlocker or even I'm going to go ahead and lock it down anyway, so I probably don't even have to use threadlocker, and now that we've got never seize here, here, and we cleaned that down.
Okay, everybody, here we go. What I did is I took all four of my bolts, I put them through the knuckle from the back side and then through the backing plate, so everything is aligned. We've got our backing plate holding steady. All four bolts are pretty much ready to go. They're going to go into our wheel bearing. Now, I'm going to take the wheel bearing, I'm going to slide it over, try to get it into the knuckle without pushing all my bolts back through that I just worked at putting in the back. All I'm going to do now is I'm going to try to start these in. We don't want to tighten down any of them until we get all four of them at least started. Let's see. I may have to wiggle it a little bit. Use your ratchet, 14mm socket. That one is definitely grabbing in, and I start this one.
When I tighten these, I'm going to try to go crisscross, and I'm not just going to go up here, down there, you know what I mean? One here, one there, one there, one there. I'm going to try to go maybe here and then across here, across... crisscross, basically. As for starting them in, you can kind of just go whichever way you need to. The reason for going crisscross is because if I tighten up both of these first and then I kind of canter it in at an angle, then I go to tighten these and I might think it's tightened all the way down, but maybe it's just kind of wedged in.
Even thought it feels like it's tight and I torqued it, well, we're going to drive it down the road, the wheel is going to be aiming out like this possibly or whichever way it might be cantered, and if you haven't gotten the alignment and the alignment specialist didn't see it yet, you're driving, you might hit a bump, now, this is all going to loosen right up on you. We'll just go crisscross. Let me grab my extension for the back side of those two bolts. Still using my 14, so all I'm going to do now is just bottom them all up in a crisscross pattern. I started down here, want to go here and I want to go there, and then I'm going to go down here. Once I do that, I'm going to torque them down.
Here we go, torquing at a crisscross pattern to 48 foot-pounds with my 14mm socket. There we go. We got them all torqued down to 48 foot-pounds. I've got the bearing torqued on, backing plate is nice and secured. Bearing is going nowhere. Now, what we're going to do is we're going to get ready to start remounting these e-brake shoes that we took off. I'm just going to use a little bit of paste. You just want to use something that isn't going to heat up and melt down once it gets hot. Generally speaking, your brakes will get pretty warm, so if you use something that melts when it gets hot, it's going to liquefy, get all over your brake shoes and cause issues.
Something that... We're just going to go along here, right there, right here, right here, right there, and right there, those are the raised areas where your shoes are actually going to be mounted and sitting up against. When we put our pins through here with our springs and everything, it's going to hold the shoe up against those. I put a little bit of lubricant there. Just helps keep things moving okay. You could even use a little up along here. Pretty much anywhere that your e-brake shoes are going to be riding on. It's going to help with the vibration dampening and just keep things moving freely. It can't hurt to clean this down if you haven't already. I got it all cleaned down, so that's nice.
This right here is our e-brake adjuster. What this does is it adjusts out. That'll push your e-brake shoes out so they'll be closer to the inside drum area of your rotor. You want to make sure that this is all moving nice and free. What I like to do is I'll open it all the way up. If you want to, you can take it right apart and clean it. This one doesn't look like it's in bad condition, but if it was pretty rusted up, you would definitely want to clean it all up. I've got it all apart.
Let me grab my stuff here. Just put a little bit of this in there, and the reason for that is it's going to help keep the moisture out and keep it from rusting up and causing an issue down the line. Now, I'm just going to screw it back in. You want to be pretty close to almost all the way in to start, and then we're going to adjust them out once we have it all together. I'd say that's probably pretty good for now. You'd do the same thing to this side. Use a little bit of my paste, just get it on there. It's pretty good. Get it so it goes in, work it. Perfect. That's going to be able to move for quite a while. Very nice.
We've got this. Now, what we're going to do is we're going to grab our shoes. We're going to start mounting them on here, and then we'll get the adjuster ready. We've got our e-brake shoe. It's got the little thing on it right here. This is a lever, so basically when you put on your emergency brake, it's going to give this a tug. It's going to pull on this. It's going to want to separate the shoe. It's going to give it a tug out, which puts it up against the inside of your rotor or the drum surface inside your rotor. We need to make sure that we reconnect this to this cable right here. It's very simple, just push the spring back, put it in there like that. There you are. That was easy.
We're going to take our shoe, we're going to line it up. We've got this all greased up, so that's nice. My locking pin and my locking hardware, spring hardware, I'm just going to put the pin through this little hole in the backing plate right here. I'm going to come through the back side just like that, and then I'll put it through the hole in the shoe right there. You'll notice the pin has an up and down flat surface, this has an up and down flat surface, so to start, you want them both going in the same direction.
To finish and lock it in, you want that pin to be turned the opposite way. I'm just going to take this little pry bar, push it in, turn the pin. There we are. Make sure it's sitting perfectly inside those grooves so it can't come out. That pin will never turn on its own. I'll have to push this in to be able to turn it. That's locked in beautifully. You just take it, make sure it's into where it needs to go. Feels good.
We'll grab our other shoe. We're going to do the same thing, use our other shoe, other side hardware, pretty basic. Here we go. Here's our hole, so I'm coming through the back side. I'm going to put our pin through. Put it through the hole in the shoe. Just let the shoe hang out there. I'm going to drop the clip on the floor. That's typical.
We got our pin through our hole in our shoe. We're going to do the same thing as we did on the other one. We're going to take our pry bar, screwdriver, whatever you happen to be using, push it in, give your pin a little twist so it's sitting in there. Make sure it's sitting right in the groove. Put this right up against the shoe, this up against the shoe. There we are. Oops. That's all right, just slides right back in. We know how to do it, we already fixed it once. All it's going to do is keep moving till we get the springs on there. We're going to need to move it anyway because there's a little plate that we're going to put in. Here's our plate. This is going to go right in between here and here, so if you need to you can just pop that out of the way. No big deal.
If the spring came off, it's really not a big deal. I'll just sit it back in there. It's got the little hooky do. That's going to go inside there just like that. Like this, and I'm going to take my shoe, slide it in there. Here we go. Feels pretty great. A couple of more springs here. They're both the exact same, so you don't have to worry about which one goes where, start freaking out. Ain't no thing. You got the hook that sticks out from the spring and the hook that sticks in from the spring. See how this one kind of end right there, this one comes out. The one that goes out has to go into the shoe. Obviously, it can't go with this one going in there and then sticking out straight like this. The reason why it's sticking out is so it can go in there and then still be coming out to go right there.
I'm going to use my cutters. I'm going to be very careful not to cut the spring. I just like to use cutters to grip because I find they have better grip than pliers sometimes on stuff like this. I'm just going to put it right there. I go inside this hole and then I come over to right here. I'm going to grab the other spring and I'm going to do the same thing. I got my sticking out part, it's going to go into my hole. This one right here is going to jump that ear. Cutters... Get it on there. Like I said, I'm not trying to cut the spring, so I'm not putting much pressure on squeezing it. All I'm trying to do is just get it over that ear. Looks pretty great. You can try to move things around a little bit. Feels good.
Now, what we're going to do is we're going to get our adjuster. We're going to set it inside here and then we're going to take our last spring and we're going to go from that little slotted hole down there to that slotted hole down there with the spring once we get the adjuster in. I've got my adjuster, I've got my spring. I'm just going to take it, put it in here. Let me show you on the adjuster. It's got these two little ears. Same thing with this one, two little ears. Those just fit over the shoes. It's pretty basic. I probably didn't need to show you that, but why not? I got it apart, let's talk about it.
You want to make sure that the ears go completely around the shoe and they sit right inside those little bevels. That spring is going to go right inside that hole like I told you. I'm going to use my cutters again. I'm just going to hold it and pull it over. If you notice that the spring isn't sitting all the way in there, you want to make sure that you get it in. Just use your strength. Pong, there we go. Now, we're going to take our shoes, we're just going to shift them all around. Feels pretty good. No springs came loose, nothing came shooting out. Everything is still aligned.
Another reason for shaking like that is to make sure that one of the shoes wasn't sitting off like this. See how far... it's right next to the backing plate there, and then over here it's quite a bit away. If you were to try to put your rotor on right now, you're going to be like, "Bonk, bonk, bonk, bonk." The rotor is going to be hitting here. "Why won't the rotor go on, Len?" Well, you skipped a step. Just go like that. Give it a little shake. Everything is nice and set in. Feels great. Now, we can grab our rotor. We're going to put a little bit of never seize around the bearing but not onto here. We'll put our rotor on, and then we can adjust up the adjuster that way.
Something that you might want to do is pay attention to which way the adjuster has to go to tighten this. You just take your pry bar, just give it a couple of turns just like this. While I'm turning this star, basically, we'll call it a star, while I turn it up, it's expanding these shoes out. I've got it de-adjusted pretty far and I'm going to try to slide the rotor over, and then once I have it in there, I'm going to keep adjusting until I feel like the shoes are just barely touching that rotor and then I'm going to go back out a little bit. Just one or two clicks to the point that I don't hear the shoes touching the rotor hardly at all.
If you have the shoes touching rotor once you have it adjusted, what's going to happen? This is going to be a friction material, up against the rotor friction material on the inside. Friction meets friction, it's going to get hot. You're brakes are going to overheat, you're going to start melting things down, ruin all the work that we just did, so make sure that they're de-adjusted. It's just the emergency brake. When you pull up on that e-brake lever, it's going to do its job, it's going to expand these shoes out and they're going to hit the rotor. We don't need the shoes hitting the rotor prior to that, okay, everybody?
Here we go. I've got my copper never seize. I'm just going to try to get it around here but not on the axle shaft itself. Obviously, not too much on the braking surface of the shoes, either. While we've been working, maybe we've been touching the shoes a little bit with our greasy, oily hands. You could try to clean them up. If these are old shoes and you notice that they're really shiny or oily, take a piece of sandpaper, scuff them up, give them a nice, clean surface again. Looks pretty decent. Yeah, they're a little shiny, but all this is is the emergency brake, okay? It's your parking brake.
Once this goes out, it's pretty much just holding your rotor nice and tight. You don't have to worry about too much friction like you're driving and you're using your brakes off and on. You don't drive using your emergency brake to stop, generally speaking. Maybe you do, I don't but anyway. Moving along, we've got our rotor. We're going to try to slip it on, just like that. We'll give it a little spin. It doesn't sound like it's connecting with the shoes, so let's go ahead and adjust it. Remember, we wanted to turn that star upward to adjust the shoes out. Right now, the shoes are pretty much riding right along here inside there. We'll imagine them. As I adjust it, they're going... trying to come out and they're going to try to touch up against this rotor.
Uh-oh, too far, Len. See, what if I left it like this now? We're going to try to drive, that's not going to move, so here we go. Now, I'm going to go the other way. I'm just going to turn down. Turn down for what? I want to get rid of that noise. I got a little bit of scrape, not too bad. Let's try going back again. Now, it's got drag again, so we know that we were pretty much in the right spot that last one. Let's go back two. Come on. One more. There it is. Perfect.
Inside our old Subaru rotor, there should be a little plug that's going to go right here. You want to make sure you put that back in. That's going to keep your debris, dirt, water, gunk, I don't know, whatever is under there, it's going to get in here. We want to make sure that's sealed up. If you don't have that boot still, maybe you lost it, maybe the last person that did it lost it, you need to make sure you fill this in with something. You can use a little bit of black RTV or whatever you might have, but you need to make sure that whatever it is isn't going to go boop into there and then cause an issue in between the shoes and the rotor that we just installed everything. If you put in a rubber and it goes boop and falls in there and you're like, "Meh", well, what's going to happen? You just imagine it. I don't need to explain it to you.
Here we go. I'm going to grab that little boot. Looks like this right here. I'm pushing from the back side. There it is. Now, I'm going to put it in. Looks pretty good. Imagine you're pushing it in now, though. Now, I'm not going to do it. I don't want to do it, but imagine you were pushing it in and the thing went boop, fell right in there. What are we going to do? We're going to find that rubber boot and do it again. Very simple.
We've got our ABS sensor, we got our ABS sensor hole, line it up. We got the hole lined up with the hole down there. We've got our bolt that we removed, 10mm head. We'll put it in by hand or however you want to put it in, whatever. I'm just going to put it in by hand, goes in nice and easy. Got my ratchet with my 10mm. We don't need to tighten it up too much. Feels pretty good. Give it a little wiggle. Nothing moves around. Everything else is still connected in. Now, we can get our caliper bracket mounted on.
We've got our cleaned and prepped caliper bracket here. We've got our two caliper bracket bolts. I'd put on a little bit of threadlocker. It's your prerogative. You do you, Boo Boo. We're going to start both these bolts before we tighten either of them down. It's just a 14mm head, so I'll grab that real quick. All I'm going to do now is I'm going to bottom it out, and then we're going to make sure we torque it down.
Here we go, friends. I'm going to torque these up. It's 48.7 foot-pounds. My torque wrench doesn't do points, so I'm going to go 49. Hopefully, Subaru won't get mad at me for overdoing it. There we go. Let's do them both one more time just for good measure. You don't have to. There we are. We'll go ahead and put on the pads and then the caliper, and we'll put those bolts in and torque those down as well. A good thing to do is to just go ahead and put on a little bit of silicon paste on the caliper or the muscle of the brake. This is going to help with vibration dampening, noise reduction. Every time you brake, it's going to help reduce noise inside the car.
Next, we're going to put on our pads. We've got our squealer side. This is the... basically you can tell... I call it a squealer because once the brakes get down to where that is going to meet up with the rotor, it's going to start making noise, and that'll tell you that it's time to replace your brakes again. You can watch this video again and I'll show you how to do it again. Here we go. I'm going to put the one with the squealer on the back side and I'm going to put the other pad on the outside. If you had to hammer them in or try to really squeeze and try to finagle them in, it was an issue, odds are you didn't clean up the bracket well enough, and that's okay. You can just take it back apart and give it a little bit more. It's no big deal. I'm not going to get mad at you. It's your car.
Anyway, so now we've got our caliper on to where our pads are. We've got our two caliper mounting screws. These mount the caliper to the caliper bracket. I'm going to go ahead and snug these down. Now, I'm trying to snug these up, bottom them out, and I'm noticing that my caliper slider is spinning. That's okay, I'm not worried about it. I'll just them with my pliers. I'll get them to the right size first, of course. That'll be helpful. There we are. I'm going to go ahead and torque these down. Just make sure that they're both bottomed out. I got my torque wrench set to 20 foot-pounds with my 14mm socket on there. There we are. That's on here.
Those are both tight. Now, we'll just take a peek at everything we've got together and make sure we tightened everything up, everything is torqued. It looks pretty great. We've got our bleeder screw right here. We can go ahead and get our recycling receptacle underneath there or our hose, whatever we have. We're going to open this back up and we're going to wait for a strong trickle of fluid to come out, but while it's closed, what we can do is we can pop up the brake pedal, make sure that that piston is fully extended and pushing the pads up against the rotor first. Then, we'll go ahead and open it up.
Here we go. I'm just going to pump up the brake pedal, get it nice and firm. Feels pretty good. Now, we can go back out there. Now, we're going to go ahead and put our axle nut on first. I'm just going to take my 32mm, you can use your ratchet or whatever you have access to. You want to tighten it down, but basically just bottom it out, and then we're going to torque it. Don't sit there if you're using an air gun like I have now and just hammer on it and just keep going. You don't need to do that. We're just going to bottom it out. Just like that. It's close. Now, we can go ahead and torque it down and that way there it will be at the right spec.
What I like to do is I like to take a long handle pry bar, set it flat along the studs, get it so it's locked in. I don't have it angled up so that this corner is hitting up against there. It's very important to make sure that it is flat as possible so you don't mess up your wheel studs on your brand new bearing. I'm going to 177 foot-pounds with my 32mm socket. There we are. It's very audible, so that's cool. Now, we have our groove in our axle right here. What we need to do is we need to peen down this nut into that groove, and that's going to help lock it in. All I'm going to use is a flat punch and my hammer. It's going to keep slipping off. That's all right.
That's peened down nice and tight into that groove. This nut will definitely not be able to back itself off no matter how long it's on there. Time to get the wheel back up on here. We made sure everything is nice and tight. We're ready to lift this. What we want to make sure we do is we don't got ahead and bend down like this and try to lift it up with our back. It's very dangerous. Try to preserve your back. Just take it like this, roll it up your leg, use your ab muscles to lift it. Hold your wheel on there, grab one lug nut. Start it on. There we go, now the wheel can't go anywhere. I can release it and start all the others. We'll get them bottomed out, and then we'll go ahead and torque them down.
Now, it's time to get this torqued down. I've got the majority of the weight of the vehicle off of the wheel, but I do have the wheel just barely on the ground to make sure that the tire doesn't spin while I'm torquing. I'm going to go to 88 foot-pounds with my 19mm socket. I'm going to go in a star pattern.
Now, I'm just going to go around again for good measure. There we go.
Thanks for watching. Visit 1aauto.com for quality auto parts shipped to your door. The place for DIY auto repair, and if you enjoyed this video, please click the subscribe button.
Shop Products


How to Replace Front Hub Assembly 2006-10 Ford Explorer
Learn how to replace a bad, failed, or noisy hub on the 06-10 Ford Explorer with the steps in this video
