How to Replace Rear Wheel ABS Speed Sensor 1992-96 Toyota Camry
Created on: 2016-09-22
This video will show what steps are needed to remove and replace the ABS sensor 92-01 Toyota Camry
-
step 1 :Removing the Wheel
- Pry off the center cap with a flat blade screwdriver
- Loosen the 21mm lug nuts with the vehicle on the ground
- Raise the vehicle with a floor jack
- Secure the vehicle on jack stands
- Remove the lug nuts
- Pull off the wheel
-
step 2 :Removing the Backseat
- Lift up the backseat from the anchor points
- Push the seatbelt buckles through the base
- Remove the back seat
- Remove the 12mm bolts on the side of the seat bolsters
- Push the bolster up to remove it
-
step 3 :Removing the ABS Speed Sensor
- Remove the 10mm bolt from the speed sensor
- Pry off the speed sensor
- Remove the sensor
- If the sensor breaks, follow the next step, otherwise move on to step 5
-
step 4 :Removing the Hub
- Remove the brake drum
- Remove the four 14mm bolts from the hub
- Push the ABS sensor out with a screwdriver and a hammer
- Insert the hub into place
- Tighten the four 14mm bolts to the hub
- Install the brake drum
-
step 5 :Removing the ABS Speed Sensor
- Remove the two 10mm bolts from the ABS harness
- Disconnect the ABS sensor connector in the door jamb
- Remove the sensor
-
step 6 :Installing the ABS Sensor
- Insert the electrical connector into the body
- Grease the opening
- Insert the sensor into place
- Tighten the two 10mm bolts to the ABS harness
- Reinstall the 10mm bolt to the sensor
-
step 7 :Reattaching the Wheel
- Slide the wheel into place
- Start the lug nuts by hand
- Tighten the lug nuts preliminarily
- Lower the vehicle to the ground
- Tighten the lug nuts to 76 foot-pounds in a crossing or star pattern
- Reattach the center cap
-
step 8 :Reinstalling the Backseat
- Insert the side backrest into place
- Tighten the 12mm bolt at the bottom
- Insert the bottom seat cushion into place
- Bring the seatbelts through the seat
- Insert the seat into the brackets
Tools needed
-
12mm Socket
Socket Extensions
Torque Wrench
14mm Socket
Hammer
Jack Stands
21mm Socket
Flat Blade Screwdriver
Anti-Seize Grease
10mm Socket
Floor Jack
Needle nose pliers
1/2 Inch Breaker Bar
Brought to you by 1AAuto.com, your source for quality replacement parts and the best service on the Internet.
Hi, I'm Mike from 1A Auto. I hope this how-to video helps you out, and next time you need parts for your vehicle, think of 1AAuto.com. Thanks!
In this video we're going to be working with our 1998 Toyota Camry. We're going to show you how to remove and replace your rear wheel speed sensor. We're doing it on the left side, but these steps are going to be exactly the same for the right side. What this sensor does is picks up a signal generated by a toothed wheel on the inside of your wheel hub to gauge the speed of all 4 tires individually. If one locks up while braking, the ABS pump can pulsate that brake and prevents you from locking up and going into a skid.
If you like this video, please click subscribe. We have a ton more information on this car as well as many other makes and models. If you need this part for your vehicle, you can follow the link down the description over to 1AAuto.com.
Here are the items you'll need for this repair: 10-21mm sockets, ratchet, socket extension, flat head screwdriver, pliers, breaker bar, torque wrench, hammer, grease, jack and jack stands.
Grab on to the hubcap and remove it from the wheel. I'm going to use a 21mm socket and breaker bar to remove all five lug nuts. We'll crack them loose now, raise and support the vehicle, and then finish removing the lugs. We've put our vehicle on a lift to make it easier to film for you, but this job can be easily done with a jack and jack stands. Remove the wheel and tire.
Find the anchor points under the seat, and lift up firmly. Push the seat belt buckles through the holes in the base of the seat cushion and remove it from the vehicle. Using a 12mm socket and ratchet we'll remove the bottom bolt on the sides of the seat bolsters. Pull the seat back in, pull some slack onto the seat belt, and push the bolster up to remove it.
Your rear ABS wheel speed sensor is located on the front side of the spindle beam for the front of the vehicle at the back of the backing plate and the brake drum. We'll remove this bolt with a 10mm socket, ratchet and extension. Grab the sensor with a pair of pliers and try to twist it a little to work it out of the spindle. If the pliers don't work, you may be able to tap a flat blade screwdriver back behind it with a hammer and remove it that way.
Now we've broken our sensor there on the way out, and it's not uncommon with these, so what we're going to try to do is get that flat blade screwdriver against the plastic and try to crack it. That way it will collapse in on itself making it easier to remove. Our sensor is really stuck; if you get yours out in one piece you don't have to follow these steps.
We're going to remove the wheel hub to be able to get inside there and get that sensor out. Remove the drum. Locate the four bolts on the backside of the wheel hub here, you can reach them through the large hole in the hub itself. Remove those with a 14mm socket ratchet and extension. When the last bolt's out, we'll remove the hub from the spindle. You can see where that cap from the ABS sensor comes through inside. We're going to go ahead and try to knock that out with a screwdriver and a hammer. With a little bit of hammering and slicing into the plastic with the screwdriver, we were able to collapse the plastic from the cab, push it through. Once all the shrapnel's cleared out, you can reinstall your wheel bearing.
You can see here that the top part is wider than the bottom, so make sure you install it that way. Once you're all lined up, reinstall your 14mm bolts. Torque these bolts to 59 foot pounds. Reinstall your brake drum being sure that the plug for the brake adjuster lines up with the big hole on the hub. Remove these 2 10mm bolts that secure the ABS harness retainers onto the strut and the body. Do this using a 10mm socket ratchet and extension. Locate the ABS sensor connector right up by the door jam. Disconnect it, and push the rubber through the body. You can now remove the sensor and harness from the vehicle.
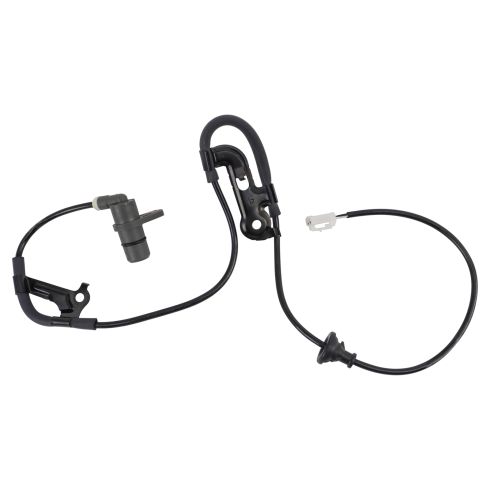
Here we have our old ABS sensor that we removed from our vehicle and our new part from 1AAuto.com. As you can see these sensors and harnesses are exactly the same. We have the same sensor on the end. This is what it's actually supposed to look like. Ours got frozen in the spindle and broke on the way out; it's very common with these. We have the same retainers to keep the wire harness where it belongs. Same grommet to insulate it where it goes through the body, and the same two-pin electrical connector on the end.
What your ABS sensor does or your wheel speed sensor does is there's a toothed wheel on the inside of the hub at the back. This sensor picks up the signal generated by that rotating toothed wheel, and that pattern changes as it spins faster and slower; the frequency of the signal changes. This is how it judges whether or not all four wheels are spinning together. If you were to lock up your brakes on a snowy road or rain it will stop that brake from engaging through the ABS pump and allow the wheel to spin again. Making it so you can control your vehicle and steer while braking. It will pulsate that on and off so it still slows you down but doesn't lock up and create a skid. If your ABS sensor is throwing the code where your ABS isn't functioning properly, this sensor from 1AAuto is going to go in direct fit just like your original equipment and fix you up right.
Send the electrical connector back inside of the body from the wheel well. Pop the rubber grommet back into place. Reinstall the bracket. 10mm bolt both on the body and on the strut. We're going to grease the opening for the sensor a little bit just to try to keep it from getting seized in there and to make sure it goes back in smoothly. We'll reinstall our sensor into the spindle. Reinstall the 10mm bolt for the sensor and tighten down all three bolts with the 10mm socket ratchet and extension.
Reinstall the wheel and the tire. Get all lug nuts down as tight as you can by hand. Lower the vehicle carefully back onto the wheel and tire. Torque the lug nuts to 76 foot-pounds in a cross pattern. Line up the notch in the hubcap over the valve stem, tap the hubcap back into place. Reconnect the electrical connector. This slot here is where we're going to install this plastic tab on the back of the side backrest. Push in and down. Grab the back of the backrest and pull toward you to make sure it's locked into place.
Now we'll reinstall our 12mm bolt at the bottom. Reinstall the bottom seat cushion. Once you've got it laid into place, you'll have to reach through and pull the bottom of the belt buckles back in. There are two on the passenger's side and one on the driver's. Slide the back of the seat into place. Line up the brackets, and knock them in at the front.
Thanks for tuning in. We hope this video helped you out. Next time you need parts for your car, please visit 1AAuto.com. Also check out our other helpful how-to and diagnosis videos.
Shop Products


How To Replace ABS Sensor and Harness 1992-95 Honda Accord
A damaged ABS sensor can turn on your ABS light or cause system malfunction. Maintain safe operation in your 92-95 Honda Accord with help from this video.
