How to Replace Rear Sway Bar Links 2006-14 Volkswagen GTI
Created on: 2018-05-07
How to remove, replace, and install a sway bar end link on 06, 07, 08, 09, 10, 11, 12, 13, 14 Volkswagen GTI
Tools needed
-
6mm Allen Wrench
Gloves
Rust Penetrant
Complete Metric Wrench Set
Complete Metric Socket Set
Hi, I'm Mike from 1A Auto. We've been selling auto parts for over 30 years.
In this video, we're going to be replacing the rear sway bar links on a 2010 Volkswagen GTI. All right. First, we're going to remove the wheel. On most Volkswagens they have these little caps that cover over the lug bolts. You're going to have to grab the tool from your tire kit, and it's like a hook. You'll grab in the cap and pull it straight out. This vehicle does not have that. So, we're just going to take our 17 millimeter socket and our breaker bar and break them loose.
Take our lug bolts out. When we get to the last one, I'm going to hold the wheel on because there's nothing that holds the wheel up. You can grab the wheel, pull it off. We're going to use a little bit of rust penetrant before we start. It'll help getting the nut out properly. We're going to break the nut free with a 16 millimeter wrench.
As you can see, the center stud is spinning with the nut. We have to hold that down. There's a couple of ways we can do that. First we're going to try for the Torx bit, it's a M6, and we'll use a hammer and just lightly tap it in. Put a wrench on there. You want to try to hold the stud while we turn the wrench. It's easy if you have it rest up against a frame piece, then you don't have to use as much muscle.
As you can see, the stud is just staying still as the nut turns. This would be easy if you had a ratchet wrench. Pull that out. Pull the nut off. Now break this through with our 16 millimeter wrench. Let's pull that out. Pull the nut off. Break this screw with our 16 millimeter wrench. As you can see, the stud does not seem to be turning, which is good. And our nut's coming right out easily.
All we need is a punch and a hammer. I'm going to pull it out. If you pull down on the sway bar, it comes out a little bit easier. Watch your fingers when pulling down. There we go.
As you can see, this is our old part. This is our new part from 1aauto.com. You can see it looks very similar. Size, it's identical. It's got a ball and socket here. It's got a stud here, just like the old one. There's a couple of new features on the new one which is kind of nice. This, you can actually put a wrench on the outside of here. It's a 13 millimeter, which will help for installation and removal, which on the old one, all you had was that triple square in there, which are sometimes difficult. On this end, the old one has the triple square. And then the new one has an Allen, the updated part, which makes easier installation and removal. You can get this at 1aauto.com and you'll be ready to rock and roll.
I'm going to angle this a little bit so this is angled down. Move that in. I'm going to pull down on the sway bar, get that bolt started. I'm going to push up on that one. It's going to take a little bit of adjustment. All right, now they're in properly. Now we're going to install our 15 millimeter nut on the outside stud. I'm going to use this 5 millimeter Allen to hold the stud, and then tighten the nut as we hold the stud.
Make sure it's snug and then give it like another quarter turn. And here install the lower nut. I'm going to put a wrench in the back stud. You can use a ratchet wrench here or even a socket. This is a 15 millimeter wrench on the nut and a 13 millimeter wrench for the stud and the bolt. I'm going to get it snug and then like another quarter turn.
I'm going to put our tire on. Line the lug holes up, hold the tire. Take our 17 millimeter socket and our lug studs. And you want to bring it down so the tires just barely touching the ground. Next we're going to torque these. We're going to do it in a star pattern. The reason you want to do it in a star pattern is to get the wheel to sit flush to the rotor without it warping. We're torquing these to 120 newton-meters or about 88 foot-pounds.
Be sure that after you do a brake job you make sure that you pump the pedal because there is going to be an air gap between the caliper and the brake pads When you first start out. You want to make sure you get that caliper piston to go in.
Thanks for watching. Visit us at 1Aauto.com for quality auto parts, fast and free shipping, and the best customer service in the industry.
Shop Products


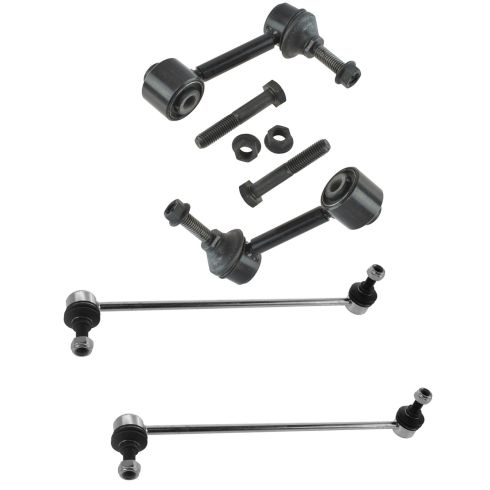
VW Audi Front & Rear 4 Piece Sway Bar Link Set TRQ PSA55975
Part Details:
- 4 Piece
- (2) Front Sway Bar Links
- (2) Rear Sway Bar Links
How to Replace Front Sway Bar Links 2007-16 Honda CR-V
How to remove, replace, and install a sway bar end link on 07, 08, 09, 10, 11, 12, 13, 14, 15, 16 Honda CR-V
