How to Replace Rear Sway Bar Link 2003-14 Volvo XC90
Created on: 2019-09-11
Check out this video to learn how to replace the rear sway bar links on your 03-14 Volvo XC90. Its a simple DIY job that you can do yourself to save money!
-
step 1 :Removing the Wheel
- Removing the wheel is not necessary but may make the job easier, this step is not shown in the video
- Raise the vehicle with minimal weight on the wheel
- Loosen the five 19 mm lug bolts
- Raise and support the vehicle
- Remove the lug bolts
- Remove the wheel
-
step 2 :Removing the Rear Sway Bar Link
- Apply rust penetrant to the sway bar link nuts and studs
- Remove the 18 mm nuts, holding the stud stationary with a T40 socket, if necessary
- Remove the upper rear sway bar link from the upper control arm
- Remove the lower rear sway bar link from the sway bar
-
step 3 :Installing the Rear Sway Bar Link
- Insert the upper sway bar link stud into the upper control arm
- Insert the lower sway bar link stud into the sway bar
- Install the 18 mm nut on each stud
- Hold the stud with an 18 mm wrench if necessary, while tightening the nuts
-
step 4 :Installing the Wheel
- This step is not shown in the video
- Hold the wheel up on the hub, or use a stud pin to help
- Install the 19 mm lug bolts
- Tighten the bolts by hand
- Lower the vehicle with minimal weight on the wheel
- Torque the 19 mm lug bots to 103 ft-lb
- Lower the vehicle completely
Tools needed
-
T40 Socket
Rust Penetrant
18mm Wrench
18mm Socket
Ratchet
Hey friends, it's Len here at 1A Auto. Today we're working on our 2004 Volvo XC90. This one's the all wheel drive version and we're going to be replacing a rear sway bar link. It's going to be super easy. I can do it. You can do it too. As always, if you need this part or any other part, you can always check us out at 1AAuto.Com. Thanks.
Okay friends. Here's our rear sway bar link. I removed the wheel just for purpose of the video, but to do the job itself, you don't have to have the wheel off. I just wanted to mention that. To take it off, it's going to be super simple. We've got a nut here and a nut located right down here. Once those are off, you just pull the studs out of either the sway bar or out of the control arm. It's going to slide right out. We'll spray this down with some penetrant first. We'll let it do its job for a second and then we'll go ahead and take off these nuts.
We're going to use our 18 millimeter socket to try to take off these nuts. What could happen is once this loosens up, the stud might want to spin inside here and it's going to become an issue. At that point we'll have to switch over to a different set of tools, but let's give this a try first and we'll deal with what may happen if it does happen.
Okay, so it is happening of course. As we're trying to remove the nuts, we're just spinning the whole shaft because on the inside of the sway bar link it's just a ball and socket. What we're going to have to do is we're going to have to grab a Torx bit socket that fits inside the stud right there and then an 18 millimeter wrench. We'll hold the Torx bit socket still with a ratchet probably and then unscrew the 18 millimeter nuts with a wrench. For the Torx bit, which is basically a star, you're going to use a T40. I'm going to grab my ratchet, put that on here. We've got our wrench. I'm going to start with a lower one because it's easier for me to get to. I'm going to put the wrench so it's ready to reverse or turn it counterclockwise. I'm going to put the ratchet so it's on forward and it's going to hold the stud in the opposite direction. Right now the nut's coming right off the stud, which is exactly what we want. Get that off of there.
There's our nut, not that it matters, we're going to replace it. Come up here to the top one. Get our wrench on there and our tool. Awesome. Get that nut off of there, grab our sway bar link, twist it, turn it and pull it right out of there. Easy peasy.
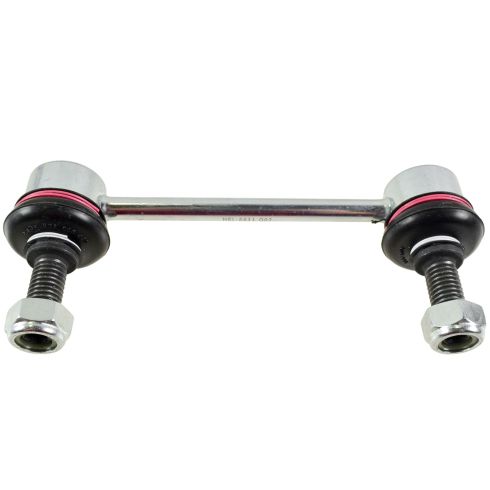
Here we are friends, a quick product comparison for you over here. We have our rear sway bar link out of our 2004 Volvo XC90, all wheel drive version. And over here we have our brand new quality 1A Auto part. Both these parts are created equal. You've got the same length, super important. You've got two mounting studs, also important. One of the awesome things about our sway bar link, is you've got this area right here which just makes it so you can get a wrench on there and hold it so the stud can't turn. This one on the other hand, not so much. You have to grab your Torx bit socket, hold it in there, which is fine, but in that instance you can't use a, like maybe an air gun to zip these off. If they were really frozen on, they're doing the wrench trick might've been a little bit of an issue.
Like I said before, same length, same studs, pretty neat little addition there and of course we've got sealed and pre-greased boots, brand new. It also comes with the mounting hardware, which is basically just two brand new nuts. Just throw that over there. They screw right on there. The whole form is oblong, that's how they lock, so they're self locking nuts. You don't need to use thread locker on those. With that said, I don't see any reason why this wouldn't be a quality part to install onto the vehicle so I'm going to go ahead and do it. As always, if you need this or any other part, you can always check us out at 1AAuto.com. Thanks.
We've got our brand new quality 1A Auto sway bar link here. We're just going to go ahead and install it. It's going to be super easy. We're going to come right up and in. I'm going to start with trying to get the top one in first. What's going to cause the biggest issue is just the the e-brake cable right here, but it's not too big of a deal. You just kind of push it out of the way and the stud should slide right through. To make sure it doesn't slide back out on its own somehow while we're trying to maneuver the bottom in, we'll just start that nut and we'll get this one in. The studs move around fairly easily so if it's not lining up perfectly, just move your stud around.
There we are, brand new nut, get this on here. The mounting on the backside there that I showed you, that's an 18 millimeter and the nut itself is an 18 millimeter. Do whatever you got to do to tighten it up. You can use your 18 millimeter on your air gun or you can just go ahead and use your ratchet and a wrench. You do you Booboo. We'll go with a ratchet and wrench for now. I'm just going to hold this side and I'm going to use my ratcheting wrench on this side. That's tight. We'll do the same to the upper one. Just try it and get it so it's going to hold that. Tight and tight. Both mounting points of the sway bar link are tight. You're all set.
Thanks for watching. Visit 1AAuto.com, your place for DIY auto repairs, for great parts, great service and more content.
Shop Products


Volvo S60 S80 V70 XC70 XC90 Rear Sway Bar Link TRQ PSA67850
Part Details:
- Yes
- No
- Male Threaded
- Male Threaded

How to Replace Front Sway Bar Links 2007-16 Honda CR-V
How to remove, replace, and install a sway bar end link on 07, 08, 09, 10, 11, 12, 13, 14, 15, 16 Honda CR-V
