How to Replace Rear Sway Bar Link 1998-2007 Honda Accord
Created on: 2019-01-31
How to remove, replace, and install a sway bar end link on 98, 99, 00, 01, 02, 03, 04, 05, 06, 07 Honda Accord
-
step 1 :Removing the Wheel
- Loosen the 19mm lug nuts with the vehicle on the ground
- Raise the vehicle with a floor jack
- Secure the vehicle on jack stands
- Remove the lug nuts
- Pull off the wheel
-
step 2 :Removing the Rear Sway Bar Link
- Break the nuts free with a 14mm wrench
- Counter-hold with a 5mm Allen bit
- Remove the upper nut with a 14mm wrench
- If necessary, secure the backside of the upper nut with locking pliers
- Remove the nut with a 14mm socket, ratchet, and socket extension
- Counter-hold with a 5mm Allen key
- Remove the lower nut with a 14mm wrench
- If necessary, secure the backside of the upper nut with locking pliers
- Remove the nut with a 14mm socket, ratchet, and socket extension
-
step 3 :Installing the Rear Sway Bar Link
- Insert the sway bar link into place
- Secure the nuts with a 14mm wrench (bottom nut first) and tighten with a 15mm socket and ratchet
- Torque the bolts to 29 foot-pounds
-
step 4 :Reattaching the Wheel
- Slide the wheel into place
- Start the lug nuts by hand
- Tighten the lug nuts preliminarily
- Lower the vehicle to the ground
- Tighten the lug nuts to 80 foot-pounds in a crossing or star pattern
Tools needed
-
5mm Hex Wrench
14mm Wrench
Socket Extensions
Torque Wrench
14mm Socket
15mm Socket
19mm Socket
Ratchet
1/2 Inch Breaker Bar
Hi. I'm Mike from 1A Auto. We've been selling auto parts for over 30 years.
Hey, everyone. Sue here from 1A Auto. And today on our 07 Honda Accord we have in the shop, we're going to do rear sway bar links. If you need those parts or any other parts for your car, click on the link below and head on over to 1aauto.com.
19 millimeter socket to loosen up the lug nuts. I'm going to use a two post lift to raise my vehicle. You can use a jack and jack stands at home. Now I can take my 19 millimeter socket, now that I've raised it up, I can remove the lug nuts to take the tire off.
Rear sway bar links, 14 millimeter wrench. I'm going to place that on the top link on the nut. My nut, and it's a five millimeter Allen head socket that goes right in the center of it. I'm just going to give it a little tap right in there. I pre-sprayed but I'm going to spray again cause of the weathering element. See if I can make sure there's no rust sticking there. Okay now I'm going to put my ratchet on there.
Let's see if we made enough room that we can actually put a pair of locking pliers in the back there. And then we'll use a socket. Now I have a pair of needle nose locking pliers and there's a metal lip, washer flat side on the other side. Once I loosen it up enough, I can grab it with these and lock this down. Now I can put a socket on there. And that's just the top. Got the bottom to go.
Okay the lower sway bar link, we're going to do the same thing. Just have a little bit more room to work with. I'm going to put the locking pliers on there. 14 millimeter socket. Marvelous, look at that.
Here we have our brand new sway bar link from 1A Auto, and here I have the manufacturer's one I just took off our 07 Honda Accord. It's still the original equipment by the looks of it and you can see their design. They put the Allen head and a little flat washer there. With a 1A one, puts a space for our open end wrench and the new nuts. They're both sealed units, non-greasable. If you need this part or any other part for your car, click on the link below and head on over to 1aauto.com.
Now we're going to reinstall our new rear wheel sway bar links and we're going to install the one of the bar first. Start the nut. Now we have the freedom of moving it back and forth, nut down. The inside bolt hex is a 14 millimeter open end wrench, and the outside is a 15 mm. So 14 mm on the inside, that open-end wrench. And 15 mm socket. I'm just going to snug them because the torque specs is 29 foot pounds. So I'll snug that one and now I'll get to this one.
So I'm going to torque them now to 29 foot-pounds. Now we're just going to repeat the process on the other side. 19 millimeter socket. We're going to torque the wheels up. The wheel torque on this particular model is 80 foot pounds. Make sure you do it in the star pattern, criss-cross and then double check.
Thanks for watching. Visit us at 1aauto.com for quality auto parts, fast and free shipping and the best customer service in the industry.
Shop Products

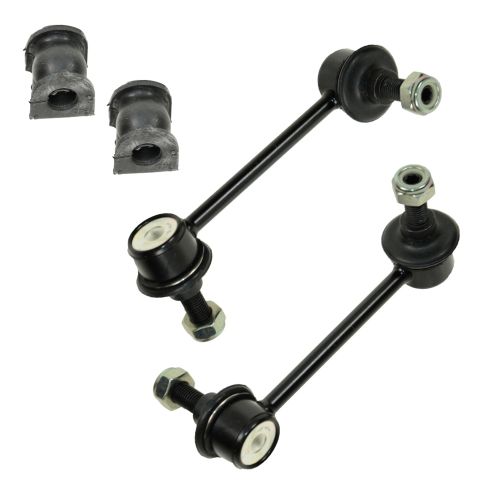
1998-02 Honda Accord Sedan Rear 4 Piece Suspension Kit TRQ PSA56202
Part Details:
- (2) Rear Sway Bar Links
- 4 Piece
- (1) Rear Sway Bar Bushing Set

How to Replace Front Sway Bar Links 2012-17 Toyota Camry
This video shows you how to install new TRQ sway bar links on your 2012-17 Toyota Camry.


