How to Replace Rear Shocks 2009-14 Ford F-150
Created on: 2018-11-16
How to repair, install , fix, change or replace your front shocks with their loaded struts. This video is applicable the 11 Ford F-150
-
step 1 :Removing the Rear Shocks
- Remove the upper bolt with a 1/2 inch breaker bar and 15mm socket and 18mm wrench
- Raise and secure the vehicle with a jack and jack stands
- Remove the lower bolts with a 1/2 inch breaker bar and 15mm socket and 18mm wrench
- Remove the shock
-
step 2 :Installing the Rear Shocks
- Compress the shock three times to activate the gas and oil
- Insert the shock and lower bolt into place with a pry bar
- Tighten the lower bolts with a 1/2 inch breaker bar and 15mm socket and 18mm wrench
- Lower the vehicle
- Tighten the upper bolt with a 1/2 inch breaker bar and 15mm socket and 18mm wrench
- Torque the upper bolt to 66 foot-pounds
- Torque the lower bolt to 66 foot-pounds
Tools needed
-
Torque Wrench
15mm Socket
18mm Wrench
Jack Stands
Floor Jack
1/2 Inch Breaker Bar
Hi. I'm Mike from 1A Auto. We've been selling auto parts for over 30 years.
Hi, everyone. Sue here at 1A Auto, and today we're going to install rear shock in our 2011 Ford F150. If you need this part or any other part for your car, click on the link below and head on over to 1AAuto.com.
We're going to disconnect the top of the shock first. The outside of the head of the bolt is a 15 millimeter socket, and on the inside, the nut is an 18 millimeter. I've got my set-up here. I've got my 1/2 inch ratchet wrench. I'm just going to break it free.cSee if we can get it by hand. Perfect.
Now we're going to raise the vehicle up. I'm going to use a two post lift. You can use a floor jack and jack stands. It's going to be the same procedure down here. We have an 18 millimeter wrench and a 15 millimeter socket. I'm going to break that free. Bring it right down.
Here, we have our new shock from 1A Auto, and the factory shock that we just took out of our 2011 Ford F150. This comes shipped in a cardboard box with this attachment strap. You just got to push down on it, compress that shock, and slide it off. It will expand to the full length. Now, these are gas shocks, and you can see that this one's worn out. See the height difference.
It's always good whenever you get new shocks to compress them three times to get the gases to activate and let them expand before you install them. If you need this part or any other part for your car, click on the link below and head on over to 1aauto.com.
Prior to installation, you want to always compress a new shock two to three times to get the gases and oil activated. That way there's no air sitting there. It's like a soda can--you want to shake it up. I'm going to bring the top one, line it up in those bolt holes, and line the bottom one down.
Now, you're just going to take a little pry bar and pry it right in here. Get that bolt to line up. Now you can put the nut on.
I'm just going to snug it, and I'm going to lower it. Make sure that the front bolt, the top bolt goes through, and then I'll torque them both down. With the vehicle back down on the ground, I can take a small pry bar, put it in the top of the shock, and move it around to line up that bolt hole. Once I get it, see if we can hold it there long enough. I'm going to compress it quite, I think.
There you go. Put the nut on the back, and then I'm going to tighten this down. Once it's tightened, I'm going to torque it to 66 foot-pounds. Okay, that's snug. Now I'm going to get my torque wrench, and the torque is 66 foot-pounds. We're going to tighten the lower shock bolt, 66 foot-pounds.
Thanks for watching. Visit us at 1aauto.com for quality auto parts, fast and free shipping, and the best customer service in the industry.
Shop Products


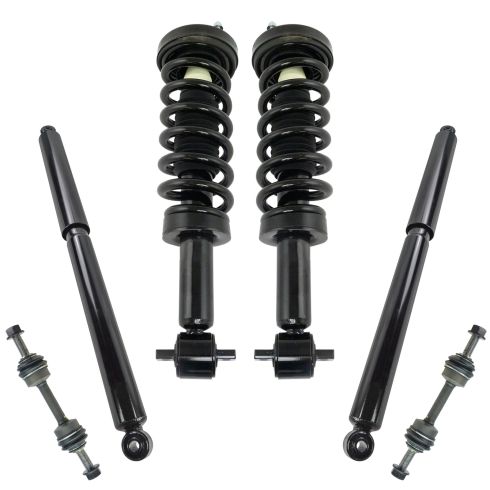
2014 Ford F150 Front & Rear 6 Piece Suspension Kit TRQ SKA67321
Part Details:
- 6 Piece
- (2) Front Sway Bar Links
- (2) Front Strut & Spring Assemblies
- (2) Rear Shock Absorbers
How To Install Replace Remove Rear Shocks Struts 2002-06 Nissan Altima
If the rear shocks on your 02-06 Nissan Altima are bouncy or clunking, it's probably time to replace them! Watch this video to learn how to do it yourself!
