How to Replace Rear Shock Mount 2004-13 Mazda 3
Created on: 2019-08-19
Learn how to replace the rear shock mount on your 03-14 Mazda 3, and save a bunch of money! 1A Auto shows you how, and has the part, too!
-
step 1 :Removing the Wheel
- Loosen the 21 mm lug nuts
- Raise and support the vehicle
- Remove the lug nuts
- Remove the wheel
-
step 2 :Removing the Rear Shock Mount
- Remove the two 12 mm upper shock mount nuts
- Remove the lower 17 mm shock bolt
- Remove the rear shock
- Remove the 13 mm upper shock nut
- Remove the upper shock mount
- You may have to pry the rubber bump stop from the shock mount
-
step 3 :Installing the Rear Shock Mount
- Insert the rubber bump stop into the shock mount
- Reinstall the shock boot
- Reinstall the shock mount
- Slide the boot up onto the rubber bump stop
- Install the 13 mm upper shock nut
- Install the upper shock mount onto the studs
- Install the two 12 mm nuts
- Torque the 12 mm nuts to 20 ft-lb
- Raise the lower shock with a jack if necessary, to align the mounting holes
- Install the 17 mm lower shock bolt
- Torque the 17 mm lower shock bolt to 77 ft-lb
-
step 4 :Installing the Wheel
- Install the wheel onto the wheel studs
- Install and tighten the 21 mm lug nuts by hand in a star pattern
- Lower the vehicle with minimal weight on the wheel
- Torque the lug nuts to 85 ft-lb in a star pattern
- Lower the vehicle completely
Tools needed
-
12mm Socket
13mm Socket
Socket Extensions
Flat Blade Screwdriver
Torque Wrench
17mm Socket
Jack Stands
Floor Jack
Hey friends, it's Len here at 1A Auto. Today we're working on our 2011 Mazda 3 and I want to show you how to do a rear shock mount. It's going to be a very easy job. I want to show you how to do it. If you need this or any other part, you can always check us out at 1AAuto.com, thanks.
Okay friends, so here we are. We've got the vehicle partially supported off the ground, but the wheel's still touching so it can't spin. We're going to use our 21 millimeter socket and we're going to loosen up all of these lug nuts, okay? Just give them a crank or two. This is just to break them free in case you're not using an air gun to do this job. If you are well, you don't really have to worry about doing this part. Now that all five of these are loosened, we can go head up with the vehicle, we'll make sure that it's secured safely so it can't shake around or fall off or anything like that. We'll move ahead to the next step.
All right, so now we're going to go ahead and fully remove these lug nuts. I'm going to take off three of them. The fourth one, I'm going to take all the way off, put it back on a few threads and then I'll remove the last one. There we are. I'm just gonna put this one on a few threads, like I said. That's just going to help keep this wheel from falling off and potentially hurting me while I put all this stuff away.
Hold the wheel, my five lug nuts, I'll slide this out of the way. On to the next step. Okay, so up here you have 12 millimeter nuts that go onto these studs right here. So I'm just going to use a ratchet and extension and a socket, of course, 12 millimeter. If you had access to an air gun, you can do that. Here we are. 12 millimeter nut. We'll do the same to the other one. Number two, set this aside. All right. Okay, so right down here we have a 17 millimeter. I'm just going to use my air gun here. Okay. Grab this, pull that out. Now we can bring our shock right down and there's our rear shock. Easy peasy.
Okay, so along the top of the shock mount here, right underneath this rubber, here we are, just get that out of the way. You've got a knot right here, 13 millimeter. If you have access to an air gun, it's going to help you along at this point, just going to put it on there. Safety glasses. That's what that looks like, I'll set this aside. I should be able to pull this apart theoretically. So there's our shock.
We got the mount right here. A little protection keeps the debris out from inside here, all right? You want to make sure that you don't get a whole bunch of crud in there, will ruin the seal. This part right here should separate, but I'm just going to go like this. You just have to break it free in there, okay? So something like a pocket screwdriver. There you are. Separate this stuff and move ahead to the next step.
So here we are friends, a quick product comparison for you. Over here we have our rear shock mount out of our 2011 Mazda 3. We just removed it. Over here we have our brand new quality 1A Auto part. These two parts are built exactly the same. You've got the same mounting holes, the area where the shock comes up through, and then of course the larger area where the rubber dampener is going to go in. It also comes with brand new mounting nuts, which is super important because these are locking nuts. With all that said, I don't see any reason why this wouldn't be a quality part to install into the vehicle, so I'm going to go ahead and do it. If you need this or any other part, you can always check us out at 1AAuto.com, thanks.
So we're just going to take our rubber dampener, slide that right in there. If it feels like it's sitting a little tight, you can use some kind of paste in there if you wanted to caliper grease, dielectric, whatever, anything really, silicone paste, just put it in there so it slides in nice and easy. So we'll go ahead and move ahead. All right, so we've got our shock. We're gonna put the little protective barrier over it like that. We've got the top, bring that through. You might say, "Uh oh Lynn, how's this go?" Well, this piece right here is just going to slide up over this first nub and over the second nub as well. Once it gets up to that point, that feels good, it's going nowhere. We'll get our mounting nut up on here. Okay, so we're going to take our brand new locking nut. Put it on there. Now we're just going to go ahead and zip this right down tight. All right, let's move ahead to the next step.
All right, so we've got our rear shock. We're ready to install it. I'm just going to come up through the bottom here, right up, bring it to my holes. We've got our two brand new, 1A Auto nuts. There we are. I'm just going to go ahead and bottom these out. Once they're bottomed out, we'll torque them down. Okay, these are close now. That one's bottomed out. Okay, let's torque these down to 20 foot pounds. One. There we are, just checking one more time. Let's move on to the next step.
Okay, so to get the lower part of the shock on there, as you can tell, when it's fully expanded, it hangs down lower than where the bolthole is and lifting this thing up by hand, try and lift it like that is ... I mean, somebody could probably do it. I'm not trying to say that I'm the strongest person in the world, it's just not the easiest thing. So I'm just going to use a pole jack. You can use a floor jack if you're working a little lower to the ground and I'm just going to kind of bring the holes up so they line up. I'm just going to line them up there. I can get that. Okay, I'm just going to blast this in a little bit. There we are. Okay, we're going to torque this down with our 17 millimeter to 77 foot pounds. There we are. Set it one more time real quick, tight.
Okay, so now it's time to get the wheel up onto the vehicle. Instead of going in front of it and trying to lift and potentially hurting our back, just come around the side of it, roll it right up your leg, and use your ab muscles to lift it up, there we are. Hold your wheel, make sure it can't go anywhere. There we are. Our next step is going to be to bottom these out and then we'll bring it down completely and torque them down.
Okay, so now that we have all the lug nuts started on here, what I'm going to do is I'm just going to bottom them out. When I go to bottom them out, what I'm going to do is I'm going to go in a star pattern. Boom, boom, boom, boom, boom, okay? Basically crisscross pattern and that's to ensure I'm not going to go around in a circle this way, the wheels not going to get kicked on just like this, and I think everything's nice and tight. You drive it down the road, the wheels going like this. Next thing you know, you're breaking studs. Your wheel comes off. God knows what could happen. Let's avoid that. Let's go crisscross star pattern.
Okay, I'm not making them very tight. I just wanted to bottom them out. Now I'm going to go ahead and torque them down. Okay, so here we go. We're going to go ahead and torque these down. We're going to make the same star pattern in a crisscross manner, okay? 21 millimeter, 85 foot pounds. I could've probably brought it down another inch. Okay just to be sure we torqued them all, let's just hit them again. Cool. Easy peasy.
Thanks for watching. Visit 1AAuto.com, your place for DIY auto repairs for great parts, great service, and more content.

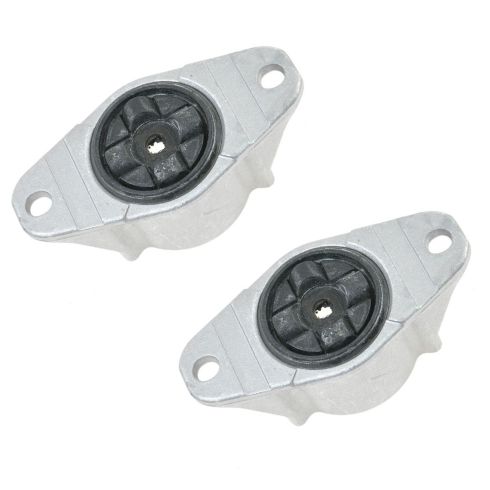
Ford Mazda Lincoln Volvo Rear Driver & Passenger Side 2 Piece Shock Mount Kit TRQ SKA85152
Part Details:
- (1) Rear Passenger Side Upper Shock Mount Kit
- (1) Rear Driver Side Upper Shock Mount Kit
- 2 Piece
How to Replace Strut Assembly 2000-05 Chevy Cavalier
Watch this video to learn how to replace the front strut assembly on your 00-05 Chevy Cavalier.
