How to Replace Rear Shock 2007-13 Chevy Silverado
Created on: 2018-11-30
How to repair, install , fix, change or replace your rear shocks on 08 Chevy Silverado
-
step 1 :Removing the Rear Shock
- Remove the spare tire
- If you choose to raise the truck to remove the shock, you'll need another support (we use a jack stand) under the axle, since the rear shock helps hold up the axle
- Use a 21mm wrench to hold the nut
- Use a 21mm socket and breaker bar to loosen the lower bolt and remove the nut
- Use the 21mm socket and breaker bar to loosen the upper bolt and use a ratchet to remove the bolt
- Pull out the lower bolt and remove the shock
-
step 2 :Reinstalling the Rear Shock
- Line up the top and bottom of the shock
- Insert the upper and bottom bolts
- Use a jack stand to support the shock
- Use a 21mm socket and ratchet to tighten the upper bolt
- Insert the bottom nut and use a 21mm wrench to tighten the nut
- Use a 21mm socket and ratchet to tighten the lower bolt
- Use a torque wrench and 21mm socket to torque them both to 85-foot pounds
- Use a torque wrench to torque the top bolt to 85-foot pounds
- If you don't choose to raise the truck for this repair, you'll need a pry bar to compress the shock to line the bolts up
Tools needed
-
21mm Socket
21mm wrench
Socket Extensions
Torque Wrench
Pry Bar
Jack Stands
Ratchet
1/2 Inch Breaker Bar
Hi, I'm Mike from 1A Auto. We've been selling auto parts for over 30 years.
What's up, guys? I'm Andy, from 1A Auto. Today, I'm going to show you how to replace the rear shock in this 2008 Chevy Silverado. If you need these parts or other parts for your vehicle, click the link in the description and head over to 1aauto.com.
One of the first things you want to do when you're doing the rear shocks on this vehicle—you're going to want to remove the spare tire. It's normally in this position. This vehicle—it doesn't have a spare tire—this support is broken. So, start by taking that off. We did raise the vehicle. You don't necessarily have to raise the vehicle when you're doing this job, but if you do and you support it by the frame, we are going to also want another support under the axle, because the rear shock is actually holding the axle up a little bit. So, when we take these bolts out, the axle will fall down a little bit. So, I'm just going to support this rear axle, right here. But like I said, you can do this on the ground. You can leave the tires on. Just get on a creeper.
I'm going to use a 21mm socket and a breaker bar, and a 21mm wrench to hold the nut. We'll loosen this up. Once that's loose, I can take the nut off. I'm not going to pull the bolt out yet.
And up top, I'm going to loosen this bolt up. You don't need a wrench on the inside, because the nut is welded to the frame. Loosen this up. Once that's loose, I'm just going to switch to a ratchet and we can loosen up this bolt. Once that's loose, you can pull this bolt out. And I can grab—that's loose up top. Grab the bolt underneath. Just slide the shock right out.
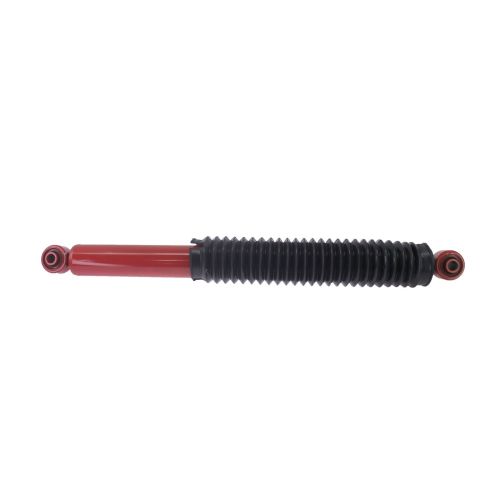
Here's our old part. Here's our new shock from 1aauto.com. It's a TRQ part. It's got an updated metal dust shield versus the old plastic style. The size of the actual shock is the same. It comes with the rubber grommets and everything is the same. Get yours at 1aauto.com and you'll be ready to rock and roll.
Alright. So, we'll take our new shock and I'll line it in up top, and line it in down below. Woops—can grab the bolt, slide it in down below first. Slide it in up top. You can do either, or whatever is easier. If you have to move the axle up a little bit, go up a little, or down a little.
Take my 21mm socket and ratchet. Start tightening the top one up first. Alright. That's good.
I'm going to put the nut on the lower bolt. Take the 21mm wrench and a socket and ratchet and I'll snug this up first. Now we're going to torque them both.
I'm going to use a torque wrench and a 21mm socket. I'm going to torque this to 85-foot pounds. That's good. Torque this top bolt.
Now, if you did not raise the vehicle and support the vehicle, and you did not have the axle have to go up and down—you just left it on the tires—you would need a pry bar to pry the shock to compress it a little bit and to get these bolts to line up. And the same—similar on the passenger side. The shock goes forward, in front of the axle, instead of behind the axle. But procedure is the same.
Thanks for watching. Visit us at 1aauto.com for quality auto parts, fast and free shipping, and the best customer service in the industry.
Shop Products


 2007-13 Chevrolet GMC Front & Rear 4 Piece Complete Shock Assembly & Shock Absorber Kit TRQ SBA60414


How to Replace Front Struts 1994-97 Honda Accord
Learn how to replace clunking or bouncy struts on your 94-97 Honda Accord by watching this tutorial video from 1A Auto.
