How To Replace Rear Power Window Regulator 2004-08 Ford F-150
Created on: 2014-11-02
This 1A Auto video will show you how to replace the rear window regulator in your 04-08 Ford F-150. Follow along to repair it yourself!
-
step 1 :Removing the Door Panel
- Pry off the trim piece inside the door handle with a flat blade screwdriver
- Pry up the window switch panel with a flat blade screwdriver
- Disconnect the window switch wiring harnesses
- Pull off the side panel next to the window
- Remove the 6mm bolt next to the window
- Remove the two 8mm bolts inside the door handle
- Remove the 10mm bolt inside the door pull
- Remove the two 6mm bolts at the bottom of the door panel
- Pry out the door panel
- Lift the door panel up and off
- Disconnect the latch cables from the door handle
- Remove the 5.5mm or 7/32 bolts from around the speaker
- Pull off the speaker
- Disconnect the speaker wiring lead
- Carefully peel off the water shield
-
step 2 :Removing the Window Regulator
- Loosen the two 10mm bolts that hold the window to the regulator
- Pry your fingers between the cushions holding the window
- Raise the window by hand
- Hold the window in place with painter's tape
- Disconnect the window motor lead
- Remove the four 10mm bolts from the regulator
- Remove the 10mm bolt from the window motor
- Unclip the wire on the door
- Pull the window regulator out through the door
-
step 3 :Installing the New Window Regulator
- Push the regulator into the door
- Hang the regulator by its bolts
- Tighten the four 10mm bolts into the regulator
- Tighten the 10mm bolt into the regulator motor
- Push the clip into the door
- Connect the window motor to the lead
-
step 4 :Testing the Regulator
- Connect the window switch to the switch panel
- Turn the vehicle on
- Run the motor up for 4 seconds
- Disconnect the switch panel
-
step 5 :Reinstalling the Door Panel
- Put the water shield into place
- Insert the 5.5mm or 7/32 bolts around the speaker
- Connect the speaker wiring lead
- Put the speaker into place
- Connect the latch cables to the door handle
- Lift the door panel into place
- Push in the door panel clips
- Insert the two 6mm bolts at the bottom of the door panel
- Insert the two 8mm bolts inside the door handle
- Insert the 10mm bolt inside the door pull
- Insert the 6mm bolt next to the window
- Connect the window switch wiring harness
- Push in the switch panel
- Push on the trim piece inside the door handle
- Push on the trim panel next to the window
Tools needed
-
Socket Extensions
Flat Blade Screwdriver
5.5mm Socket
6mm Socket
8mm Socket
Painter's Tape
10mm Socket
Ratchet
Needle nose pliers
7/32 Inch Socket
Brought to you by 1AAuto.com, your source for quality replacement parts and the best service on the Internet.
Hi, I'm Mike from 1A Auto. I hope this how-to video helps you out, and next time you need parts for your vehicle, think of 1AAuto.com. Thanks.
In this video, we're going to show you how to replace the rear window regulator on this 2005 Ford F150. We show you on the driver side, but the passenger side is the same procedure. The items you'll need for this include a new rear window regulator from 1AAuto.com, a 6mm, 8mm, and 10mm socket and ratchet with an extension, flat blade screwdriver, and a 5.5mm or 7/32 socket.
Pry out on the small panel behind the door handle. Then pry up on this panel, and just pull it forward. Lift it up and push the tab on the harness and disconnect it. Then pull out on this panel and pull it free. It helps to use the flat blade screwdriver and just pry it free. Remove the 6mm bolt, these two 8mm bolts, this 10mm bolt, and then these two 6mm bolts down here. We'll fast-forward as Mike does that. Now lift the door panel up and pull it out. Then you want to pull out your door handle cable. It's easiest with a flat blade screwdriver to pry it out. Then unclip it from the door handle, and your door handle's free. Then remove these 5.5mm or 7/32 bolts from your speaker. You may notice that we switched doors. We're just going to show you the procedure on this door that actually has a water shield. Pull your speaker out, and then just push the tab on the harness and disconnect it. Then just peel back your water shield. Then you want to do this slowly so as not to rip your water shield or stretch it too much.
You can see this cable is part of what drives the window mechanism. You can also see that somebody tried to put some wood in here and stuff to try to help support the window while it was broken. A better idea is just to replace the regulator. We're going to show you how to do that.
There's a bolt here and one here. Loosen those up, and then the window will separate from the regulator. Once you get your window out of those clamps, just slide it up and tape it into place. Push the tab on this harness and disconnect it. Then loosen up these four 10mm bolts, and then remove this 10mm bolt. Now just unhook your window regulator.
Now just work your window regulator down and using a flat blade screwdriver. Unclip the wire here. Then just work the window regulator the rest of the way out of the window. Make sure that if you used any wooden flooring or anything to hold your window up you remove that, too. On the left is the old window regulator; on the right is the new one from 1A Auto. You can see they are identical and they'll be exactly the same.
Make sure these four bolts are pretty loose. You got to first make sure your harness doesn't get caught. Feed your window regulator back into the door and re-clip it up into those holes. Now tighten up those four 10mm bolts. Then replace that center 10mm bolt and tighten it up. Push this clip back into the door and then reconnect the window regulator harness. Our motor is slightly different in that it has a small pigtail. We just take a wire tie and secure it right to the motor so that it doesn't have any chance of interfering with the window at all.
Reconnect your window switch. Put your vehicle into the accessory mode. Then just roll the window up to this point where you can access both of these window clamps. Remove the tape and slide your window down into the window regulator. As the window comes down, you'll be able to see some dirt marks on the window. That shows you where it should line up. Once you have it lined up, just tighten up those 10mm bolts to tighten the clamps. No more need for duct tape.
Now replace your water shield. Reconnect your speaker. Push it back into place and then replace those four 5.5mm bolts and tighten them up. To replace your door panel, just re-clip the door handle cable into the door handle and then push it back into place. Make sure these clips stay into the door. Then line up the tabs on the back and make sure that the lock rod goes up through the door panel and that your harness for your window switch is coming up through that hole in the door panel. Then push the door panel down into place. We'll fast-forward as Mike replaces all of those bolts. Now replace the small panel behind the door handle, reconnect your window switch, push those tabs into place, and push the panel back down. Then line this panel up, slide it down into the door panel, and push those two clips back into place. You're all set.
We hope this video helps you out. Brought to you by www.1AAuto.com, your source for quality replacement parts and the best service on the Internet. Please feel free to call us toll-free, 888-844-3393. We're the company that's here for you on the Internet and in person.
Shop Products


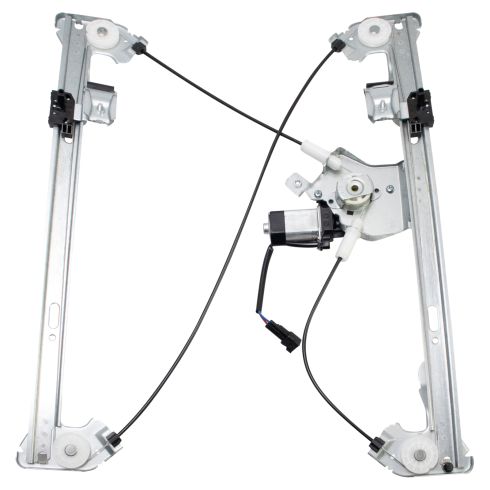
Ford F150 Lincoln Mark LT Rear Driver Side Power Power Window Motor & Regulator Assembly TRQ WRA52187
Part Details:
- Power
- No
- 8
- 2
- No
- 7.87 in
- No
- Galvanized Steel
- Nylon
- Yes

How to Replace Front Window Regulator 1997-2005 Chevy Venture
Check out this video and learn how to replace the front window regulator on your 97-05 Chevy Venture or Pontiac Montana.
