How to Replace Rear Lower Control Arms 2009-12 Ford Escape
Created on: 2019-04-22
How to repair, install, fix, change or replace failing, rusted, rotted, or damaged control arms with ball joint on 09, 10, 11, 12 Ford Explorer
-
step 1 :Removing the Wheel
- Loosen the 19mm lug nuts with the vehicle on the ground
- Raise the vehicle with a floor jack
- Secure the vehicle on jack stands
- Remove the lug nuts
- Pull off the wheel
-
step 2 :Removing the Rear Lower Control Arm
- Loosen the lower ball joint nut with an 18mm socket and breaker bar
- Tap the knuckle with a hammer to separate it from the ball joint
- Standing away from the control arm, remove the 18mm bolt from the control arm
-
step 3 :Installing the Rear Lower Control Arm
- Insert the control arm into place
- Tighten the upper 18mm bolt to the control arm
- Insert the ball joint to the spindle
- Tighten the nut to the ball joint by hand
- Raise up underneath the control arm to simulate ride height
- Torque the upper bolt to 129 foot-pounds
- Tighten the 18mm bolt to the ball joint
- Torque the ball joint nut to 46 foot-pounds
- Lower the jack from the suspension
-
step 4 :Reattaching the Wheel
- Slide the wheel into place
- Start the lug nuts by hand
- Tighten the lug nuts preliminarily
- Lower the vehicle to the ground
- Tighten the lug nuts to 100 foot-pounds in a crossing or star pattern
Tools needed
-
Hammer
Torque Wrench
Rust Penetrant
Jack Stands
18mm Socket
19mm Socket
Floor Jack
1/2 Inch Breaker Bar
What's up, guys? I'm Andy from 1A Auto. In this video, I'm going to show you how to replace the rear lower control arm on this 2012 Ford Escape. If you need this part, or other parts for your vehicle, click the link in the description and head over to 1AAuto.com.
You remove the wheel. You're going to use a 19 millimeter socket and a breaker bar. Loosen up the lug nuts before I raise the vehicle up. Now I'm going to remove the lug nuts. Grab the wheel. This wheel's stuck on there pretty good. So, going to put a lug nut on. Take a hammer and hit it from the back side. You can take the lug nut off and pull the wheel off.
I want to take this nut off right here, but it's badly corroded. So I'm just going to take some rust penetrant; soak it down. All right, just going to take some rust penetrant, spray in here just to soak that bolt before we take it out. So now I'm going to take an 18 millimeter socket and a breaker bar and loosen this nut up. Now I'm just going to take an extension and a ratchet; make it a little bit easier to do this.
All right. That's pretty loose. I'm just going to leave that on right now and I'm going to take a hammer and just hammer this down; separate it from the knuckle. There we go. Now that's separated, I can loosen this up. You can just hammer this down, just like that.
Now we're going to loosen this bolt up. Keep in mind, when this gets loose, this arm may swing down, so just stay out of the line of sight of it. Just like that. Now I'll just switch to a ratchet. So pull that bolt out and pull the arm right off.
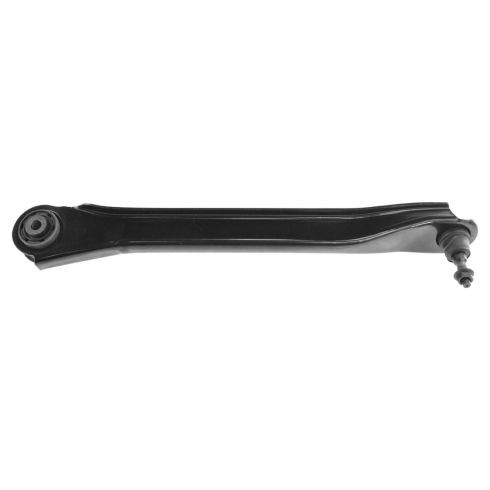
Here we have the old lower control arm. Here we have the new one from 1AAuto.com. The shape is the same, the mounting position is in the same spot. The ball joint is the same. Comes with a new nut. Take this off and this covers just for shipping purposes. Get yours at 1AAuto.com. You can do it yourself.
Now we'll just take the arm. Make sure you take the nut off the ball joint. Slide the arm in position. Take the bolt. Install the bolt. I'm just going to use a ratchet and the 18 millimeter socket; tighten this bolt down. Before I tighten this all the way down, I want to position the lower arm. I want to get it in the proper spot; get the ball joint through the spindle or the knuckle, just like that. Take the new nut; get that started.
Now I am going to use this screw jack. If you're doing this on the ground, you could use a regular floor jack. I want to raise this up. Before I torque that bolt on the inside of the lower control arm, you want this lower control arm to be as close to ride height as possible. The problem with torquing it at actual ride height with the wheel on and on the ground, is you probably can't slide underneath there with a torque wrench, so I'm going to raise it up and do the best I can. Right about there is good.
Now I'm going to to use a torque wrench and torque this bolt to 129 foot pounds. Now with that lower control arm still supported, I'm going to use my 18 millimeter socket, extension and a ratchet, and I'm going to start tightening this nut down and with this still supported, that's going to prevent the ball joint from spinning.
Now I'm going to use an 18 millimeter socket, a torque wrench. We actually sell this torque wrench at 1AAuto.com, and I'm going to torque this nut to 46 foot pounds.
Now I can lower the suspension and put the tire back on. Put the lug nuts on. Just going to use the 19 millimeter socket; tighten these down by hand. I'm going to take my socket and the torque wrench. I'm going to torque these to 100 foot pounds and I'm going to do it in a star pattern so that the wheel gets tightened down evenly.
Just going to go around again and make sure everything's tight.
Thanks for watching. If you want the parts to do it yourself, check out 1AAuto.com, the place for DIY auto repair.
Shop Products


Ford Escape Mercury Mariner Rear Driver Side Control Arm with Ball Joint TRQ PSA63949
Part Details:
- Press In
- No
- Yes
- No
- Steel
How to Replace Lower Trailing Arm 1992-2001 Toyota Camry
How to repair, install, fix, change or replace failing, rusted, rotted, or damaged front trailing arms on 92, 93, 94, 95, 96, 97, 98, 99 00, 01 Toyota Camry
