How to Replace Rear Door Latch Assembly 2006-12 Toyota RAV4
Created on: 2019-09-22
Watch this video to learn how to replace the rear door latch on your 06-12 Toyota RAV4. You can learn to DIY and save money with 1A Auto!
-
step 1 :Removing the Rear Door Panel
- Pry up underneath the window switch bezel
- Disconnect the window switch connector
- Pry out the trim piece behind the door handle
- Pry off the trim bezel from the door pull
- Remove the Phillips screw from the door handle
- Remove the two Phillips screw from the door pull
- Pry out the door panel from its clips with a trim tool
- Lift the door panel up and off
- Unclip the door handle
-
step 2 :Removing the Rear Door Latch
- Disconnect the cables from the inside door handle
- Disconnect the door latch electrical connector
- Cut the vapor barrier butyl tape with a utility knife
- Disconnect the door speaker wire
- Remove the vapor barrier
- Remove the three T30 door latch screws
- Remove the door latch
-
step 3 :Removing the Rear Door Cables
- Pry open the center door latch cover
- Disconnect the cable from the door latch
- Push through the rear openings to release the side latch cover
- Disconnect the cable from the door latch
-
step 4 :Installing the Rear Door Cables
- Install the blue cable into the side door latch lever, and close the cover
- Install the green cable into the center door latch lever, and close the cover
-
step 5 :Installing the Rear Door Latch
- Slide the latch mechanism into position
- Pull the cables out through between the support bar and the door opening
- Install the three T30 door latch bolts
- Make sure the outside door handle lever is aligned with the handle
- Pass the cables and wires through the vapor barrier, and position the vapor barrier
- Connect the speaker electrical connector
- Connect the door latch electrical connector
- Connect the green door cable to the inside door handle
- Connect the white door cable to the inside lock lever
-
step 6 :Installing the Rear Door Panel
- Clip on the door handle
- Lift the door panel up into place
- Press in the door panel clips
- Tighten the two Phillips screws to the door pull
- Tighten the Phillips screw to the interior door handle
- Press on the interior door handle trim
- Press on the door pull trim
- Connect the window switch wiring harness
- Press the window switch into the door panel
Tools needed
-
Phillips Head Screwdriver
T30 Socket
Ratchet
Magnet - Extendable
Trim Tool Set
Pocket Screwdriver
Utility Knife
What's up guys. I'm Andy from 1A Auto. In this video I'm going to show you how to replace the rear door latch assembly on this 2010 Toyota Rav4. If you need parts for your vehicle, click the link in the description and head over to 1aauto.com.
I'm going to take a trim tool and I want to get underneath this bezel right here. Slide this up. Slide this out of the way. You can disconnect the connector right here. Just push down. Disconnect the connector. Now you don't necessarily have to take this off to take the door panel off. It just makes it a lot easier to disconnect the connector like this rather than while you're fighting and fumbling with the door pan. Now we want to take this cover out. Just take a trim tool. Get underneath here and there's some clips that hold that on.
Take this cover off right here. Sometimes you can just grab it with your fingers or you can get the trim tool underneath there. Try to rotate it off. There's clips on there, bottom, in the middle and on the top. Now there's three screws. There's one right here and two right there. I'm going to use a Phillips head screwdriver. Take these screws out. Just grab it and then these two and this last one. Take a magnet to get the bottom one out and remember these two are different than that other one. Now you can use some trim tools and I always like to start from the front of the door panel closest to the car in case you scratch anything and just go all around. There's just some push pins that hold the door panel on just like that.
Take it. Slide up the door panel. This handle should slide off here. Should just be clipped in. There we go. Just slides down. We're going to take this inside door handle off. We want to take the cables off the handle. So disconnect this cable right here and the bottom one happens to be the green one, which is the lever side and the white one is the lock side. So slide it up and then slide the retaining ball out and same with the white one. Slide it up. Twist it and slide out the ball. Disconnect this connector right here. It goes to the door latch assembly. Now I'm going to peel back the vapor barrier. You can take a razor blade or a utility knife and just cut some of this butyl tape. Generally it'll stick to itself afterwards. When you go to put it back on, if you have to add more, you can always add more butyl tape.
If you're doing this in hotter weather, it's going to be a little bit easier to peel back. I just want to pull those cables through and then that wiring harness so I can peel back on this a little bit more. Just going to disconnect this speaker wire just so I can take the vapor barrier off completely just so it's out of the way. Sometimes you can just fold it out of the way. But if it's in your way, sometimes it's just easier to pull it off completely. There we go. set this aside. I'm going to take these screws out right here. I'm going to use a T30 socket and a ratchet.
Take those screws out. Now I'll just take this latch out and just slide in. Then you slide it down. I'm going to just slide the cables this way. You want to try to get the cables around this window channel. It seems like it would be easy to just take this channel out. But this window channel goes all the way up. So we don't want to take that out if we don't have to. Slide the cables this way. You can slide the latch out just like that. Just take a pocket screwdriver. Slide in under right here. There's a little retainer that holds the door down and grab the cable. Slide it out of the slot there and slide it out of the release here. If you use the pocket screwdriver, that might help a little bit. Slide it up. That's the first cable. To get the second cable out, so there's some releases for these latches right here on the backside. So if you take a straight blade screwdriver, you can release the door. These bottom ones release pretty easy. This top one, not quite as easy.
I'm sure they make a special tool to release these. I just went in from this side, released that first one and then these bottom ones are a little bit easier. There we go. You just push on those. That releases those and take this cable. Slide it up and then slide this retaining ball out. Just like that.
I'm going to take the cable with the blue end on it. Now if you have different cables, they may have different colors. Slide the ball back in position there, the retaining ball and then slide the cable slot right there and we can close the door. Lock it in place. Now we'll do the same with this. Take this retainer. That's going to go right in this level just like that and then slide that into the slot and close the door. So we want to slide this back in position. I am going to try to slide these cables back through first. The cables come this way just like that and just twist this around. All right. That worked. It wasn't the easiest but it'd probably be easier to slide the latch mechanism in first and then slide the cables through. So either way, we got them in. Then we'll take these screws. Get these screws started on the outside here. Take a T30 socket. Just snug these up and use a ratchet. Tighten these down. They're pretty snug.
Keep in mind that child safety lock, if you wanted this to lock and not be able to open it from the outside, you're going to want to have that in the down position or up position if you don't want that function. So keep that in mind. So when you put it back together, don't think that your door latch is broken if you didn't put that in the right position. Another thing, when you're installing the latch, you have to have this lever lined up with the outside door handle. It's kind of hard to see. But you want to make sure that's lined up properly before you actually put the screws in. So now we want to take the vapor barrier. Slide all the cables and all the wires in the correct positions. Where you took them out.
Sometimes it's easiest to get it started and then take all the wires and add those just like that. It's all secured. Now reconnect the speaker wire, locking it in place and reconnect the door latch. Lock that in place. We want to reattach this to the cables. Slide the green cable into the bottom. That's the one with the handle, just like that and then through there. The white one goes on top just like that. I'll take the door panel. We'll slide the handle right through here and there's two tabs right there on the top and the bottom. It's just going to slide into place right there. If you check it from the outside, just make sure it looks good. That's right and then slide the top part of the panel in first. Pull the wiring harness through here so you can connect the switch after and then once the panel's lined up, you can just push it on.
Take a Phillips head screwdriver and these two longer screws are going to go for the handle part. Get those started first. Snug those up and then this smaller screw's going to go right here through the handle. Snug it up, not too tight. This cover is going to go over the handle. Lock that in place and this cover is going to go right behind the handle. Pull out the handle. Line it up. Lock it in place. Reconnect the window switch to the connector. Line it up. Lock it in place then there's a slide right here that slides in the back. That slides like that and then push down on the front.
Thanks for watching. If you want the parts to do it yourself, check out one a 1aauto.com, the place for DIY auto repair.
Shop Products
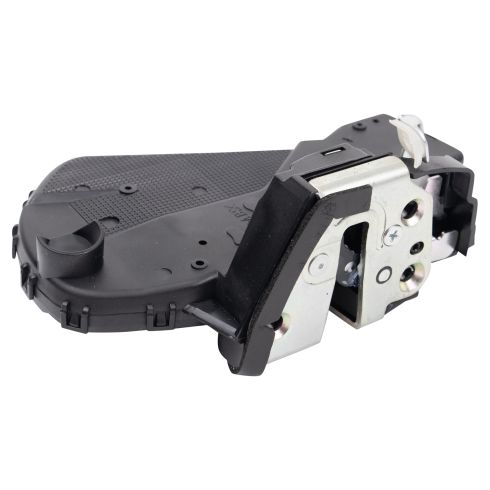
2006-12 Toyota Rav4 Rear Liftgate Door Lock Actuator TRQ BDA33413
Part Details:
- Integrated Latch
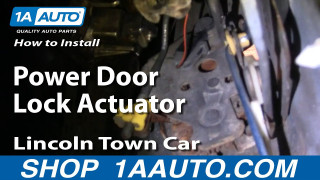
How to Replace Door Lock Actuator 1998-2001 Lincoln Town Car
How to repair, replace, fix, change or install a broken or snapped rear power door lock actuator on 1998-2004 Lincoln Town Car models.
