How to Replace Rear Bumper Corner Cap 2007-14 Toyota FJ Cruiser
Created on: 2019-07-30
Learn how to remove the rear bumper to gain access to and replace the corner cap by following the instructions in this how-to video
-
step 1 :Removing the Rear Bumper Corner Cap
- Open the hatch
- Remove the five 10mm bolts from the top of the bumper
- Pry out the pushpin from the inner sides of bumper
- Remove the 10mm bolts beneath the bumper
- Separate the bumper cover off by tugging without damaging the wiring
- Lift and remove the white clips from the inside of the corner cap
- Remove the corner cap
-
step 2 :Installing the Rear Bumper Corner Cap
- Insert the corner cap to the bumper cover
- Slide the white clips on
- Press the bumper cover into place
- Tighten the 10mm bolts beneath the bumper
- Press in the push-pins to each inner side of the bumper
- Tighten the five 10mm bolts to the top of the bumper
Tools needed
-
Flat Blade Screwdriver
10mm Socket
Ratchet
Hey friends, it's Lenny here at 1A Auto. Today I'm working on a 2007 Toyota FJ Cruiser, and I want to show you how to replace a rear plastic bumper cover. It's going to be a very simple job. I want to be the one that shows you how to do it. If you need any parts, you can always check us out at 1aauto.com. Thanks.
Okay, so to get started, we need to be inside the rear of the vehicle. You open it up. Right back here, you've got 10 millimeter head bolts. There's five of them going across the top. We're going to remove all five. 10 millimeter with a ratchet and extension. So we're onto our last one here. It's almost out. Here we are. We'll set that aside so you get this little push pin here. Pull up the center. Here we are. When you go to lock this in, you push in on the outer ring until it's locked in or until it's pushed all the way in and then you lock it in with the center. Very simple.
So we've got some bolts under here. You're going to use your 10 millimeter. You can use a ratchet or an air gun. Whatever you're using, just wear safety glasses, of course. So we're going to work our way around, just kind of tugging down. These ones right here that go into the gray, those just kind of go into the black plastic under there so you don't have to worry about that too much. Let's keep working our way around and get another one here. There we are. Okay. So now when we take the bumper cover off, we need to pay special attention to the fact that we have trailer hitch wiring here. So when we pull it off, we'll just pull it away enough to get the job done and then put it back. Otherwise, we can disconnect all this stuff if we wanted to, but I'm not going to worry about it on this video.
In case your vehicle has the parking assist sensors, they're right in the back bumper, you want to also be careful of those for the wiring, of course. Okay? Okay. So now we're just going to grab onto the bumper cover. Give that a nice tug, see if we can get it separate. Here we are. I'm on the bottom here. Let's get my hand up as close as I can. Loving tug. Here we are. Cool. That one's ready to come off. Cool. Here we are. Okay. I'd say we're probably about as far away as we need to get at this point because we can get to all the clips that we need to back here, and we'll be able to get this done.
So behind your bumper cover, you've got these little white clips right here. All right. You're just going to want to try to lift those out. You can use a pocket screwdriver or your finger if you're strong enough. There's the clip. There should be one here. It's missing. There's one right here. Grab this one out of here hopefully. Of course, this one's going to want me to use a pocket screwdriver. Here we are. So there's the two that we have left. This piece right here should be attached to the new piece that we're going to have.
Over here, we have our original corner bumper cover off of our 2007 Toyota FJ Cruiser. Over here, we have our brand new quality 1A Auto part. They're both shaped the exact same, right, on the outside. Looks good. We'll turn it around. The inside, assuming this one had its piece in there, that's supposed to be there, has the mounting brackets right here, mounting, got all the same mounting holes. Everything matches up perfectly. So with that said, I don't see any reason why this wouldn't be a quality part to install into the vehicle, so I'm going to go ahead and do it. If you need this or any other part, you can always check us out at 1aauto.com. Thanks.
Okay, so when we install this, it's going to go in from the rear of the vehicle towards the front. Now, we're going to put in the lock pins that we have left. Okay? It's going to go like this, line up our prongs with the slots. Same thing on this side over here. Let's see. Where is it? Right there. It's going to go up higher, right along there. Along this side over here, I'm going to close this. Right up along here, it's easy to miss the fact that those are kind of a super tight fit, so you want to be able to lift it and line up your pins. Looks like we're lined up. Bonk, bonk, bonk. That's my thing. That's in. Cool.
Just pull us away again real quick. We've got the clips that we have left, one on the floor. Perfect. I'm just going to slide it right in, hopefully. Here we go. This one's right out in the open. There's that one. Grab my other clip here. There we are. Cool. So I got in the locking pins that I could. Now we want to pay attention to this little doodad right here. Okay? That's a clip. And this is going to slide right over it. There's going to be the same on the other side of the vehicle. So what we're going to do, get this lined up, push this in so it's kind of sliding over and give it a little bonk. There we are.
Do the same to the other side of the vehicle. Find our little doodad. Looks a little bit closer. Here we go. Okay. Beautiful. Very nice. A little push. Like I said before, we're going to push in with the outer ring. Once it's all the way up against the body of the vehicle, lock in the center. Locked. Take our bolts, just going to start them all in. Now I'm just going to get all these tightened up using our 10 millimeter. Once we have all five on top, we'll go ahead and do the lower ones.
All right, let's close this up. There we are. Now we'll get under it and finish up. Let's start putting in these 10 millimeters again. Get this lined up with the hole. Nice charged up gun. Here we are. Okay. Keep on rolling. Get this one over here. Here we are. Okay, looking good. All right friends, and that's how you do driver's side rear bumper cap. Easy peasy.
Thanks for watching. Visit 1aauto.com for quality auto parts shipped to your door, the place for DIY auto repair. And if you enjoyed this video, please click the subscribe button.
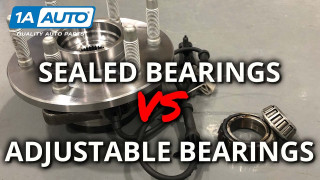
Wheel Bearings on Cars and Trucks Sealed Bearing vs Adjustable Bearing
Do you know the difference between sealed wheel bearings, and adjustable wheel bearings on cars and trucks?
