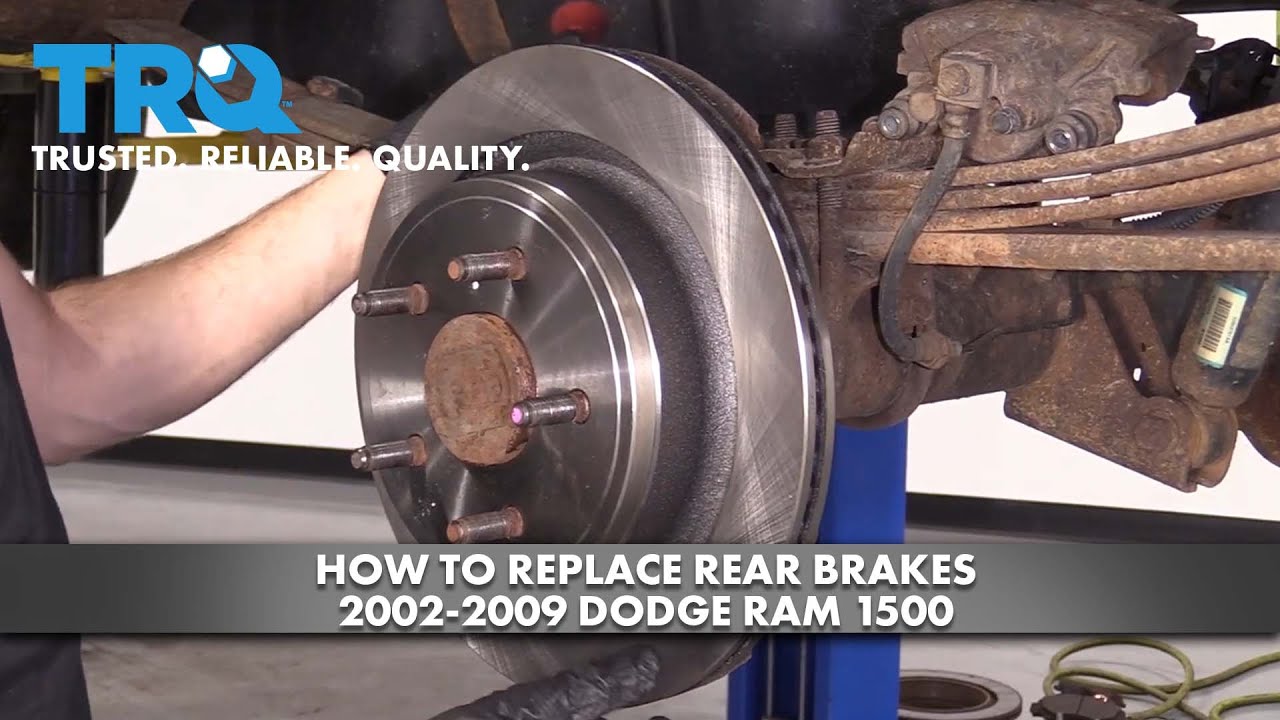
How to Replace Rear Brakes 2002-09 Dodge RAM 1500
Created on: 2020-10-01
This video shows you how to install new, quality TRQ brake pads and rotors on your 2002-2009 Dodge Ram 1500.
Tools needed
-
Torque Wrench
Hammer
Socket Extensions
Pry Bar
Jack Stands
Brake Parts Cleaner
21mm Socket
Flat Blade Screwdriver
Socket Driver
Paper Towels
Copper Anti-Seize
Wheel Chocks
Brake Grease
Ratchet
Floor Jack
Wire Brush
Okay, friends, before we get started, let's talk about some hand and eye protection. With that said, go ahead and raise and support the vehicle and then remove all five of your lug nuts and pull the wheel off.
Now that we have the wheel off, we have a clear view of our brakes and the caliper. I'm going to use a nice pry bar, I'm going to come in through the slot and I'm going to try to push back that caliper piston by prying up against the pad/rotor. That feels good. This can move around a little bit. Now, we're going to remove our two caliper slider bolts. Right here and right there. Go ahead and grab onto that caliper, give it a nice wiggle, and remove it. Now, you want to look at this caliper piston area right here and make sure you don't see any moisture. If you see moisture, it's probably brake fluid, in which case, you have to replace your caliper. I also like to give your sliders right here a little push, see if they move. These ones are very frozen, so they're going to be an issue, but we're going to deal with those anyway. Let's set this aside for now. All right. Next, let's remove our caliper bracket bolts, you have one here and one below it, using a 21-millimeter socket. There is our bracket.
The next thing we need to do is remove the rotor. If it's stuck on, just go ahead and take one of your lug nuts, start it on the stud for safety, and now we're going to continue on by bonking along the rotor to try to break it free. There we are. There it is. Now, let's continue on to cleaning this up. I like to have a nice collection bucket to collect any of my chemicals that I'm going to be using. Put it right down on the ground. We're going to try to spray behind this hub area right here because that's where your adjuster is right there. And then, of course, the pivot's going to be down here. So, spray it down. Clean up the surface where your rotor is gonna mate onto. Okay. So, now that we have this nice and cleaned up, let's continue on by using our wire brush along this area right here. You want to make sure you have all the debris out away from this area. Continuing on, at this point, you definitely want to make sure that your emergency brake's working as it should.
So, if you want it to get into the vehicle or get under the vehicle and pull on the e-brake cable, you'd want to make sure that this lower area of your shoes separates a little bit and then retracts. If for some reason when you step on the e-brake maybe it separates and then you release it it doesn't retract, that means that you have to take off your e-brake shoes and free up your e-brake pivot. If it works like it should, I just hit it with a little bit of penetrant/lubricant just to help it along down the line. And then if you were to look up along the top here, you're going to be able to see a little star wheel. That's where the adjustment is. So, I like to hit that with some penetrating as well. And then, of course, this end over here, where it's going to just kind of spin in. Let that sit and do its job and we can move along. Looking down along the top area right here, you're going to see a little rubber boot that comes through the backing plate. I like to just go ahead and push that out now, and we'll set that up here so we can use it later.
Now, we're going to use a little bit of copper never-seize, just kind of coat this hub area where the mating surfaces. Let's clean up the rotor braking surface. Don't forget about this area in here. That's where the emergency brake shoes are gonna ride. Real quick to show you how the adjuster works before we go ahead and put the rotor on there, I'm just going to take my little pry bar, come through that slot in the backing plate, and then as I pivot it, you're going to be able to see this move. By pushing down on my bar and lifting this so it's going around in this direction, that's going to be expanding the shoes. And if I go in the opposite direction, it'll contract the shoes. Let's go ahead and get this rotor on here. Now, at this point is the best time to go ahead and adjust that e-brake. When you do that, you want to make sure that you don't have the rotor sitting off-kilter or at least at an angle, and it's easiest to do it while the caliper's off as it is now. Go ahead and use your bar, come from the backside, and start adjusting that. You want to continue spinning this at the same time as you do it, and you want to just kind of listen till you hear a slight amount of drag.
The teensiest bit, that means that it's touching and that means that it's close enough. If you have a bunch of drag and/or it's too hard to be able to turn this, you know you went too far. Now that we have it properly adjusted, let's go ahead and make sure we put our boot back in. Now, we made our way over to the bench and we need to start stripping down this caliper bracket. Let's go ahead and get the pads out of there. That was frozen in pretty good. Get these tins off of here. Perfect. Now, we need to clean these down. Make sure they're perfectly clean so there's no debris or buildup on them. Okay. So this looks great. I did both sides. Let's continue on with a little bit of caliper grease. I'm going to coat all those areas that I just cleaned down. Perfect. So, now looking at your tins, you're going to notice that they're different. You might find that if you took two out of the package, they look identical. If that's the case, you need to go ahead and grab one of the other ones. Because essentially what you need to find is if you hold them both so they have the little flippy-dos coming off to the side, you're going to have one with a long area here and then the other one will have a long area on the other side.
Now, let's go ahead and install our tins. I'm just going to put it on just like this. And if you were to look at it, you can see that I have this little dimpled-out area right there facing towards the front, okay, or outward. I'm gonna do the same thing on this one. And you can see I have the dimpled area facing towards me, which would be the outward position. Okay. So, now let's make our way back over to the vehicle and we need to deal with these sliders. Like I said before, they're kind of stuck in there. If they're frozen, you might need to peel back the boot a little bit, put a little bit of penetrating in there, let it sit for a second. Otherwise, if you didn't want to go through that, give it a couple of loving bonks with your hammer. Just see if it breaks free. If it does like ours is, I'm just gonna work it back and forth a couple of times. And then I can go ahead and use a punch and continue driving it through. Do the same thing to the other one. And it's actually working really good. Let's go ahead and pull out these sliders at this point.
Now, we need to perform a quick inspection on it. You want to make sure it's not rusted or rotted in any way that's going to cause it to be stuck inside this area. You also want to double-check up inside the groove up here and one right there and just make sure it doesn't have any crud inside there as well. That's where the boot's gonna ride. It needs to make perfect contact so moisture can't get in. Now, I like to take a nice rag and I'll put it up inside the boot right here. Give the boots a couple of little squishes around there. Try to get out any grease or debris that might be still left inside. Do the same thing to the other one. Take a little bit of grease and go right inside that boot. Put as much right in there, get down into here as much as possible. That feels good. Go ahead and grab your slider. Put a nice coating on that as well. Just keep in mind that the majority of this is probably going to get pressed off of there. That's why I tried to put some grease right inside actually. I'm going to make sure I get inside the lip right here. And then once I get it down far enough, I'll make sure I get inside this lip as well. Now, let's go ahead and start this in there. There we are. And start pushing it in.
There we are. Perfect. This can move around nice and free. If you happen to find that your sliders just don't want to move inside there even though you just cleaned and lubed everything, what you'd probably want to do is take the slider back out, and then you fully remove the boot from inside the caliper. You'll notice that there's probably a rust or rot buildup inside this area. Clean that up, put your boot back in, re-lubricate everything, and then down the road you go. Now it's going to be time to clean up the threads on our mounting bolts. It's time to put on our caliper bracket. I've got my two caliper bolts with a little bit of thread locker on them. Bottom them out and torque them to 100 foot-pounds.
So, now we're just gonna push in our caliper piston so it's all the way bottomed out. Let's take a little bit of that caliper grease, just go right along the piston area. And, of course, along both these forked ends, which is where the pads are going to be touching up against. Now, it's gonna be time to install our brand new pads. That's one. Same with this one. Up on the tabs, squeeze them in. Perfect. Now it's going to be time to install our caliper. Pay attention to this area right here. That needs to kind of hook in underneath this area of the caliper bracket. So, as you come in, come at a slight angle, put it down and under there, and then rock it right in. Perfect. Start in your slider bolts. Now, let's go ahead and snug these up, and then we're going to torque them to 22 foot-pounds.
All right. Let's get the wheel on here, center cover, start on your lug nuts. We're going to bottom them all out, and then we'll torque them to 130 foot-pounds. All right. With the wheel touching the ground, now it's time to torque these. Torqued. Just keep in mind that the process for the other side would be the same as this side. Okay, friends, so now all that's left is to go ahead and pump up that brake pedal so it's nice and firm, and then go ahead and check that brake fluid. After that, take it for a road test.
Shop Products


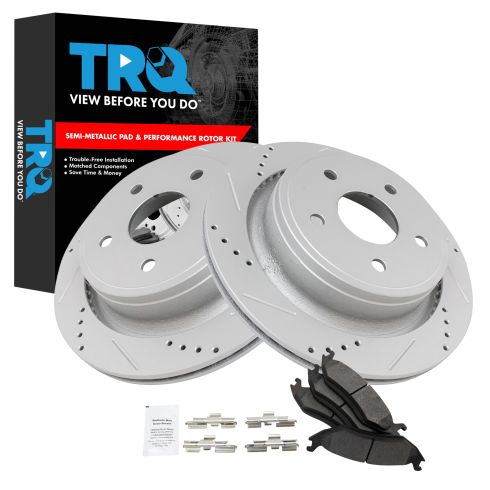
Dodge Ram Chrysler Rear Semi-Metallic Premium G-Coated Performance Brake Pad & Rotor Kit TRQ Performance BKA20871
Part Details:
- Performance
- Premium G-Coated
- Semi-Metallic
- Slotted X Drilled
- Performance
- (1) Rear Semi-Metallic Brake Pad Set
- (1) Rear Premium G-Coated Performance Brake Rotor Set

How to Install Front Brake Pads Rotors 2006-07 Mazda 6
How to repair, install, fix, change or replace your own worn, squeaky, fading old brakes on 06, 07 Mazda 6
