How to Replace Rear Brakes 2006-14 Toyota RAV 4
Created on: 2019-09-22
Check out this video to learn how to replace your own brakes! 1A Auto shows you how to do it yourself, and save a ton of money!
-
step 1 :Removing the Wheel
- Raise the vehicle to take some weight off the wheel
- Loosen the 21 mm lug nuts
- Raise the vehicle completely
- Remove the 21 mm lug nuts
- Remove the wheel
-
step 2 :Removing the Brakes
- Pry between the brake rotor and caliper to compress the brake piston slightly
- Remove the two 14 mm brake caliper slider bolts
- Remove the brake caliper and support it to keep tension off the brake hose
- Remove the brake pads
- Remove the two 17 mm brake caliper bracket bolts to remove the caliper bracket
- If the rotor is stuck on, you can install and tighten bolts into the threaded holes of the rotor to help press it out
- You may also hammer on the drum portion of the rotor to break rust free
- Remove the rotor
-
step 3 :Servicing the Brake Caliper
- Pry the metal pad retainers out from the caliper bracket
- Clean the pad grooves of the caliper bracket with a wire brush
- Apply brake grease to the caliper grooves
- Install the metal pad retainers into the caliper bracket
- Optionally, apply brake grease to the surface of the pad retainers
- Remove and clean the caliper slider pins
- Clean the inside of the slider pin boots
- Apply brake grease to the pin surfaces and the pin boots
- Install the slider pins
- Transfer the parking brake adjuster access plug to the new rotor
-
step 4 :Installing the Brakes
- Clean the wheel hub surface if necessary
- Clean the brake rotor surface with brake parts cleaner
- Install the brake rotor onto the wheel hub
- Install the brake caliper bracket with the two 17 mm bolts
- Torque the 17 mm caliper bracket bolts to 65 ft-lb
- Install the brake pads into the caliper bracket
- Compress the caliper piston with a compressor tool or a C-clamp
- Install the brake caliper over the pads and align it with the slider pins
- Install the 14 mm slider bolts and torque them to 25 ft-lb
- After lowering the vehicle, pump the brake pedal to seat the pads on the rotor, and check the brake fluid level and top it off if necessary
-
step 5 :Installing the Wheel
- Slide the wheel onto the wheel studs
- Install the five 21 mm lug nuts
- Tighten the 21 mm lug nuts by hand in a crossing pattern
- Lower the vehicle with minimal weight on the wheel
- Torque the 21 mm lug nuts to 76 ft-lb
- Lower the vehicle completely
Tools needed
-
14mm Wrench
Socket Extensions
Torque Wrench
14mm Socket
Hammer
17mm Socket
Brake Parts Cleaner
21mm Socket
Flat Blade Screwdriver
Brake Caliper Hanger
Brake Grease
Brake Caliper Compressor Tool. Quad Piston. Ratchet Style.
Ratchet
Wire Brush
Cloth Rags
1/2 Inch Breaker Bar
What's up, guys? I'm Andy from 1A Auto. In this video, I'm going to show you how to replace the rear brakes on this 2010 Toyota RAV4. If you need these parts or other parts for your vehicle, click the link in the description and head over to 1aauto.com.
I'm going to remove the wheel. I'm using a 21 millimeter socket and an air gun. If you don't have an air gun, you can remove it on the ground with a breaker bar before you raise the vehicle up. That wheel wasn't too difficult to get off. If you do have trouble getting it off you can just put a lug nut on there and hit the back of the tire with a hammer. Generally that gets them off.
Now I just want to compress this caliper a little bit just to make it easier to pull off. Just take a straight blade screwdriver, get in here and just try to pry it out a little bit. It'll just make the pads slide off easier. Now I'm going to take these two bolts out. I'm going to use a 14 millimeter socket and ratchet break these free. Then if the slide starts spinning you can use a wrench on that slide. Before I take that one out, break the top one free.
All right, now I'll just take these bolts out. Slide those out. You can grab the caliper and you want to use some type of a caliper hook. We actually sell these at 1aauto.com. Then we'll just hook this onto the spring right here. That way it keeps the tension off the hose. You don't ever want to just let the caliper hang from the hose because it could damage the hose.
Next I'm just going to remove these pads. Just grab the pads and slide them out. Just like that, set them aside. Then I'm going to take a 17 millimeter socket and a ratchet, loosen these two bolts up that hold this bracket on. They're pretty tight so if you need to use a breaker bar to break them free. To make it easier I'm just going to use an electric electric ratchet.
All right. This rotor's stuck on there pretty good. There is these two little threaded holes. What you can do is find a bolt that's going to work with those threads. Then take a ... Well, depending on the bolt, I'm using a 12 millimeter socket and electric ratchet. I'm just going to tighten this down a little bit. Now I'm actually going to tap the rotor with a hammer. I just want to tap in these locations. Be careful not to hit the studs. That loosens up. Tighten that up a little bit more. And you could get two bolts, but I'm just going to use one. There we go. Nice and loose. You can slide it right off.
Here's the old parts, here's the new brake parts from 1AAuto.com. As you can see, the height of the rotor is the same. It's machined the same way. It actually is slotted and drilled for better cooling. The pads themselves are made of the same material and shaped the same direction. Get yours at 1AAuto.com, you'll be ready to rock and roll.
I'm just going to take a pocket screwdriver, take these clips off. You can take them off both sides. We just want to clean up this caliper bracket. Be careful if you have to reuse those, and then take a wire brush just clean up this area right here. Then we'll do the same for the other side.
All right. So, this is more of a preference but you can put a little grease on this area right here. Then when you take the clip put the anti-rattle clip back on. Then we're going to take some more grease and just clean up on here. If you had any dirt on there you want to clean that off as well. But, just grease that area up there, just like that. Do the same for the other side. What happens on these caliper brackets is they corrode underneath there and the rust actually pushes up on these rattle clips. That prevents the pads from sliding properly.
Then also with the slide pins, I'm going to take these slide pins out, take some brake parts cleaner, clean these off and a rag, just wipe them down. Then same in the hole, you can spray a little brake parts cleaner in there, clean those out the best you can. Just like that. Dump some of that out. Take a little break caliper grease, grease up the pin. We'll do the same with the other side. Slide it in, make sure that little grommet is sealed properly.
I need to take this little cover off on the old rotor. This is actually the adjuster cover for the parking brakes. You can pull this off and then you can adjust the parking brakes, transfer it over to the new rotor. Just take a pocket screwdriver, get it back in position. That's good.
Now we do have a new hub on this vehicle so we wouldn't need to do this, but normally you would take a wire brush and just clean the hub surface. Any of the rust right here and right here. Just try to get in there, clean it out the best you can.
All right. The first thing I want to do put the rotor on backwards. So I'm going to spray the rotor. There is a protective coating on the rotor, so just wipe it off. That's just to prevent it from rusting. And slide it the other way. Then spray some more brake parts cleaner and wipe it off.
Now we'll take the bracket, slide that back in position right there. Take the caliper bolts, caliper bracket bolts get those started. I'm just going to take my 17 millimeter socket and a ratchet tighten these up. Now I'm going to use that same 17 millimeter socket and a torque wrench. We're going to tighten these bolts to 65 foot pounds.
Okay, now take these brake pads. It doesn't really matter which way they go. Slide those in position there and then same on the inside. That's good. Now we can grab the brake caliper, slide the hanger off of the caliper. I'm going to use a piston compressor, a caliper piston compressor. There's obviously different types of caliper piston compressors. We actually sell this on at 1AAuto.com. I like the way this one works. Just get this lined up in there and then it ratchets. Ratchets one way to tighten it and another way to loosen it. Now you want to go nice and slow when you're doing this. As you're compressing this piston into the caliper fluid's going through the lines up to the master cylinder and into the reservoir. So it's a good idea to check the reservoir after you're done and adjust accordingly.
All right. Put it back on loosen. Loosen this up. Take the caliper, slide it over the pads. Take these caliper bolts, slide those in there. One there, one there. Then I'm going to use a 14 millimeter socket and a torque wrench. I'm going to torque these bolts to 20 foot pounds. If you have to, you can use a wrench to hold the slide from spinning. If the slide spins, then just use a 14 millimeter wrench. That's good. Same with the bottom one. All right, for the bottom one, I just need an extension because the hose was in the way. Just like that.
Now I'm going to reinstall the tire. Take the lug nuts, install the lug nuts. Now I'm going to use a 21 millimeter socket and a torque wrench. I'm torquing these lug nuts to 76 foot pounds and I'm going to do it in a star pattern. That way that the wheel gets tightened down evenly. I'll just go around again, just make sure. Good to go.
Now we want to make sure we pump up the brake pedal because there is going to be a little bit of an air gap between the brake pads and the rotor. This is going to eliminate that air gap. Just pump it up, it's going to squish the piston into the brake pads and it's good. Make sure it feels good and last under under the hood you want to make sure you check your brake fluid level and make sure it's not too high. If it's above the max, you want to empty some out, use some kind of fluid transfer pump, and then if it's too low, you want to add the appropriate brake fluid.
Thanks for watching. Visit 1AAuto.com for quality auto parts shipped to your door. The place for DIY auto repair. And if you enjoyed this video, please click the subscribe button.
Shop Products


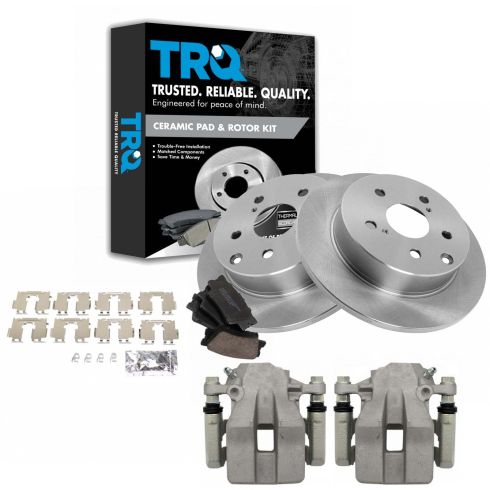
2006-11 Toyota Rav4 Rear Ceramic Brake Pad & Rotor Kit with Calipers TRQ BKA19152
Part Details:
- Solid
- 11.06 in. (281mm)
- Premium Posi
- 5 Lug
- Ceramic
- (2) Rear Brake Rotors
- (1) Rear Ceramic Brake Pad Set
- (2) Rear Brake Calipers
How to Replace Front Brakes 2014-17 Infiniti QX50
This video shows you how to install new, quality TRQ brake pads and rotors on your 2016-19 Infiniti QX50.
